

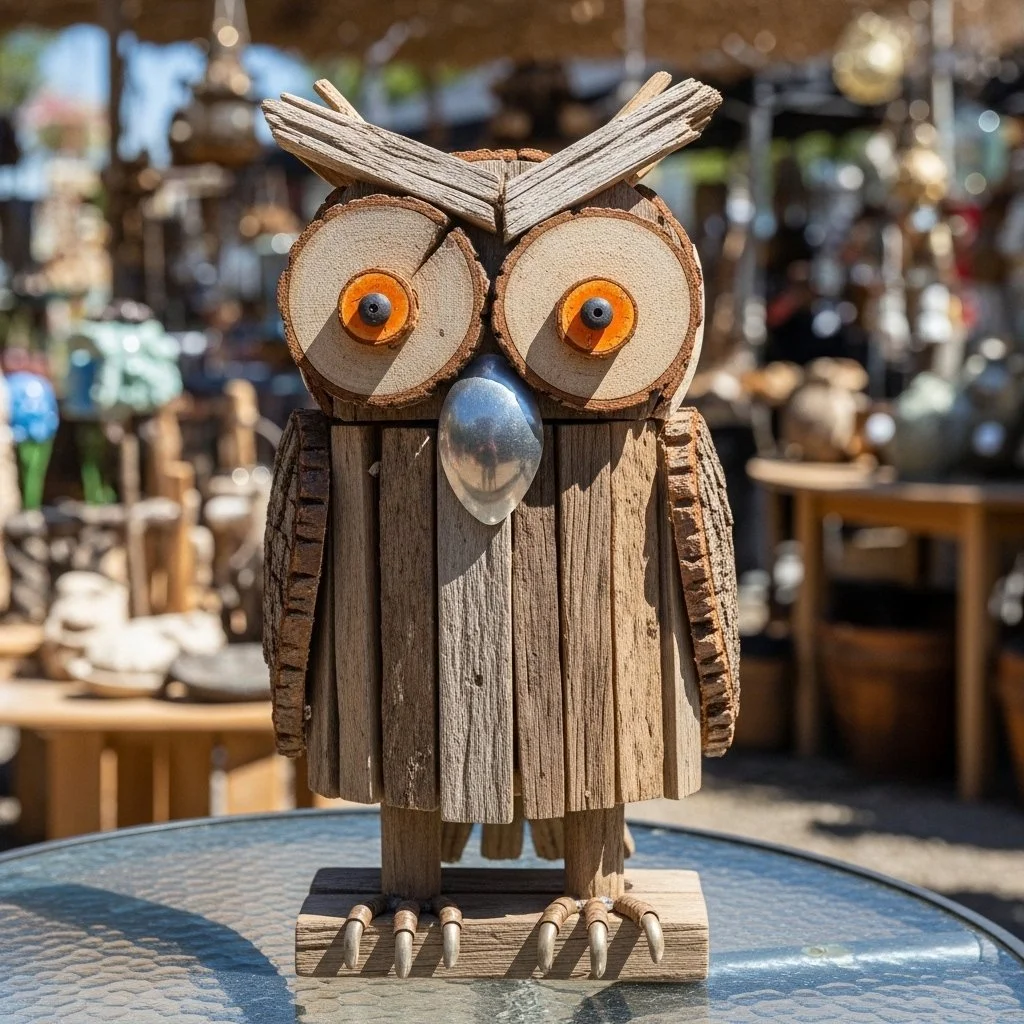
I press a thumb into the warm grain of a reclaimed board and breathe in the dry, faintly sweet scent of old pine. The Rustic Wood Owl Made from Scrap Wood Garden Art leans against my knee, a slow companion in a quiet work of hands and time. The wood feels rough at first, then softens where fingers rub, and the small, uneven circles we carve for eyes catch the late light like tiny moons. If you have made small, mindful pieces before, like my crystal heart craft, you will know this kind of gentle attention—the kind that makes a garden corner feel more like home.
The Quiet Joy of Making Rustic Wood Owl Made from Scrap Wood Garden Art

There is a hush that comes with sorting through scrap wood. You lift a slat and imagine its life as part of a fence, a crate, or a shelf, and then you give it a new purpose. This project helps you slow down, breathe, and notice texture, weight, and the small music of tools on wood. You listen to the soft rasp of sandpaper, the quiet tap of a hammer, the satisfying thud when a stake finds soil. Each sound feels steady and simple.
Working with imperfect wood invites calm. Knots and old nail holes become character lines, not problems. The owl asks less of perfect strokes and more of patient choices. As you lay out pieces, you notice color shifts, grain lines, and the way sunlight moves across rough edges. The process offers a plain but deep pleasure: you make something that looks like it has always belonged where you place it.
This quiet craft also suits small, slow routines. You might do a little each morning with a cup of tea, or carve and sand in the late afternoon while the garden cools. The rhythm of the hands is gentle and steady. That rhythm asks you to be present. It invites you to enjoy the act of making as much as the finished owl.
A Gentle Look at the Process
Before we gather tools, take a moment to imagine the motions. You will trace shapes with a pencil and cut with a saw that hums low and sure. You will sand to reveal soft ridges and brush on stain or paint in thin layers that let the grain speak. The nails meet wood with a small, firm sound that feels honest and final.
This project moves in small steps that respect the material. You work with scraps, which limit choices and encourage creativity. The slow sanding warms the wood where your palm rests. The glue settles with a nearly inaudible pull and then calms as it dries. I like to keep a small bowl of warm water nearby for wiping hands and smoothing glue lines; it resets my pace and keeps the work tidy.
If you enjoy simple, repeated movements, this project will feel meditative. If you prefer short bursts, you can cut and assemble in segments and return later to finish. The goal is not speed. It is presence, and the quiet joy of making something that will live outdoors and greet the day with a knowing, wooden face.
Materials You’ll Need
- Assorted scrap wood pieces (one larger piece for the body, smaller ones for wings and beak) — easy to find around the workshop or salvage stores
- Wooden garden stake or thin post for mounting — optional if you plan to lean the owl against a pot
- Sandpaper in coarse and fine grits (80, 120, 220) — needed for smoothing and finishing
- Wood glue and a few small nails or screws for extra hold — simple, strong joinery
- Hand saw or jigsaw for cutting shapes — substitute a coping saw for smaller pieces
- Pencil and ruler for marking shapes — keeps lines calm and gentle
- Stain or outdoor paint and a small brush — choose weather-friendly options for garden use
- Clear outdoor sealant (satin or matte) — helps the piece last outside
- Small drill bit for pilot holes — optional, helps prevent splits
- Cloth for wiping excess stain and a small bowl of water for cleaning hands — comforting and practical
A note on wood: using reclaimed wood brings extra texture and stories. If the boards have old paint, sanding can reveal layers that add warmth. If you prefer a cleaner look, select light, even boards and sand to a smooth finish. I choose what feels right in the moment and let the wood speak.
Step-by-Step Directions
- Choose a body board roughly 6 to 10 inches tall and 4 to 6 inches wide. Trace a gentle, rounded owl silhouette with a pencil. Work slowly and enjoy the curve under your hand.
- Cut the silhouette with a hand saw or jigsaw. Feel the vibration change as the blade meets different grain lines. Pause to steady your grip if the cut feels uneven.
- Mark two round eye shapes near the top and a small triangle for the beak. Use a drill or a small saw to remove the eye pieces, or carve them gently with a chisel for extra texture.
- Cut two wing shapes from smaller scrap pieces. Let the wings be imperfect. They can be slightly different in size or grain; this gives personality.
- Sand all edges and surfaces. Start with coarse grit to shape, then move to medium and fine for a soft finish. Notice the warmth where the sandpaper rubs and the change in color as grit smooths the wood.
- Attach the wings with wood glue and a small nail or screw through the back. Hold for a minute until the glue sets. Listen to the small click as the nail seats, and feel the steadiness settle in your hands.
- Glue and fix the beak into its notch. Let the glue make a thin seam, then wipe away the excess with a damp cloth. The damp cloth cools your fingers and leaves a clean edge.
- Mount the owl to a stake or backboard. For a stake, drill a pilot hole into the base and secure with a screw. For a backboard, glue and clamp until dry. The piece should feel balanced when you lift it.
- Apply a light stain or paint in thin layers. Brush with the grain and wipe away extra stain to reveal the wood. Allow each coat to dry fully before adding another.
- Seal the finished owl with a clear outdoor sealant. Apply evenly and let it cure outside or in a well-ventilated space. The sealant will clear the surface and offer protection without stealing texture.
- Plant the stake or lean the owl in a sheltered spot and step back. Take a slow breath and notice how the owl fits into the space and how light and shadow play across its face.
- If you wish, age the piece further by lightly sanding edges after sealing to reveal underlying layers. Do this sparingly to keep weather resistance intact.
Bringing Rustic Wood Owl Made from Scrap Wood Garden Art Into Your Space


Place the owl where it can catch soft light and gentle wind. A little cluster of potted herbs or a small bed of lavender makes a warm home for it. In a rock garden, let the owl peek from behind leaves so it feels like a private watcher.
You can tuck one by the back door to greet visitors with a rustic nod, or line a few along a path for quiet companionship as you walk. When winter comes, move the owl to a covered porch so it keeps its finish and returns to the garden in spring. I find a spot at eye level works best; it allows the carved features to be read easily and gives the piece a friendly presence.
If you make several, vary their heights and stains. Grouping them creates a small scene that feels like a family of quiet sentries. The owl will deepen in character with rain and sun; those changes add warmth and show the history of the seasons.
Making This DIY Last
To keep the owl looking its best, choose a spot where it avoids direct, harsh sun and heavy splash from garden hoses. A sheltered bed or an area under a tree offers natural protection while letting the piece stay outdoors.
Reapply a thin layer of clear sealant each year in early spring. This refresh keeps the surface guarded against moisture and the slow fade of sunlight. If the owl shows signs of mildew, gently clean with a soft brush and a mild soap solution, then rinse and dry fully before resealing.
For long-term storage during harsh winters, wrap the owl in breathable cloth and place it in a dry, cool area. Avoid plastic wraps that can trap moisture. Store stakes and small loose parts separately, wrapped in tissue or a soft rag, so nothing scratches during rest.
If cracks appear over time, fill them with a wood filler suited for outdoor use, sand smooth, and reseal. Small fixes like these preserve the piece and keep repairs simple. The wood will change; honor those changes. They mark the place the owl has held in your garden life.
I once left a small owl too close to a damp patch and it grew a fine, soft moss in a corner. I chose to embrace it. I brushed it gently and let the moss remain. That small softness made the owl part of the place in a new way.
Gentle Tips & Variations
- Try different eye styles. A round wooden plug gives a classic look, while metal washers or old buttons bring a folk-art charm. Invite a little surprise into the face.
- Use layered paint washes to let grain show through. Thin the paint with water and brush in soft strokes. Wipe some away to reveal layers beneath for a weathered feel.
- Make mini owls from thin offcuts and hang them on a branch or stake as tiny ornaments. They make calm gifts and add a playful rhythm to your garden.
- Attach a short piece of rope or leather under the beak as a small perch for real birds. Keep it high enough to avoid nesting, and refresh the perch material each season for cleanliness.
- Combine with low-light plants like ferns or hostas. The owl will feel more secretive and companionable tucked among lush leaves.
These are invitations rather than rules. Let the project fit your pace and your space. Small choices often lead to the most satisfying results.
FAQs About Rustic Wood Owl Made from Scrap Wood Garden Art
Q: Can I use any kind of scrap wood for this project?
A: Yes, but some woods last longer outdoors. Cedar and redwood resist rot naturally. Pine and other softwoods work well too if you seal them. If a board has heavy rot, avoid it. Look for solid pieces that feel firm when you press them.
Q: Do I need power tools to make the owl?
A: No. A hand saw, a chisel, and sandpaper can do much of the work. A jigsaw makes curves quicker, but patience and simple tools can achieve the same warmth and texture.
Q: How can I make the owl child-friendly to join in?
A: Let children trace shapes and sand small parts under supervision. They can paint with washable outdoor paint. Keep cutting and heavy fastening to adults, and use hand-safe activities for little hands.
Q: What if the wood splits when I nail or screw?
A: Drill pilot holes first with a small bit. That relieves stress and keeps wood from cracking. For thin pieces, use glue and clamp instead of nails.
Q: How long will the finish last outdoors?
A: A good outdoor seal lasts a year or more depending on sun and weather. Reapply a thin coat in spring to refresh the protection and brightening of colors.
A Gentle Note Before You Go
Hold the finished owl and notice where your fingers fall. Feel the sanded places and the seams where glue dried. Each small imperfection is evidence of hands that took time to make, and that time is the real value of this craft. Let the owl join your garden slowly, and let its presence remind you to pause and notice the small things.
Conclusion
If you want inspiration from other makers, the simple idea of a Reclaimed Wood Owl on Etsy shows how different woods and finishes create unique moods and faces that might spark a variation you love. For a step-by-step photo example and a gentle approach to stake-style owls, this Scrap Wood Owl Garden Stakes project offers a calm visual guide you can browse slowly.
Thank you for making with care. May your hands stay gentle, your work remain steady, and your garden gain one more small, quiet friend.
PrintRustic Wood Owl Made from Scrap Wood Garden Art

A serene and mindful project to create a rustic wood owl for your garden using scrap wood.
- Prep Time: 30 minutes
- Cook Time: 120 minutes
- Total Time: 150 minutes
- Yield: 1 rustic wood owl
- Category: Crafts
- Method: Crafting
- Cuisine: N/A
- Diet: N/A
Ingredients
- Assorted scrap wood pieces (one larger piece for the body, smaller ones for wings and beak)
- Wooden garden stake or thin post for mounting (optional)
- Sandpaper in coarse and fine grits (80, 120, 220)
- Wood glue and a few small nails or screws
- Hand saw or jigsaw for cutting shapes
- Pencil and ruler for marking shapes
- Stain or outdoor paint and a small brush
- Clear outdoor sealant (satin or matte)
- Small drill bit for pilot holes (optional)
- Cloth for wiping excess stain
- A small bowl of water for cleaning hands
Instructions
- Choose a body board roughly 6 to 10 inches tall and 4 to 6 inches wide. Trace a gentle, rounded owl silhouette with a pencil.
- Cut the silhouette with a hand saw or jigsaw.
- Mark two round eye shapes near the top and a small triangle for the beak.
- Cut two wing shapes from smaller scrap pieces.
- Sand all edges and surfaces.
- Attach the wings with wood glue and a small nail or screw through the back.
- Glue and fix the beak into its notch.
- Mount the owl to a stake or backboard.
- Apply a light stain or paint in thin layers.
- Seal the finished owl with a clear outdoor sealant.
- Plant the stake or lean the owl in a sheltered spot.
Notes
Using reclaimed wood brings extra texture and stories. Choose a spot where it avoids direct sun and moisture for longevity.