

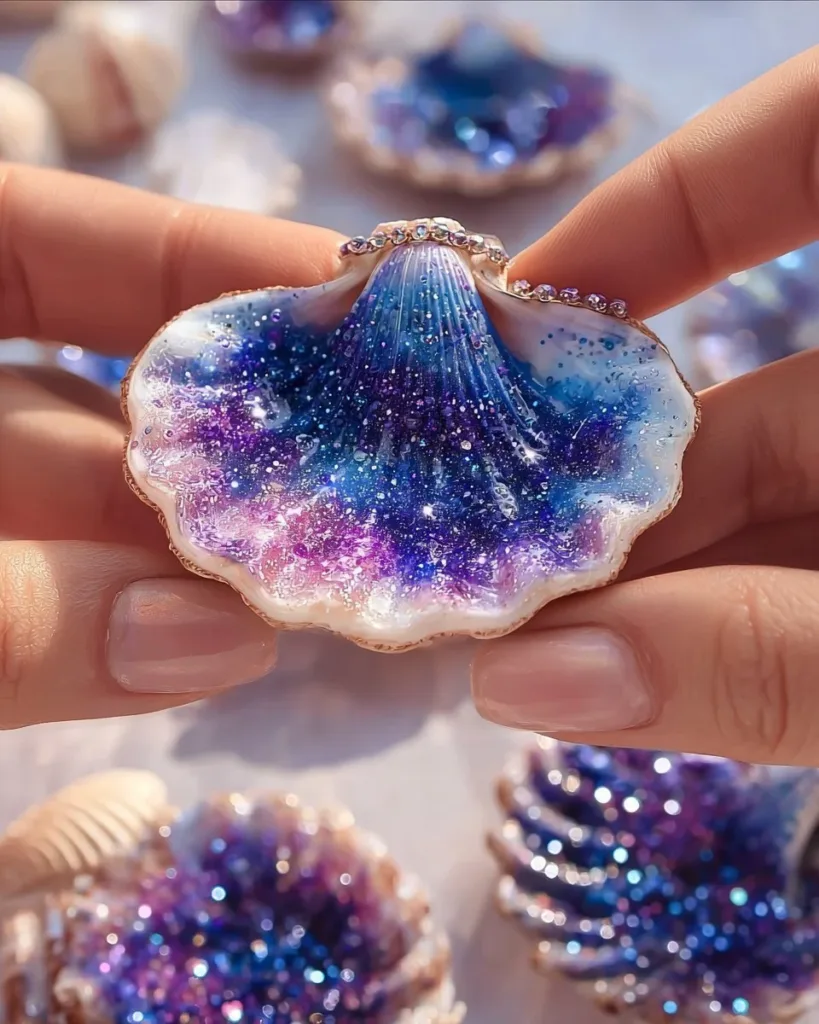
I cup a tiny scallop shell in my palm and feel the ridges under my skin, cool and close. The light slips across a base of inky paint and tiny glitter stars, and for a slow, quiet moment I watch pale crystals bloom like constellations across the curve. That gentle hush is the heart of The Quiet Joy of Making Galaxy Crystal Seashells, a small ritual that invites slow breaths, calm focus, and hands that move with care. If you want to see how these pieces look finished, you can find a soft gallery to wander through at our gallery of galaxy crystal seashells.
Why The Quiet Joy of Making Galaxy Crystal Seashells Feels Comforting to Create

This craft asks nothing hurried of you. You mix a warm solution, paint a shell, and then wait while the quiet work of cooling turns dissolved minerals into tiny, glittering forms. The pace is steady and gentle. You watch, you breathe, you cup the shell as the first edges of crystal begin to lace the rim.
Making in this way calms the mind because it engages simple senses. You notice the sound of a spoon against glass, the shimmer of mica powder in water, the soft give of glue under a fingertip. Those small details bring you into the present. The act of creating an object that looks like a piece of night sky feels grounding too. The shells keep a memory of the sea beneath them, and the crystals catch light like distant stars.
This project pairs well with quiet routines. You can make a single shell as a meditative evening task, or keep a small collection that dims and brightens on a shelf. If you enjoy seeing different methods side by side, you may like a companion post that dives into a slightly different approach in detail at the step-by-step crystal seashell technique. The trust in the process comes from gentle repetition and safe materials, and from knowing that each shell will carry its own tiny landscape.
A Gentle Look at the Process
Before you set out, imagine a slow, warm rhythm. You heat water until it will comfortably dissolve your chosen crystal powder. You mix color and shimmer into a dark base paint, like painting a small night sky inside a bowl. You set the painted shells on a soft towel, and you apply a thin line of glue where you want crystal to anchor. Then you pour or brush on the saturated solution and wait.
The textures here teach you as much as the steps. The paint dries with a satiny hush. The glue feels slightly tacky until it sets. The solution trickles and pools, then finds tiny edges and beads where crystals begin to gather. Over hours, tiny geometric shapes appear. You can gently tap the shell and hear nothing loud, only the soft click of dried paint and the crystal edges. The whole process offers measured, sensory cues that help you stay relaxed and present.
This method uses materials that work by encouraging crystallization on a surface. Hot water carries dissolved minerals. As the water cools and the solution becomes supersaturated, the mineral comes out of solution and forms ordered solids. Your shell, rough glue, and dust of mica become places where those crystals prefer to grow. The result feels like uncovering a map of stars where you decide to place them.
Materials You’ll Need
- Clean seashells, bowls, or sand dollars (real or ceramic, washed and dry). Easy to find.
- Water (hot, but handled with care).
- Crystal-forming powder: alum or borax. Alum gives glassy, gem-like crystals; borax makes large, faceted crystals. Choose one and follow safety notes.
- White craft glue or clear-drying tacky glue (for anchoring crystals).
- Acrylic paint in deep colors: black, navy, deep purple. Optional metallics for shimmer.
- Mica powder, fine glitter, or pearlescent pigment for a galaxy sheen. Substitute-friendly.
- Small heatproof glass jar or cup for mixing the solution.
- Wooden stir sticks or a spoon.
- Small paintbrushes and a foam brush.
- Protective gloves and eye protection, especially when handling hot solutions.
- A shallow tray and soft towel for resting shells while crystals form.
- Optional: liquid dye or food coloring for subtle color in crystals.
- Optional: clear resin if you choose to seal the finished piece later. Work in a ventilated area if you use resin.
If you are new to crystal projects, a basic primer on crystal seashell making can be helpful and straightforward to read at the basic crystal seashell guide.
Step-by-Step Directions
-
Prepare your workspace with a towel and tray. Wear gloves and eye protection.
Lay out shells with the painted side up and keep hot water in a safe cup nearby.
-
Paint a deep base inside each shell.
Use navy, black, or purple. Add a hint of metallic with mica while the paint is wet for a soft sheen.
-
Let the paint dry until it is only slightly tacky.
The glue will stick better to a surface that is not glossy wet but still has a bit of tooth.
-
Mix your crystal solution in the heatproof jar.
Pour boiling water over alum or borax by the tablespoon, stirring until dissolved. The solution should be saturated and warm.
-
Add a drop of dye or a pinch of mica to the solution for subtle color.
Stir gently. The solution should still be clear but carry a soft tint and shimmer.
-
Apply a thin line of glue where you want crystals to grow.
Focus on the edges or spiral ridges. The glue acts as a rough place for crystals to catch.
-
Either dip the glued edge into the solution or carefully spoon a little solution over it.
The crystal powder will begin to deposit around the glue as the water cools.
-
Place the shell on the towel in a calm spot and cover loosely with a box to keep dust away.
Avoid moving the tray; crystals need still air to form neatly.
-
Check after one hour for the first hints of crystal.
You can gently tip the shell to see how the crystal catches light. If needed, add a small second application of solution.
-
Let the crystals grow for several hours to overnight.
The longer you wait, the larger and more defined the crystals become.
- When you are happy with the growth, lift the shell and let it dry fully on the towel.
If you used glue and paint carefully, the crystals will stay anchored to the shell.
- Optionally, seal the shells with a thin gloss resin or clear spray to protect fragile crystals.
If you use resin, follow the safety guidance and work in a ventilated area.
Bringing The Quiet Joy of Making Galaxy Crystal Seashells Into Your Space


These little shells work in gentle displays. A small tray on a bedside table holds two or three, and the low light of evening lets the mica and crystals glow. I keep one near a reading chair. I touch its edge sometimes as if petting a quiet thing. The shell carries a memory of water and sky, and having it close offers a kind of small comfort.
Use a shallow bowl filled with sand to nest a handful of shells on a shelf. The sand helps them sit at slight angles so light can catch the crystals. For a mantelpiece, group shells of different sizes and paint depths to create a tiny night-scape. You can pair them with a small candle behind glass so the flame picks up the facets of crystals without warming them.
If you enjoy mixing luminous projects, you might like the soft glow ideas in our related craft, which shows how crystals play with light in a different way at the glow in the dark crystal tree. That piece uses glow pigments to make a night-time surprise, while the seashells hold a more steady, reflective light.
Caring for Your Finished DIY
Keep shells away from heavy handling. The crystals can be delicate, and repeated touch will loosen tiny facets over time. If a shell becomes dusty, use a soft brush or a gentle puff of air to clear it. Avoid water; moisture can dissolve or dull some crystal types.
Store shells flat in a shallow box padded with tissue if you need to move them. If you display them on a shelf, place them where they will not catch direct sun for long hours. Strong, hot sunlight can warm resin seals and shift adhesive lines. If you seal your piece with clear resin, allow at least 48 hours of cure time before moving.
If a small area of crystal flakes off, you can gently glue a loose flake back with a toothpick and a dot of clear glue. For larger fixes, reapply a tiny amount of the saturated crystal solution to encourage new growth in the exact spot. Work slowly and test small areas first.
Gentle Tips & Variations
- Try different crystal powders as an invitation. Alum yields clearer, gem-like crystals. Borax gives larger, blocky crystals. Each creates a slightly different wintery texture.
- Paint layers for depth: start with black, then sponge on navy and violet. Add tiny dots of white paint for distant stars. Let each layer dry until slightly tacky for gentle blending.
- Anchor crystals with a thin brush of glue, not a heavy bead. Light glue gives many places for crystals to nucleate and creates a delicate, lacy look.
- Make tiny clusters by dipping only the shell’s ridges into the solution. The ridges act like mountain peaks where crystals can grow like frost.
- Gift a shell with a little card describing the making. Include a note about the calm steps and invite the recipient to enjoy it slowly.
These invites are just that. Walk with what feels fun. Pick one tip to test, not all at once.
FAQs About The Quiet Joy of Making Galaxy Crystal Seashells:
Q: Are these safe to make at home?
A: Yes, when you follow simple safety steps. Use gloves, eye protection, and keep hot solutions away from children. Work on a stable surface and let solutions cool before handling. If you choose resin, work in a ventilated area.
Q: Which crystal powder should I use?
A: Both alum and borax work well. Alum tends to give clearer, faceted crystals that sparkle like glass. Borax often forms bigger, chunkier crystals. Your choice depends on the look you prefer. Try both in small tests to feel the difference.
Q: How long do crystals take to form?
A: You will see tiny crystals within an hour. More defined shapes appear over several hours and often look best after overnight growth. Patience rewards you with fuller, more structured crystals.
Q: Can I use real sea shells safely?
A: Yes. Wash them first and let them dry completely. Real shells have natural texture that helps crystals stick. If a shell has open holes or delicate edges, handle it with extra care while pouring solutions.
Q: What if crystals fall off later?
A: Store gently and avoid frequent touching. If bits come loose, you can reapply a drop of clear glue or a very small amount of solution to let new crystals form. For long-term durability, seal carefully with a clear resin, watching safety steps.
A Quiet Closing Thought
Hold the process as a place to rest rather than a task to finish. The shells will teach you to wait, to notice small changes, and to value a slow reveal. Each piece you make will differ slightly, and those differences are the quiet proof of time spent paying attention. Let the work be soft and simple, and let it bring a small, steady calm into your hands and into your shelves.
Conclusion
If you like the hush of making and you want to see how words and art sit together, this gentle collection of poems and readings can be a calm companion during craft time; I often read a passage while waiting for crystals to form, such as in Wordsworth poems collection. For a different kind of quiet making, short, reflective pieces written during slow days can pair well with this craft; see the gentle anthology at Ledbury Lockdown Poems.
Thank you for letting me sit beside you for this calm project. Keep one shell near your cozy chair and touch it when you need a small reminder to breathe slowly and notice the light.
PrintGalaxy Crystal Seashells

Create beautiful galaxy crystal seashells using simple materials and a calming process.
- Prep Time: 15 minutes
- Cook Time: 60 minutes
- Total Time: 75 minutes
- Yield: Varies
- Category: Craft
- Method: Crafting
- Cuisine: N/A
- Diet: N/A
Ingredients
- Clean seashells, bowls, or sand dollars (real or ceramic)
- Water (hot, handled with care)
- Crystal-forming powder: alum or borax
- White craft glue or clear-drying tacky glue
- Acrylic paint in deep colors: black, navy, deep purple
- Mica powder, fine glitter, or pearlescent pigment
- Small heatproof glass jar or cup
- Wooden stir sticks or a spoon
- Small paintbrushes and a foam brush
- Protective gloves and eye protection
- A shallow tray and soft towel for resting shells
- Optional: liquid dye or food coloring
- Optional: clear resin if sealing later
Instructions
- Prepare your workspace with a towel and tray. Wear gloves and eye protection.
- Lay out shells with the painted side up and keep hot water in a safe cup nearby.
- Paint a deep base inside each shell. Use navy, black, or purple with mica for shimmer.
- Let the paint dry until slightly tacky.
- Mix your crystal solution in the heatproof jar by pouring boiling water over alum or borax, stirring until dissolved.
- Add dye or mica to the solution, stirring gently.
- Apply a thin line of glue where you want crystals to grow.
- Dip the glued edge into the solution or spoon a little over it.
- Place the shell on a towel in a calm spot and cover loosely to keep dust away.
- Check after one hour for crystal growth; add more solution if needed.
- Allow crystals to grow for several hours or overnight.
- When satisfied, let the shell dry fully on the towel.
- Optionally, seal the shell with gloss resin or clear spray for protection.
Notes
The crystals may vary in size and form; patience and careful handling are key for the best results.