

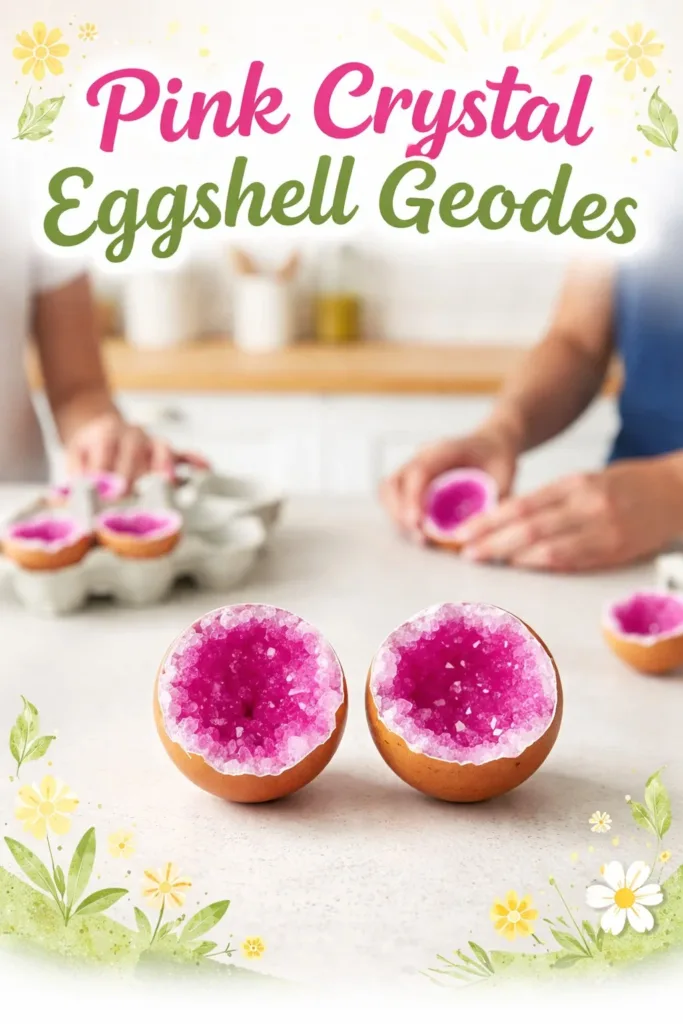
The shell sits in my hand like a small, quiet bowl. Warm from my palm, it still carries a faint chalky scent. Tiny glints gather where the pink crystals have found a home, catching late light and asking me to slow down. Making Pink Crystal Eggshell Geodes asks for soft movements, a steady breath, and time to watch crystals form like tiny gardens.
The Quiet Joy of Making Pink Crystal Eggshell Geodes

This project brings a slow, gentle rhythm to a busy day. Filling a hollow eggshell and waiting as crystals grow gives you a small, beautiful pause. The soft hiss of warm water, the light scent of dye, and the fine, fragile texture of the shell invite a mindful pace.
I like to keep one nearby as a reminder to breathe and to finish something small with care. If you have other projects, you might find echoes between them. For an idea that steps through similar crystal play, take a look at my page about growing tiny heart crystals for another soothing craft: growing crystal pink hearts.
This craft fits well on a quiet table with a cup of tea. It asks for soft attention, not hurry, and it rewards you with a tactile object that looks like a slice of the earth turned pink and gentle.
A Gentle Look at the Process
Before you start mixing and pouring, notice how the project moves. You wash and dry shells with light, careful motions. You heat water slowly and stir with a wooden spoon that makes a soft rhythm. You add dye in drops and watch the color bloom.
Then comes the patient part. You pour and set the shells somewhere warm and still. The sound changes. You trade the stirring for watching. Over hours and days, crystals form along the inner curve, tiny by tiny. That quiet change brings a calm pace.
If you like stepwise science play, I have another guide that explores crystals in eggshells with a slightly different method that you can compare as you learn: crystal eggshell geodes guide.
The process gives you two kinds of satisfaction. The first comes from the making motions. The second comes from waiting and noticing growth. Both feel like a small ritual.
Materials You’ll Need
- Empty eggshell halves, cleaned and dried (easy to find; save them as you cook)
- Table salt, Epsom salt, borax, or alum powder (options that change crystal shape; see notes)
- Warm water (comfortably hot, not boiling)
- Pink food coloring or powdered dye (subtle shades work best)
- Small cup or container for stirring (use glass or heat-safe plastic)
- Wooden stir stick or spoon (smooth, slow stirring feels good)
- Tweezers or a toothpick (for gentle adjustments)
- Clear glue or white craft glue (to seal tiny points if desired, optional)
- A shallow box or egg carton to keep shells steady while crystals grow
- Paper towels and a soft brush for cleaning edges (gentle tools)
- Safety gloves and eye protection if you use borax or alum (safety first)
- A small notebook or camera to record stages (optional, nice for watching changes)
Notes on salts: Table salt and Epsom salt give different crystal textures. Borax creates larger, more glittering crystals. Alum often yields very defined, clear crystals that look almost like tiny quartz. Each makes a different kind of sensory finish. If you prefer a child-safe version, stick with salt or Epsom salt and supervise the heating step.
Step-by-Step Directions
-
Gently rinse the eggshell halves and let them dry completely.
Take slow, light movements so the thin edge does not chip.
Lay them on a towel with the inner curve facing up. -
Prepare a warm, saturated salt solution.
Heat water until comfortably hot and stir in your chosen salt until it stops dissolving.
Add tiny drops of pink dye as you stir, pausing to watch the color deepen. -
Move slowly as you fill each shell.
Use a small cup to pour with control.
Fill to just below the rim; small spills should be wiped with a soft towel. -
Set the shells in a stable, warm place to rest.
An egg carton or shallow box keeps them steady and reduces jostle.
Choose a spot with soft light and little draft. -
Wait and check the shells quietly after a few hours.
You may see a thin shimmer at the rim as crystals begin to form.
Record a photo or make a gentle note in your notebook. -
If crystals do not appear in 24 hours, add a small amount of more concentrated solution.
Heat a bit more water and dissolve more salt, then drop a milliliter into the shell.
Do this with tweezers or a dropper to avoid shaking the shell. -
Let the crystals grow over 2 to 5 days.
The growth will slow but may continue to refine for a week.
Keep the shells still and avoid moving them when crystals are fragile. -
When you like the look, drain excess liquid carefully.
Tilt the shell slightly and use a pipette or soft paper towel to catch drips.
Dry by leaving them in a warm, stable place until fully set. -
Optional: seal the crystals with a light coat of clear glue.
Thinly brush the back or touch points to strengthen fragile spikes.
A seal keeps tiny crystals from flaking off and makes the piece more durable. -
Sit with the finished piece for a few quiet moments.
Notice the weight, the coolness, the inner shine.
Decide how to display it with gentle care.
Enjoying the Finished Piece


A finished Pink Crystal Eggshell Geode makes a small, gentle treasure. It feels fragile and precious. Place it on a low shelf, in a shallow dish with moss, or tuck it beside a favorite book.
I like to set one near a window where morning light moves across the crystals. The subtle pink tone deepens as the sun changes. You might also keep one on a bedside table to offer a calming sight at the start and end of your day.
If you enjoy making pink crystal hearts as keepsakes, you can pair this geode with a hanging ornament for a coordinated feel: how to make pink crystal heart ornaments.
Think of the geode as both a quiet object and a memory of slow making. It invites touch, but it asks for measured handling because the crystals can shred if you are rough.
Making This DIY Last
Store these pieces somewhere dry and steady. Moisture can soften certain salts over time and change the crystal edges. A shallow box lined with tissue keeps them safe.
Avoid placing them where little hands or pets might reach. If you must move one, carry it on a flat tray to prevent tipping. Sunlight will not harm the crystals, but very strong, direct heat may affect any residual salts.
If tiny crystals flake, use a soft brush to remove loose bits. Re-sealing with a thin layer of clear glue helps preserve delicate points. If the inner surface dulls, a gentle polish with a soft cloth can bring back some shine.
Some methods let you re-grow crystals. If you notice the piece has lost vibrancy, you can place it in a fresh, warm saturated solution for a short period and then dry it again. This step needs patience and careful drying to avoid cracking the shell.
Over time, you may enjoy keeping a small set in different shades or crystal styles. Rotate them into your space as simple seasonal accents.
What I’ve Learned While Making This
-
Move slowly and accept small imperfections.
The first time I rushed the rinse stage, an edge cracked.
Now I know that careful hands and gentle motion protect the shell and add to the calm of the process. -
Small changes change the crystal language.
A pinch more borax gives larger facets.
A softer dye gives a wash of color that feels more vintage and restful. -
Warmth matters, but not heat pain.
Keeping shells in a cozy, warm place helps growth.
If the solution is too hot when you pour, it can crack the shell. Warm and steady is the right choice. -
Keep a simple kit together.
I store my stirring cup, tweezers, and a small box together.
Having tools ready makes the start of a project gentle and inviting. -
Safety and calm go hand in hand.
I always wear gloves when I handle borax or alum.
It protects my skin and makes the work feel deliberate. If you work with children, supervise heating steps and use child-safe salts when possible.
These observations come from slow practice and small experiments. They help the craft feel more like a shared ritual than a checklist.
FAQs About Pink Crystal Eggshell Geodes
Q: Are these crystals safe to touch?
A: The crystals themselves are not toxic in tiny contact, but some materials like borax can irritate skin. I recommend wearing gloves if you use borax or alum. Do not ingest anything used in the process. For household safety, keep finished pieces out of reach of children and pets.
Q: How long do crystals take to form?
A: You will usually see initial crystal hints within a few hours. A pleasing growth often appears over 2 to 5 days. Full refinement may take a week. Patience makes the difference; slow, steady warmth gives the best shapes.
Q: What gives the crystals their pink color?
A: The color comes from dye in the solution that the crystals pull as they form. How deep the color appears depends on the dye strength and the salt type. A gentle pink often looks softer and more natural than a heavy, saturated tone.
Q: Can I reuse the eggshells after making geodes?
A: You can keep them as decorative objects or store them carefully for future projects. If they hold residual salt, they may not suit food use afterward. I keep finished shells as keepsakes rather than recycling them into the kitchen.
Q: Which salt should I choose?
A: For safe, kid-friendly play, start with table salt or Epsom salt. If you want more glitter and don’t mind extra caution, borax or alum yield different crystal shapes. Always handle stronger chemicals with gloves and avoid inhaling dust.
A Quiet Closing Thought
Making Pink Crystal Eggshell Geodes gives you a small, mindful pause you can repeat whenever you need a calm moment. The project asks you to move slowly, to notice light and shape, and to wait with a quiet curiosity. You do not need perfect results to find comfort in the process. Each geode becomes a gentle reminder that small, careful acts create quiet beauty.
Conclusion
If you would like a different step-by-step approach that explains crystal chemistry in a hands-on way, this tutorial shares another method for making crystal geodes with clear photos and notes: How to Make a Crystal Geode – Parenting Chaos.
For a science-focused guide that walks through crystal growth in eggshells with safety tips and classroom-style steps, this article offers useful background you may appreciate as you refine your process: How to Make Crystal Eggshell Geode Chemistry Science Experiment.
PrintPink Crystal Eggshell Geodes

A tranquil craft that invites you to create beautiful pink crystal geodes from eggshells, encouraging mindfulness and patience as crystals form over time.
- Prep Time: 15 minutes
- Cook Time: 0 minutes
- Total Time: 300 minutes
- Yield: 1-2 geodes
- Category: Craft
- Method: Crafting
- Cuisine: N/A
- Diet: N/A
Ingredients
- Empty eggshell halves, cleaned and dried
- Table salt, Epsom salt, borax, or alum powder
- Warm water
- Pink food coloring or powdered dye
- Small cup or container for stirring
- Wooden stir stick or spoon
- Tweezers or a toothpick
- Clear glue or white craft glue (optional)
- A shallow box or egg carton
- Paper towels and a soft brush
- Safety gloves and eye protection if using borax or alum
- A small notebook or camera (optional)
Instructions
- Gently rinse the eggshell halves and let them dry completely.
- Prepare a warm, saturated salt solution by heating water and adding salt until it no longer dissolves.
- Add tiny drops of pink dye as you stir the salt solution.
- Carefully fill each shell with the prepared solution, wiping any spills.
- Set the shells in a stable, warm place to rest.
- Check the shells quietly after a few hours for initial crystal formation.
- If crystals do not appear in 24 hours, add a small amount of concentrated solution.
- Let the crystals grow over 2 to 5 days.
- Drain excess liquid carefully once the crystals are formed.
- Optionally, seal the crystals with a light coat of clear glue.
- Enjoy your finished piece and decide how to display it.
Notes
Different salts yield different types of crystals: Table salt/Epsom for softer textures, borax for glittering crystals, and alum for clear facets. If you prefer a child-safe version, stick with salt or Epsom salt.