

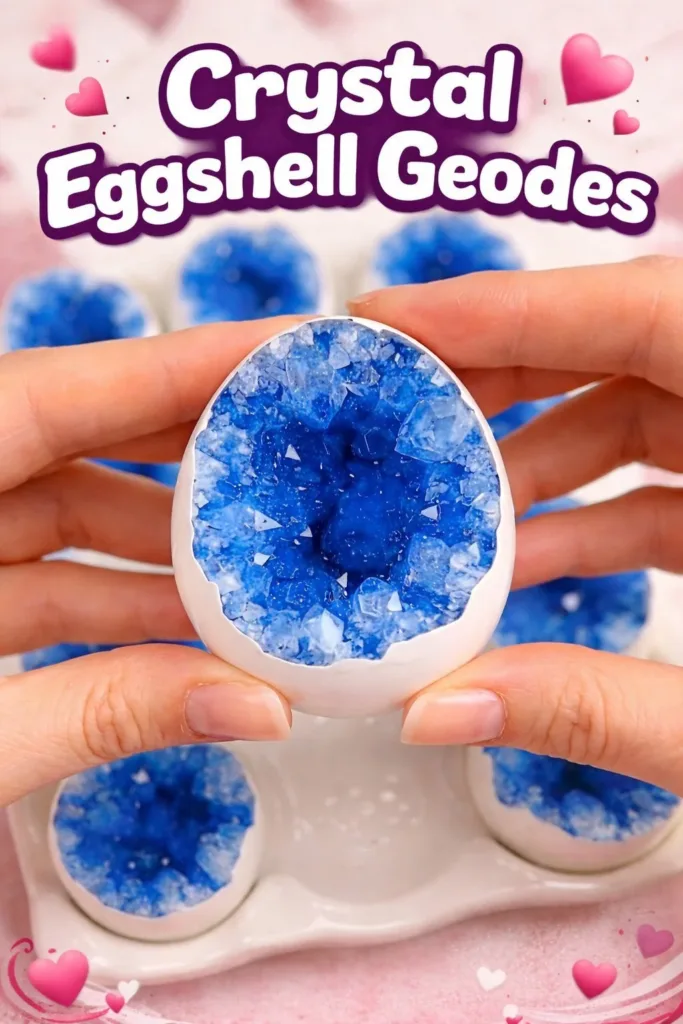
A cool, hollow eggshell rests in my palm. I turn it slowly and watch light find the tiny crystals that formed like frost inside. The shell feels fragile and strangely steady at once, like a quiet little world. Making Crystal Eggshell Geodes invites that same hush: a slow pour, a patient pause, and a tiny burst of sparkle that feels earned. If you loved the slow chemistry of the baking soda crystal growing tree, you will find the same gentle wonder here in scales you can cradle in your hand. baking soda crystal growing tree
The Quiet Joy of Making Crystal Eggshell Geodes

This project asks you to move slowly and notice small changes. You watch a glossy solution change into a web of crystals. You touch a shell that once held something alive and now holds quiet light. The steps ask for steady hands and soft attention. You set aside time to sit and listen to the tiny sounds of drying solution and to feel the gentle weight of a shell as it cools.
Making Crystal Eggshell Geodes calms the mind because it focuses attention on texture and rhythm. You mix, you strain, you wait. Each small motion becomes a ritual. The slow evaporation and the way crystals grow along the inner ridges reward patience. The finished pieces offer a soft kind of treasure small objects that hold a quiet shine and a memory of making.
I often make them in late afternoon light. The room smells faintly of warmed vinegar from cleaning the shells. Water beads on the rim and then settles. That little routine frames a break in the day. You leave the shells to grow and return with a cup of tea. The small reveal feels like opening a secret only you know.
How This DIY Comes Together
Before you gather your materials, imagine a few gentle movements. You will cradle shells, pour calm liquids, and watch for tiny crystals to attach to the inner surface. The process moves from cleaning to seeding to waiting. Each stage has its own pace.
First you prepare the shells and a stable base. Then you make a warm, saturated solution that will carry tiny minerals. You introduce the solution into the shell and let evaporation do the rest. Over hours to days the solution retreats and leaves behind crystalline patterns that catch the light.
The quiet rhythm of this work matters. Work in a bright window or beside a lamp so you can see color and shape reveal themselves. Keep your hands steady when you pour. Keep your heart patient while nature does the forming. If you enjoyed experimenting with crystal shapes before, you might also like exploring the gentle drama of crystal heart growth, which uses similar ideas of saturation and time. crystal heart growth
Materials You’ll Need
- Clean eggshell halves, washed and dried (easy to find; recycle kitchen waste).
- White vinegar or warm soapy water for cleaning.
- Epsom salt (magnesium sulfate) or table salt; Epsom salt gives larger, clearer crystals.
- Warm water to dissolve the salt.
- Food coloring or powdered pigments, optional for gentle color.
- A small funnel or paper cone to pour without spills, optional.
- A tray or shallow bowl to hold shells upright while they dry.
- Cotton, rolled paper, or modeling clay to stabilize shells on the tray.
- Clear craft glue or a thin layer of water-based sealer, optional to prep the inner surface.
- Measuring spoons and a small cup for mixing.
- A fine paintbrush or dropper to add solution where you want crystals to start.
- Tweezers for careful placement or for removing stray bits.
- Protective gloves and adult supervision for children, recommended.
I like Epsom salt because it dissolves easily in warm water and often forms larger, sparkly crystals with a soft, frosty look. Table salt works too and makes a coarser, grain-like texture that feels earthy. Avoid borax if you worry about sensitive skin or young children; borax forms striking crystals but requires careful handling.
STEP-BY-STEP DIRECTIONS:

- Clean and dry each eggshell half gently.
Place shells in warm soapy water or a vinegar rinse to remove membrane.
Pat dry and let air-dry until cool and completely dry to the touch. - Stabilize the shells in a shallow tray.
Nestle them in rolled paper, cotton, or soft clay so they sit open-side up.
Make sure they sit level so the solution pools inside and does not spill. - Make a warm, saturated salt solution.
Stir Epsom salt into warm water until no more dissolves and a tiny grain remains.
If you want color, add a drop or two of food coloring and stir very slowly. - Optional: seal the inside lightly.
A thin coat of clear glue or water-based sealer can make crystals form with a different pattern.
Paint it on in a whisper-thin layer and let it dry before adding solution. - Seed the shell gently to encourage crystal growth.
Use a fine brush or a tiny pinch of dry salt to place seed crystals on the inner surface.
The seed gives crystals a place to begin so they grow there first. - Slowly pour or drop the solution into each shell.
Use a small funnel or a paper cone to guide the liquid without splashing.
Fill only to the curved interior so crystals meet air evenly as the liquid recedes. - Place the tray in a warm, still spot with soft light.
Avoid drafts and direct heat sources that make evaporation uneven.
Listen for silence and breathe slowly as you leave the shells to grow. - Watch and wait, checking gently after a few hours.
You will see tiny grains attach and start to form clusters along ridges.
Let them grow for 24 to 72 hours depending on the size of crystals you want. - Remove excess solution with care if needed.
Use a fine brush or carefully tilt the shell and blot with absorbent paper.
Move slowly so you do not disturb forming crystals. - Let shells dry fully before touching the crystals.
When the interior looks dry and firm, you can move the shell into place for display.
Handle by the outside of the shell and enjoy the way light travels through the tiny facets.
Bringing Crystal Eggshell Geodes Into Your Space

The finished shells feel like little windows, so place them where light can pass through. On a windowsill the crystals glint in morning sun. In a small dish with soft linen they sit like quiet keepsakes. You can group several geodes in a shallow bowl to make a tiny mineral garden.
I enjoy using one as a gentle desk companion. When I feel rushed I let my thumb trace the smooth outer curve and then lift it to see the crystals. That small ritual slows my breath and helps me come back to the task at hand. If you like to craft small displays, you can nest geodes among moss and tiny twigs, or add them to a tray with candles for a calming vignette. For a playful twist, pair them with other gentle crystal experiments such as a rainbow crystal forest to make a tiny, colorful landscape. rainbow crystal forest
How to Store or Reuse Crystal Eggshell Geodes
Store finished geodes in a dry, stable place away from direct sunlight.
Heat and humidity can soften or change the crystals over time.
If you plan to keep them for a long time, place each shell in a small box lined with soft tissue.
You can reuse the shells for another round if you wash and dissolve the old crystals.
Soak the shell in warm water and gentle soap to loosen the mineral layer.
Scrape softly with a plastic tool, rinse, and let dry before starting again.
If the crystals look dusty, gently dust them with a soft brush.
Avoid running water over the interior once the crystal structure forms; water can dissolve the delicate points.
Preserve them like any fragile keepsake: handle with care and give them a quiet home.
Gentle Tips & Variations
- Invite color softly.
Add just one or two drops of food coloring to the warm solution. The color will appear like a watercolor wash through the crystals. Start light and add more on future batches if you want stronger tones. - Try different salts.
Epsom salt gives a frosty, feathery look. Table salt forms coarser grains. Try small test shells to learn which texture you prefer. - Use seeded locations.
If you want crystals to form in a certain area, place a tiny grain of dry salt on that spot before adding solution. Crystals will gather there first and create a focal point. - Make a series for slow reveals.
Set up several shells and fill them on different days. You see how the process changes with room temperature and humidity. I learned that my window seat made crystals grow faster in summer and more delicately in cool months. - Practice gentle handling.
Eggshells feel fragile but they withstand this process when you support them well. Use cotton or paper nests and lift by the outer rim to avoid cracking.
These small invitations let you make the project your own. Think of them as experiments rather than rules. Each batch teaches you something about timing, temperature, and texture. What I learned most is to slow down and watch carefully; the results reward that quiet care.
FAQs About Crystal Eggshell Geodes:
u003cstrongu003eWill the crystals break if I touch them?u003c/strongu003e
u003cpu003eThe crystals form into delicate clusters. Light dusting with a soft brush will not harm them, but pressing or rubbing can break points. Handle the shell by the outside edge and admire the interior from a short distance.u003c/pu003e
u003cstrongu003eWhich salt makes the prettiest crystals?u003c/strongu003e
u003cpu003eEpsom salt often makes clear, sparkly, frosty crystals that catch light softly. Table salt gives a coarser, sand-like texture. Try both to see which you love. If you work with children, choose the gentlest option and supervise closely.u003c/pu003e
u003cstrongu003eHow long do they take to grow?u003c/strongu003e
u003cpu003eYou will see initial crystal clumps within a few hours. For fuller growth wait 24 to 72 hours. The room temperature matters. Warmer, still air speeds evaporation and growth. Cooler air slows it down and can create more finely detailed structures.u003c/pu003e
u003cstrongu003eCan I use the shells for other crafts after the crystals dissolve?u003c/strongu003e
u003cpu003eYes. You can gently soak and wash away the crystals and reuse the shells in other projects. They make lovely tiny planters, decorations, or gifts once cleaned.u003c/pu003e
u003cstrongu003eIs this safe for children?u003c/strongu003e
u003cpu003eThe project works well with children under close adult supervision. Use safe salts like Epsom salt and avoid borax with young hands. Keep small crystals away from mouths. Wear gloves if you wish and model careful handling.u003c/pu003e
A Quiet Closing Thought
Making Crystal Eggshell Geodes gives you both a small ritual and a lovely object. The job asks you to be patient and attentive. The reward appears slowly: a quiet inner sparkle that feels earned. I find that the act of waiting for the crystals calms my breath and draws my attention to tiny beauty. Keep your hands soft, your movements slow, and your curiosity open. Each shell becomes a small lesson in care.
Conclusion
If you want a clear, simple how-to from a science-focused source, the Make Eggshell Geodes – Little Bins for Little Hands walkthrough complements this cozy guide with hands-on experiment notes. For a classic science perspective on eggshell geode crystals and their formation, see the easy explanations at Eggshell Geode Crystals | ScienceBob.com.
PrintCrystal Eggshell Geodes

A calming DIY project to create beautiful crystal formations inside cleaned eggshells.
- Prep Time: 15 minutes
- Cook Time: 0 minutes
- Total Time: 72 hours
- Yield: 4-6 shells
- Category: Craft
- Method: Crafting
- Cuisine: N/A
- Diet: N/A
Ingredients
- Clean eggshell halves, washed and dried
- White vinegar or warm soapy water for cleaning
- Epsom salt (magnesium sulfate) or table salt
- Warm water to dissolve the salt
- Food coloring or powdered pigments (optional)
- A small funnel or paper cone (optional)
- A tray or shallow bowl for holding shells
- Cotton, rolled paper, or modeling clay for stabilization
- Clear craft glue or water-based sealer (optional)
- Measuring spoons and a small cup for mixing
- A fine paintbrush or dropper
- Tweezers for careful placement
- Protective gloves and adult supervision
Instructions
- Clean and dry each eggshell half gently.
- Stabilize the shells in a shallow tray.
- Make a warm, saturated salt solution.
- Optional: seal the inside lightly.
- Seed the shell gently to encourage crystal growth.
- Slowly pour or drop the solution into each shell.
- Place the tray in a warm, still spot with soft light.
- Watch and wait, checking gently after a few hours.
- Remove excess solution with care if needed.
- Let shells dry fully before touching the crystals.
Notes
Handle eggshells with care and allow the crystals to grow undisturbed for optimal results.