

The light through the window catches the soft twist of a pipe cleaner and tiny glass beads, and a small, quiet satisfaction settles in my hands. I breathe in the faint scent of fresh craft supplies, feel the fuzzy wire beneath my fingers, and watch crystals form a gentle halo around a shaped egg. This is the simple pleasure of the Crystal Pipe Cleaner Egg Craft, a slow, sensory way to make something bright and calm with the hands.
The Quiet Joy of Making Crystal Pipe Cleaner Egg Craft

This craft brings together texture, light, and a slow rhythm that asks only for a few focused minutes and a warm breath. Wrapping pipe cleaners, threading beads, and letting crystals grow invite a steady attention that feels like a soft pause in the day. The tactile contrast between plush pipe cleaners and hard beads soothes the fingertips. The tiny clink of beads and the whisper of wire as you twist create a quiet rhythm that helps the mind settle.
I often reach for projects like this when I want to leave the rush of lists for a while. If you enjoy little geode-like pieces made from egg shells, you might like the eggshell geode project I shared before on our site: eggshell geode project. That project and this one share a slow, sparkling language of crystals, and both feel right on a table with a warm drink and good light.
The Crystal Pipe Cleaner Egg Craft fits small routines. It asks for a few tools, a little patience, and gentle hands. It returns a cheerful object that catches light and invites touch. This is a craft to sit with, not race through. You will notice textures and small sounds. You will feel calm.
The Flow of Making Crystal Pipe Cleaner Egg Craft
Before we gather tools, imagine the movement. You will bend, wrap, and pinch. You will thread beads and adjust loops. There is a folding rhythm to shaping pipe cleaners, similar to forming a small nest in your palms.
The sound is quiet. Wire on wire, beads slipping against beads, a faint scrape when you snip. The visual rhythm comes from repetition: a tiny loop here, a bead added there, another crystal forming over time. That steady repetition creates a soft focus.
If you want a slightly different sensory play, the crystal eggshells tutorial has related ideas for texture and sparkle: crystal eggshells tutorial. Seeing different materials arrange themselves into a small, finished piece can help you picture how this egg craft will feel in your hands.
Move slowly to begin. Notice the warmth from your fingers as you press wire into a curve. Notice the weight of a bead as it slips into place. These small observations make the process calming and meaningful.
Materials You’ll Need
- Pipe cleaners, medium thickness, assorted colors (easy to find at craft stores)
- Small plastic or glass beads, clear or colored (optional: seed beads are lovely)
- Fine gauge floral wire or thin craft wire (for structure)
- Small egg shape template or a foam egg base (optional, substitute-friendly)
- White glue or craft glue that dries clear (PVA glue works well)
- Borax, water, and a shallow jar for crystal growth (optional if doing crystal coating)
- Small clothespins or clips (to hold shapes while drying)
- Craft scissors or wire cutters (safety first)
- Tweezers (useful for bead placement)
- A tray or saucer to hold the project and catch glue or crystals
Note on choices: I like fuzzy pipe cleaners for their tactile warmth. They soften the look and feel of the finished piece. Glass beads reflect light beautifully, while plastic beads keep things lightweight. If you prefer not to grow crystals with Borax, you can use glue and glitter or tiny rhinestones to mimic sparkle. For a related small sparkly heart project, see this gentle heart option: small crystal heart craft.
Why these materials work
- Pipe cleaners hold shape because they have a wire core. This lets you sculpt an egg form that keeps its curve.
- Beads add points of reflection and anchor glue or crystals in place.
- PVA glue bonds well with fuzzy fibers and beads, and it dries clear so the sparkle reads as natural.
- Borax creates crystals when saturated in warm water. The crystals grow on rough surfaces where the solution can cling, so fuzzy pipe cleaners make a welcoming bed.
Step-by-Step Directions
Gather a small workspace with natural light and a tray to catch mess.
Take a breath and settle. Lay out your colors and beads so they are easy to reach.Twist two pipe cleaners together for strength if you want a firmer egg base.
Feel the soft fuzz and the slight resistance as the wires twist. This core will hold the curve.Bend the twisted pipe cleaners into an egg shape, forming a gentle oval.
Adjust with your fingers until the shape feels balanced and comfortable in your hand.Secure the ends by wrapping a short piece of thin craft wire around them.
Press the wire lightly so it sits snug against the pipe cleaner but does not poke the skin.Add beads by threading them onto small sections of pipe cleaner or sliding them into loops.
Notice the sound of beads touching and the slight weight as each bead slips into place.Fill in gaps with short lengths of pipe cleaner, wrapping them around the base shape.
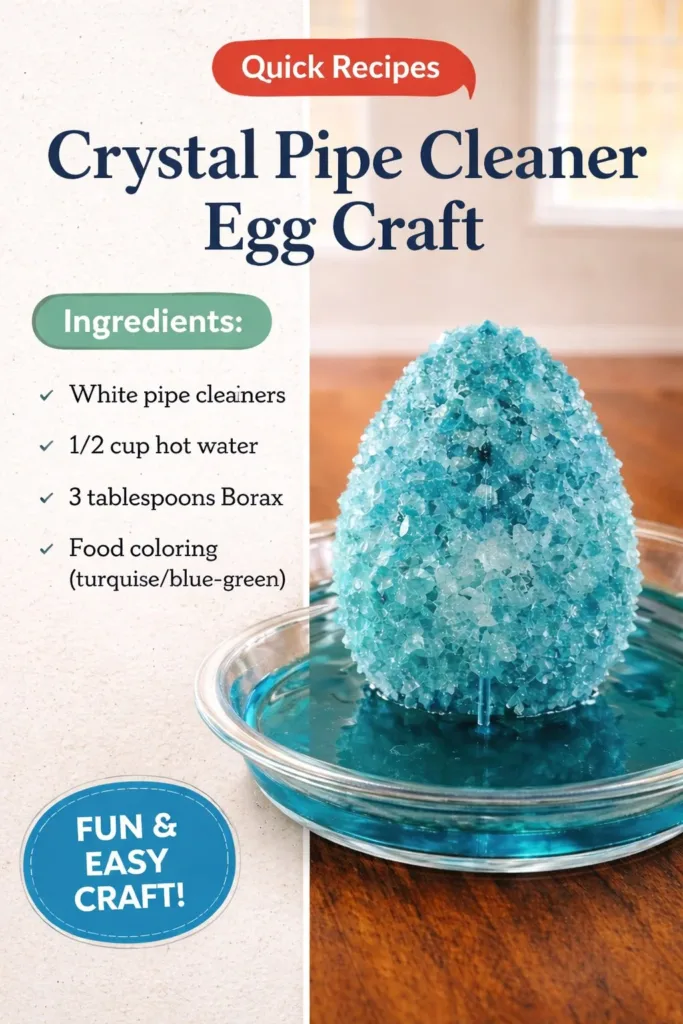
The extra fuzz gives a surface for glue and crystals to cling to.If you plan to grow crystals, prepare a Borax solution: two to three tablespoons per cup of very warm water.
Stir slowly until the powder mostly dissolves. Warmth helps dissolve Borax, so use water you can safely handle.Dip or brush clear PVA glue on the fuzzy surface where you want crystals to form.
Apply in a thin, even layer. Glue provides initial grip and a smooth place for crystals to take hold.Sprinkle beads or tiny rhinestones onto the glue while it is wet for instant sparkle.
Press gently with tweezers if a bead needs nudging. Let this layer dry to the touch.For crystalline growth, gently lower the glued piece into the Borax solution so the glue-covered area is submerged.
Use tweezers or a clip to keep the piece steady. Avoid stirring the solution afterward.Let the piece sit undisturbed for several hours or overnight.
Watch from a distance if you wish. You may notice small crystals forming along edges after a few hours.Remove the piece carefully and let it dry on a tray.
Patience here pays off. Drying slowly keeps the crystals intact and the fibers soft.Trim any stray wire ends with wire cutters and tuck them inward so the piece feels smooth.
Run your fingers lightly along seams to make sure nothing pokes.If you prefer not to use Borax, glue on a scatter of glitter or small rhinestones and let dry fully.
This makes a gentle sparkling surface without needing a soaking step.Add a small loop of thin wire at the top if you want to hang the egg as an ornament.
Secure the loop and twist the ends underneath so it sits flat when hung.
Each step invites a small check-in. Pause, feel, and notice. This keeps the making calm and steady.
Enjoying the Finished Piece


Place your Crystal Pipe Cleaner Egg Craft where it catches a little light. On a windowsill the crystals flicker in morning rays. In a shallow bowl with other small objects, it reads like a quiet talisman.
Use it as a soft ornament on a houseplant or a small hook. The fuzzy pipe cleaner base keeps it light enough to rest on delicate branches. If you make several, nest them in a linen-lined tray to create a tiny, sparkling display.
I like to put one near where I sip tea. The egg becomes part of a slow ritual. You might set one on a bedside table as a calm shape to look at during a few breathing moments. If you made the piece with a loop, hang it where the breeze can move it gently, and listen to the subtle clink of beads.
If you enjoy pairing soft crystals with other small handmade items, you can explore different heart-shaped pieces for a matching set: crystal heart variation. The shared textures and light help the pieces feel like a calm collection.
Caring for Your Finished DIY
Store the piece in a small box lined with tissue when not on display.
Tissue keeps the crystals from knocking against each other and the pipe cleaner from flattening.
Avoid high humidity or direct steam near the crystals, especially if you used Borax.
Humidity can dull surface crystals over time. A cool, dry spot works best.
If dust settles, brush lightly with a soft, dry paintbrush.
Do not use water or cleaning sprays on Borax crystals. Spot clean only the pipe cleaner portions with a barely damp cloth if needed.
Be gentle when handling. The crystals provide beauty but can be delicate.
If tiny crystals flake, you can touch up with a dab of glue and a few new beads or rhinestones.
If you want to refresh sparkle later, add a thin layer of clear glue and sprinkle new beads or fine glitter.
Let each layer dry fully. Rework slowly to keep the piece feeling handmade and quiet.
Gentle Tips & Variations
Try a monochrome palette for a calm, minimal look. A single color of pipe cleaner with clear beads reads soft and soothing.
Accept the quiet power of restraint and notice how small changes affect mood.Make a set in graduated sizes and nest them together.
This visual rhythm creates a small sense of order that feels calming on a shelf or coffee table.Use felt or thin foam as a subtle base if you want more stability.
A soft base helps the egg rest upright on uneven surfaces without changing the tactile feel.Swap Borax crystals for sugar crystal decoration techniques if you prefer household materials.
Sugar crystals form similarly and smell faintly sweet, which can be charming in seasonal displays.Invite a child to help with bead threading and color choices.
Keep sharp tools for adults, but let small hands engage with safe tasks. Crafting together can be a slow, shared ritual.
Frame these as invitations. Each suggestion shifts the craft slightly and lets you follow what feels right.
FAQs About Crystal Pipe Cleaner Egg Craft
Q: Is Borax safe to use at home with this craft?
A: Borax works well for growing crystals, but it is a household chemical. Use warm water in a well-ventilated area, keep it away from small children and pets, and wash hands after handling. If you prefer, use glitter or rhinestones instead for a no-soak option.
Q: How long do the crystals take to grow?
A: You will often see tiny crystals after a few hours, but the best results come from letting the piece sit overnight. Growth slows as the solution cools and reaches saturation. Patience gives a fuller bloom.
Q: Can I hang these outside?
A: I advise keeping them mostly indoors. Outdoor weather can change humidity and temperature, which affects crystal stability. In a protected covered porch, they may hold up, but indoor display keeps them lasting longer.
Q: What if the pipe cleaner shape deforms?
A: Pipe cleaners hold shape well, but repeated handling can loosen them. If the form softens, gently rewrap a thin piece of wire inside or reinforce with another pipe cleaner. Tuck and trim ends to keep the piece neat.
Q: Can I make this with recycled materials?
A: Yes. Reused beads, thrifted jewelry bits, and repurposed fuzzy wires can all work. The core principle is a textured base that holds sparkle. Recycling adds a quiet story to the piece.
A Quiet Closing Thought
Making this Crystal Pipe Cleaner Egg Craft invites slow attention and a small joy that you can return to again and again. The tactile rhythms of wrapping, the little clink of beads, and the patient growth of crystals create a calm loop of making and noticing. Your finished egg will carry a memory of those hands-on moments, a tiny shape that reflects light and quiet time.
Take your time with it. Let each step be a small act of care. Sit near a window, make a warm cup, and let the process be its own comfort. There is no rush to finish. The craft does its work while you breathe and hold a gentle pace.
Conclusion
If you would like a step-by-step variation focused on crystal growth inside shells, see this clear tutorial on creating crystal eggs at Fantastic Fun & Learning: How To Make a Crystal Egg Easter Craft – Fantastic Fun & Learning. For another approachable guide that blends craft and a simple science experiment, this Preschool Powol Packets post offers a friendly walkthrough: Easter Craft/Science Experiment: Crystal Eggs!
PrintCrystal Pipe Cleaner Egg Craft

A calming and tactile crafting experience, this Crystal Pipe Cleaner Egg Craft combines pipe cleaners and beads to create a sparkling ornament.
- Prep Time: 15 minutes
- Cook Time: 120 minutes
- Total Time: 135 minutes
- Yield: 1 egg ornament
- Category: Crafts
- Method: Crafting
- Cuisine: N/A
- Diet: N/A
Ingredients
- Assorted pipe cleaners, medium thickness
- Small plastic or glass beads, clear or colored
- Fine gauge floral wire or thin craft wire
- Small egg shape template or foam egg base (optional)
- White craft glue (PVA glue recommended)
- Borax and warm water for crystal growth (optional)
- Small clothespins or clips
- Craft scissors or wire cutters
- Tweezers
- A tray or saucer to catch glue or crystals
Instructions
- Gather a small workspace with natural light and a tray to catch mess.
- Take a breath and settle. Lay out your colors and beads.
- Twist two pipe cleaners together for strength if desired.
- Bend the twisted pipe cleaners into an egg shape.
- Secure the ends by wrapping a short piece of thin craft wire.
- Add beads by threading them onto small sections of pipe cleaner or sliding them into loops.
- Fill in gaps with short lengths of pipe cleaner wrapped around the base shape.
- If growing crystals, prepare a Borax solution: two to three tablespoons per cup of very warm water.
- Dip or brush clear PVA glue on the fuzzy surface where crystals will form.
- Sprinkle beads or tiny rhinestones onto the glue while it is wet.
- For crystalline growth, lower the glued piece into the Borax solution.
- Let the piece sit undisturbed for several hours or overnight.
- Remove the piece carefully and let it dry on a tray.
- Trim any stray wire ends and tuck them inward.
- If not using Borax, glue on a scatter of glitter or small rhinestones.
- Add a small loop of wire at the top for hanging, if desired.
Notes
This craft can be enjoyed alone or with children, inviting a slow and mindful crafting experience. Store the finished piece carefully to avoid damaging crystals.