

A warm beam of late morning light rests on a small wooden table. The cotton fabric feels soft beneath my fingers. I press a tiny powdered hand into linen, feeling the fine ridges and the quiet weight of a memory. This is the moment an Embroidered Handprint Mother’s Day Craft begins to feel like more than a keepsake; it becomes a slow, attentive way to hold a small piece of a child’s growing self.
The Quiet Joy of Making Embroidered Handprint Mother’s Day Craft

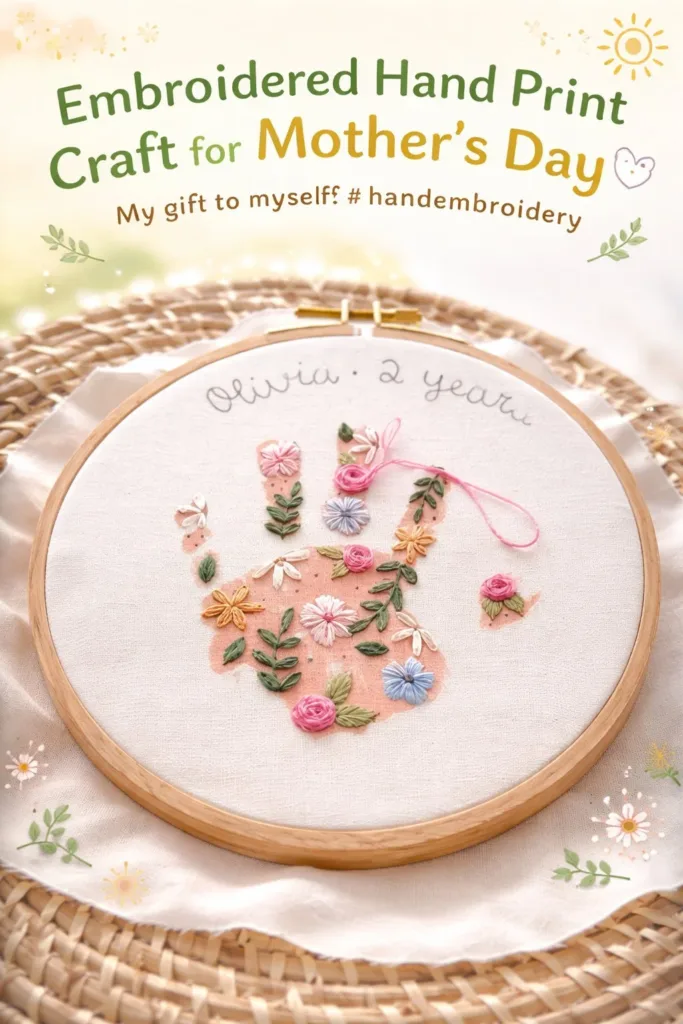
There is a steady calm in tracing a handprint and stitching around its outline. Each stitch asks you to slow down, to notice the texture of thread and cloth, and to breathe with the rhythm of a simple, deliberate motion. The process asks for attention without demanding perfection, and that gentle focus often leaves a room of soft light and softer thoughts.
Making this craft gives a chance to keep a moment that fades quickly otherwise. The tactile memory of a small hand becomes visible in thread and fabric. The embroidery invites touch and gives room to remember the warmth of a palm, the sweep of fingers, the small weight of a hand that once fit so easily in mine.
If you like small meditative projects, you might enjoy making little tactile tokens like the DIY worry stones I wrote about before. They sit in the hand in a similar, calming way and pair well with a stitched handprint on a shelf or in a frame.
A Gentle Look at the Process
Before you gather your scissors and thread, take a moment to imagine the moves you will make. You will smooth fabric, set a light hand down, and let ink or paint catch the tiny ridges. You will hoop the cloth and watch a small shape sit centered like a quiet island.
The sound of the needle passing through linen often becomes a quiet metronome. The thread slides, sometimes with a soft tug, and the tiny knots at the end remind you to slow and steady the wrist. The visual rhythm of repeating small stitches brings a soothing predictability. Each stitch tucks a memory into cloth.
Working with children, I learned to let the pace be their pace. Sometimes the handprint dries in sun-warmed minutes; other times it takes longer. The craft works best when you let the child’s curiosity guide the timing. If you want ideas for other simple keepsake crafts that hold a child’s imprint, try this gentle crystal heart craft for a different texture and light-catching finish.
Materials You’ll Need
- A piece of cotton or linen fabric (easy to find; natural fibers take dye and paint nicely)
- An embroidery hoop (keeps fabric steady; 4 to 6 inch works well)
- Fabric-safe ink pad or non-toxic fabric paint (washable and child-friendly)
- Embroidery floss in 1 to 3 colors (soft cotton gives a cozy look)
- Embroidery needle with a blunt eye comfortable for floss
- Water-soluble fabric marker or pencil (for light guidelines)
- Small scissors with a sharp point (for neat thread ends)
- A scrap piece of cardboard or a plastic tray for pressing the hand
- Optional: small frame or wooden hoop for display
Materials like cotton and linen absorb paint evenly and hold stitches well because their weave gives the needle a gentle path. Embroidery floss comes in multiple strands; you can separate them to make thinner, more delicate lines or keep them together for bolder outlines. A hoop keeps the fabric taut, which makes each stitch feel smooth and even rather than puckered.
If you enjoy adding little charms or extras after stitching, think about how a different craft might add a sparkle. A bright translucent addition can echo this piece nicely, similar in spirit to the bioplastic suncatchers that catch light alongside a framed handprint.
Step-by-Step Directions
Prepare your space and materials.
Take a slow breath and set a small bowl of water and a cloth nearby.
Lay the fabric flat on a clean surface and place the hoop ready to use.Make the handprint.
Help the child press their hand gently into the fabric ink or paint.
Press evenly, then lift straight up to keep a clear outline of fingers.Let the print dry.
Place the print in a warm spot away from drafts so the ink sets slowly.
Avoid touching the damp print to keep edges soft and clear.Center and hoop the fabric.
Place the fabric over the inner hoop and pull it taut with gentle hands.
Set the outer hoop on top and tighten so the surface feels smooth like a drum.Mark a light guideline around the print.
Use a water-soluble marker to trace a slim border a few millimeters from the print.
This gives a gentle path for your stitches without being visible later.Thread the needle.
Choose one or two strands of embroidery floss and knot the end with a small, tidy knot.
Feed the needle and let the thread settle; hold the hoop so the fabric faces you.Start stitching the outline.
Use a simple backstitch or stem stitch to follow the guideline slowly.
Aim for small, even stitches; feel the thread slide through the cloth as you move.Fill or embellish as you wish.
Add small satin stitches for the palm or tiny French knots at the fingertip for texture.
Work patiently and stop when the piece feels complete rather than perfect.Finish the back and press.
Tie off threads with a neat knot and trim any long ends close to the knot.
Press lightly with a warm iron under a cloth to set the stitches and flatten the fabric.Frame or finish the hoop.
Place the fabric in a frame or leave it as-is in the hoop for a cozy, finished look.
Add a soft ribbon if you plan to hang it somewhere your eyes rest often.
Using Embroidered Handprint Mother’s Day Craft in Everyday Life


A stitched handprint invites close, calm moments when you pass a shelf or a bedside table. You can prop a small hoop on a stacked set of books, or tuck the framed linen into a quiet corner of a living room shelf where morning light brushes it gently. The piece works well beside a cluster of simple objects like a ceramic mug and a favorite photo.
Place the handprint near places you linger. On a bedside table, it can be a gentle sight to wake to. Near a kitchen window, it can sit with a plant and catch the same light the plant enjoys. If you give the piece as a Mother’s Day gift, consider presenting it in a small basket with a handwritten note and a tiny sprig of dried lavender for a sensory duet.
For a child’s room, the embroidered handprint can sit as a companion to their growth chart. It pairs well with soft textiles nearby so the eyes move from the stitched outline to the textures around it. If you like, add a small label on the back with the date and a word or two about the moment the print captures.
Caring for Your Finished DIY
Treat the embroidery gently. Clean hands help keep the fabric free of oils and dust. If the piece needs a light cleaning, use a soft sponge, dab gently with cool water and a mild soap, and avoid rubbing the stitched areas hard.
Store flat when not on display. If you keep it in a drawer or a keepsake box, lay acid-free tissue paper between pieces. Avoid storing in plastic bags because natural fibers breathe better when given a small flow of air.
If you plan to wash it, spot test a small corner first. Some ink pads and paints can withstand a gentle hand wash if the dye sets fully, but always follow the paint manufacturer’s advice. When in doubt, a dry cloth or a light dusting with a soft-bristled brush will protect both the stitches and the fabric.
Consider light exposure. Extended direct sunlight can fade threads and soften color edges, so choose a place with bright, indirect light if you want the piece to hold color for years.
Gentle Tips & Variations
Try a single color for a minimalist look.
A single thread color highlights the shape and feels calm and quiet.
This works well when you want the texture to speak more than the color.
Play with neat little details as invitations, not rules.
Add a small heart stitched in a contrasting color near the palm.
Let the stitch mark be a small note of affection rather than a focal point.
Make a duo of handprints when you want to mark a pair.
Stitch two small hands side by side for siblings or a child and a parent.
Use slightly different thread weights for contrast and a friendly rhythm.
Experiment with fabric backgrounds.
A soft, neutral linen will keep the focus on the hand; a light patterned fabric adds a cozy context.
Test a scrap first so you get the look you want without risking the main piece.
Include a small note on the back as part of the memory.
Write the date and a short line about the day on a piece of paper and stitch it into a pocket on the back.
This keeps the story of the hand close to the artwork.
FAQs About Embroidered Handprint Mother’s Day Craft
Q: Will the ink wash out if I wash the fabric?
A: Many fabric inks bond when they dry and set, but some need heat-setting or a follow-up step.
Test a small scrap first and follow the manufacturer’s instructions for care.
Q: My child moved during the press. Can I still stitch around a smudged print?
A: Absolutely. A smudged print becomes part of the story.
You can stitch a softer edge or add small decorative stitches that celebrate the movement.
Q: I am new to embroidery. Which stitch should I start with?
A: Start with a stem stitch or backstitch for a clean, steady outline.
They feel secure and help you make even lines; practice on a scrap before working on the print.
Q: Can I add names or small messages?
A: Yes, simple letters stitched in a small font add intimacy and tell the story.
Use a fine strand of floss and keep the lines consistent to keep the words legible.
Q: How do I keep my thread from knotting?
A: Keep thread lengths short, about 18 inches, and let the thread slide naturally through your fingers.
If you feel a tug, pause, let the thread rest, and then continue; gentle pauses keep the stitching calm.
A Gentle Note Before You Go
When you stitch a small handprint, you sew into memory as well as fabric. The work gives you a slow way to hold time between your fingers. Allow room for small imperfections; they remind you that the piece came from a living, breathing moment.
Sit with the piece for a few minutes after you finish. Notice the way the stitches catch light, the soft rise of the thread, and the quiet of the cloth. Whether you give it as a gift or keep it near for yourself, let the simplicity of the work offer a small moment of calm each day.
Conclusion
If you want a few more ideas for keepsakes that celebrate hands and small marks, you might enjoy browsing the collection of handprint gifts like Handprint Grandma Mothers Day items for inspiration on presentation and style choices. For a playful two-handed imprint idea and other handprint crafts, the Happy Valentines Day Flowers Handprint 2 Hands guide has fun variations to spark a new creative moment.
PrintEmbroidered Handprint Mother’s Day Craft

Create a memorable handprint keepsake using embroidery to celebrate Mother’s Day. This craft combines the tactile joy of stitching with the sentimental value of a child’s handprint.
- Prep Time: 10 minutes
- Cook Time: 60 minutes
- Total Time: 70 minutes
- Yield: 1 craft
- Category: Craft
- Method: Handcrafting
- Cuisine: N/A
- Diet: N/A
Ingredients
- A piece of cotton or linen fabric
- An embroidery hoop (4 to 6 inch)
- Fabric-safe ink pad or non-toxic fabric paint
- Embroidery floss in 1 to 3 colors
- Embroidery needle with a blunt eye
- Water-soluble fabric marker or pencil
- Small scissors with a sharp point
- A scrap piece of cardboard or plastic tray for pressing
- Optional: small frame or wooden hoop for display
Instructions
- Prepare your space and materials.
- Take a slow breath and set a small bowl of water and a cloth nearby.
- Lay the fabric flat on a clean surface and place the hoop ready to use.
- Make the handprint.
- Help the child press their hand gently into the fabric ink or paint.
- Press evenly, then lift straight up to keep a clear outline of fingers.
- Let the print dry.
- Place the print in a warm spot away from drafts.
- Center and hoop the fabric.
- Place the fabric over the inner hoop and pull it taut.
- Mark a light guideline around the print.
- Use a water-soluble marker to trace a slim border.
- Thread the needle.
- Choose one or two strands of embroidery floss and knot the end.
- Start stitching the outline.
- Use a simple backstitch or stem stitch to follow the guideline slowly.
- Fill or embellish as you wish.
- Finish the back and press.
- Tie off threads with a neat knot.
- Frame or finish the hoop.
Notes
Consider light exposure as direct sunlight can fade threads. Store flat when not on display for longevity.