

The sunlight slides across my work table, warm and thin, and a small wedge of blue plastic catches it and comes alive. I breathe in the faint, sweet scent of melted polymer, and I trace a soft fin shape with my fingertip, feeling the smooth curve under my nail. Making a Suncatcher Shark Craft feels like holding a little piece of ocean light in my hands, a slow, tactile ritual that asks only for quiet attention and a few simple supplies. If you have made bioplastic suncatchers before, you will find a familiar calm in this process, and you can revisit that gentle craft with this shark design for new textures and colors: DIY bioplastic suncatchers.
Why Suncatcher Shark Craft Feels Comforting to Create

There is a soft magic in watching a flat piece of material turn into a tiny window of color. This Suncatcher Shark Craft slows my pace. I cut, press, and watch light pass through, and the seconds stretch out like taffy. The steady gestures calm my shoulders, and the warm touch of the material against my palms feels reassuring.
The craft invites a gentle rhythm. You trace a shape, smooth an edge, and then pause to notice color blending. The quiet of these small motions helps you stay present. The shark motif adds a playful edge without being loud. It connects to ocean sounds and the cool sense of water, even when you work indoors.
Making this piece in the morning sun turns it into a mindful ritual. I often make one while a kettle hums nearby and the house wakes up. The act of choosing colors, deciding whether to include tiny beads or keep it minimal, and nudging the finished piece into a window gives the day a small, steady anchor. If you like exploring similar techniques for soft, translucent crafts, try this cozy page about blue crayon suncatchers that uses simple materials and lovely color washes: blue crayon suncatchers.
A Gentle Look at the Process
This craft moves in slow, tactile stages. You will cut a pattern, arrange color, and then melt or bind the plastic in a calm, controlled way. Each stage offers a sensory cue. The scissors give a soft snip. The plastic warms and relaxes under a low heat, and the smell stays light if you work slowly and in a ventilated space.
You will notice the way the material shifts from stiff to supple. That change feels almost like a small breath in the object itself. The rhythm of making is patient and forgiving. You can pause between steps, sip tea, and return. The process mirrors how a shoreline forms: layers, gentle pressure, and time.
This Suncatcher Shark Craft pairs well with other translucent projects. If you want to vary textures and recipes, this resource on colorful bioplastic suncatchers shows ways to play with pigment and thickness while keeping the method gentle and approachable: colorful DIY bioplastic suncatchers recipe.
Materials You’ll Need
- Clear or translucent plastic sheets suitable for crafting, recycled or new (easy to find)
- Scissors or craft blade (sharp and safe)
- Pencil or water soluble marker for tracing (optional)
- Shark template or freehand drawing on paper (printable templates work)
- Small round hole punch or awl for hanging hole (optional)
- Permanent markers or translucent paint pens in blues, greys, and white (substitute-friendly)
- Oven or laminator depending on your method (choose what fits your comfort)
- Baking tray and parchment paper if you use an oven (protects the surface)
- Thin string, fishing line, or ribbon for hanging (soft and subtle)
- Small glass beads or sequins for sparkles (optional)
- A well-ventilated workspace and heat-resistant surface for safety (important)
- Sandpaper or nail file for smoothing edges (gentle finish)
Notes: If you prefer a low-heat method, look for plastic that is made for craft melting at modest temperatures. The permanent markers help keep color vivid while letting light pass through. The hole punch is optional if you prefer to glue the suncatcher to a window instead.
Step-by-Step Directions
Prepare your workspace. Lay out parchment paper and set your tools so you can move slowly without hurry. Feel the cool grain of the table and arrange a small cup of water or tea nearby.
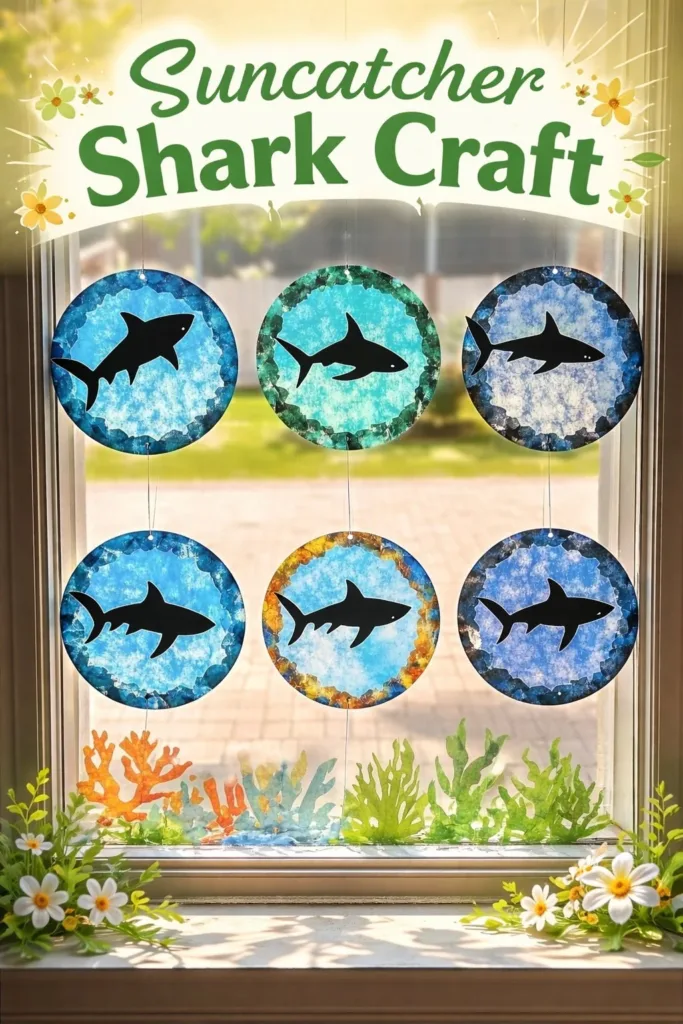
Trace or draw the shark shape. Use a pencil to sketch the silhouette on paper first. The gentle arc of the dorsal fin and a rounded body will keep the piece friendly and calm.
Cut the plastic to match the paper shape. Move the scissors with steady, even gestures. The sound is soft and satisfying. Take breaks between cuts if your hands want them.
Add color with translucent markers. Layer light blues and greys in soft strokes. Let the ink dry for a moment. You will see color deepen as it sits. This step lets you feel how pigment and light will interact.
Place small beads or sequins if you want shimmer. Arrange them in a tiny curve along the shark’s belly or near the tail. The beads will catch the light and add small, bright notes.
If you use an oven method, preheat to low heat and place the suncatcher on parchment. Watch carefully as the plastic warms and relaxes. It will flatten slightly and the colors will settle. Move calmly and keep a window open for fresh air.
For laminator or iron methods, sandwich the plastic between parchment and pass it gently. The pressure bonds layers and smooths texture. You will feel a gentle warmth on the tool’s surface.
Let the finished piece cool completely. When it becomes cool, the material restores rigidity. Touch the edge very lightly and sand small rough spots with gentle strokes.
Punch a small hole near the top for hanging. Thread a soft string or fishing line and knot it cleanly. The knot feels like tying a small promise to place the piece where light will find it.
Hang the suncatcher in a window or on a sunlit wall. Step back, breathe, and notice the way light paints a small ocean onto your walls.
Where This DIY Fits Into a Calm Routine


This suncatcher becomes a small ritual in a quiet day. I like to make one in the late morning and hang it while the sun moves across the room. Watching the patch of color change feels like reading a short, peaceful story.
You can tie the making to another slow habit. Try crafting while a playlist of soft instrumentals plays, or while you sip a favorite tea. The craft fills a spare twenty or forty minutes with calm attention. It also offers a gentle end-of-day practice if you prefer to unwind by tracing color with tired eyes.
A finished suncatcher can sit by a bedside window to catch the early light. You can also hang them in the kitchen while you prepare food. The presence of a little colored fin makes ordinary routines feel kinder and more considered.
If you have other small translucent projects, place them together to create a chorus of light. The pieces will share a language of texture and hue. If you want a heart-themed companion for the shark, this crystal heart craft shows how different shapes bring different emotional tones to a sunny display: crystal heart craft.
Keeping It for Later
Store suncatchers flat if you want to keep them pristine. Use a shallow box lined with tissue or parchment so edges do not press into each other. The plastic remains most stable when it rests in a cool, dry place.
If you plan to reuse pieces, label small stacks with the date and color notes. This practice helps you remember which blend of inks you liked and what heat setting produced the best translucency.
If a corner gets scuffed, sand it gently with fine sandpaper. Small repairs can bring a piece back to life. For longer storage, avoid high heat and direct sunlight that can warp or fade colors over months.
If you use recycled plastic, keep a record of which kinds reacted best to heat and marker. That little notebook of tests becomes a quiet map of materials that suit your rhythm and environment.
Gentle Tips & Variations
Invite a child to participate with a simple role. They can choose color placements or press sequins gently onto the plastic. Small hands bring a bright unpredictability that feels alive and warm.
Try layered translucency. Cut two thin shapes and bond them together with a soft press. The resulting depth will dance differently in the light and feel like a small ocean window.
Use a muted palette for a calm version. Soft greys, pale blues, and a touch of pearly white yield a minimal, soothing piece that works well in restful spaces.
Add a tiny painted eye or simple stitched accent. A small detail can give personality and make the shark feel like a companion rather than a craft.
Experiment with different hanging lengths. A longer string brings slow, mobile movement in a gentle breeze, while a short string holds the piece close and steady.
These ideas are invitations. Try one, then sit with it. Notice what calms you. There is no right way here, only ways that help you feel more present.
FAQs About Suncatcher Shark Craft
Q: Is this safe for children to make with adults?
A: Yes, with supervision. Young hands can color and place beads while an adult handles any heat or cutting. Keep sharp tools and hot surfaces out of reach and work in a ventilated spot.
Q: What kind of plastic works best?
A: Thin, translucent craft plastic or recycled clear packaging that melts gently works well. Look for plastics labeled for low heat crafting. Test a small scrap first to see how it reacts.
Q: How do I prevent harsh fumes when heating plastic?
A: Work slowly at low temperatures and always ventilate the room. Use a small fan near a window and keep heat brief. If you notice a strong smell, stop and air the space.
Q: Can I make these without heat?
A: Yes. You can use laminating pouches or clear adhesive sheets to bond layers. These methods keep the craft cool and still create a translucent finish.
Q: Will ink fade over time?
A: Permanent translucent markers last longer than water-based ones, but all pigment will soften with long sun exposure. To preserve color, rotate hanging locations and avoid constant direct sunlight.
A Quiet Closing Thought
Sit with your finished shark for a moment. Let your fingers rest near the fishing line, and watch the way a thin rim of light moves across the fin. This small object remembers your choices. Its curve holds your morning, your pauses, and your small daring to make something by hand.
The process matters as much as the piece. Each step invites you to notice texture, temperature, and color. When you slow down and attend, the act of making becomes a gentle practice in presence.
Let your suncatcher become a small map of calm in the home. Move it, still it, and let it surprise you with how a little colored light can shift the mood of a whole corner.
Conclusion
For a straightforward take and printable template ideas, see this friendly tutorial that shows a similar technique for a shark shape: Shark Suncatcher Craft – One Simple Party.
If you enjoy child-friendly variations and simple step-by-step instructions, this guide offers a warm, approachable version for preschool makers: Shark Crafts for Preschoolers: Shark Suncatcher – Buggy and Buddy.
PrintSuncatcher Shark Craft

Create a beautiful suncatcher in the shape of a shark using simple materials and a few easy steps.
- Prep Time: 10 minutes
- Cook Time: 10 minutes
- Total Time: 20 minutes
- Yield: 1 suncatcher
- Category: Crafts
- Method: Crafting
- Cuisine: N/A
- Diet: N/A
Ingredients
- Clear or translucent plastic sheets
- Scissors or craft blade
- Pencil or water soluble marker
- Shark template or drawing
- Small round hole punch or awl
- Permanent markers or translucent paint pens in blues, greys, and white
- Oven or laminator
- Baking tray and parchment paper
- Thin string, fishing line, or ribbon
- Small glass beads or sequins (optional)
- Sandpaper or nail file
- Well-ventilated workspace
Instructions
- Prepare your workspace with parchment paper.
- Trace or draw the shark shape on paper.
- Cut the plastic to match the shape.
- Add color with translucent markers.
- Place small beads or sequins for shimmer.
- If using an oven, preheat to low heat and watch carefully as the plastic warms.
- For laminator methods, sandwich the plastic between parchment and press gently.
- Let the piece cool completely.
- Punch a small hole for hanging and thread a soft string.
- Hang the suncatcher and enjoy the light it brings.
Notes
For a low-heat method, choose plastic made for low-temperature crafting. The hole punch is optional depending on your preference for hanging.