

I cup my hands around a warm jar while sunlight pours across the table. A thin, translucent sheet waits on a cooling rack, its edges glowing like soft glass. The kitchen smells faintly of vinegar and warm starch. My fingers press a dried petal into the surface, and the tiny ridges leave a quiet map. Making DIY Bioplastic Suncatchers asks me to slow down, to notice texture, light, and the gentle tug of a project that lives between craft and chemistry.
Why DIY Bioplastic Suncatchers Feels Comforting to Create

This craft asks for small movements and simple attention. The mixture bubbles slowly, the spoon moves in a steady circle, and each pause becomes a place to breathe. The result collects sunlight and turns it into a soft glow that changes through the day.
I return to these suncatchers when I want a calm task that still feels alive. Working with gelatin or agar yields a tactile rhythm. The material cools, peels, and flexes in ways that feel satisfying under my thumbs. The finished pieces hang in a window and remind me of the slow, steady work I did to make them.
If you enjoy adding gentle color, try a variation from our colorful bioplastic suncatchers recipe. It shows how a little dye changes the mood without rushing the process.
Why this feels comforting also comes from using things you recognize. Flour, gelatin, glycerin, and water respond like old friends. They change when warmed and cooled, and that change has a quiet predictability. You learn to listen to the sound of the simmer, to the sheen of the liquid, and to the way the mixture moves. That gentle feedback keeps you present.
Beyond texture and sound, these suncatchers offer a slow reward. You place a pressed leaf or a few glass beads with care and wait for the sun to reveal the piece. The time between making and seeing light through it gives space for reflection. It is a small, mindful ritual.
A Gentle Look at the Process
Before you mix a single spoonful, the process asks you to move slowly and deliberately. You heat, stir, pour, press, and wait. Each step offers a sensory note: warmth on your wrist, the soft scrape of a spoon, the cooling snap of the finished film.
I like to clear a small corner of the table and lay out a towel. This makes the process feel intentional. You will find that the motion of stirring becomes a gentle cadence. The mixture goes from cloudy to clear, then glossy. That shift tells you the chemistry is working.
This project does something simple and clever. When gelatin or starch joins glycerin and a little vinegar, the result forms a flexible, clear sheet. The gelatin proteins or starch molecules entangle and, with the glycerin working as a plasticizer, hold water and remain pliable. You will see how the mixture responds to heat and cooling. That response gives you a predictable, safe path to follow.
If you want to compare techniques or see another take on simple methods, I often look back at our homemade bioplastic suncatchers guide to remember small tricks and timing. It reads like a companion more than a strict manual.
Materials You’ll Need
- Gelatin powder or agar flakes (gelatin creates a slightly firmer film; agar makes a vegan option)
- Glycerin (a small bottle; it helps keep the film soft and bendable)
- Warm water (easy to find)
- White vinegar (a splash helps set and preserve)
- Spoon for stirring (wood or heat-safe plastic)
- Small saucepan (use one you trust for gentle heating)
- Shallow molds or a silicone baking mat (for even, thin sheets)
- Measuring spoons and cups
- Food coloring or natural dyes (optional; use sparingly)
- Dried flowers, leaves, or small beads (pressed and dry; optional)
- Straw or skewer (for making a hole to hang)
- String, thread, or ribbon for hanging
- Parchment paper and a cooling rack (for drying)
- Gloves or tongs for handling warm sheets (safety-friendly)
- A well-ventilated space and a timer (safety and patience helpers)
You can substitute agar for gelatin to make a plant-based version. If you prefer a bit of shimmer, small bits of iridescent film work well, but use them sparingly. If you plan to involve children, include oven mitts and keep them at a safe distance while the mixture is hot.
If you want to plan a nature-focused version, gather inspiration from our nature’s window art materials list which shows how delicate petals and leaves become part of the piece.
Step-by-Step Directions

- Measure and warm your water. Pour one cup of warm water into the saucepan. The warmth helps gelatin or agar dissolve more quickly. Use a gentle heat and watch the surface.
- Sprinkle gelatin or scatter agar. Add two tablespoons of gelatin or agar slowly while stirring. The mixture will thicken as it absorbs the water. Stir in calm circles.
- Add glycerin and vinegar. Stir in one teaspoon of glycerin and one teaspoon of white vinegar. The glycerin keeps the film flexible, and vinegar helps the mixture set evenly.
- Heat gently to combine. Keep the heat low. Stir until the mixture turns clear and glossy. Avoid boiling; a gentle shimmer and steam tell you it is ready.
- Color if you like. Stir in a drop or two of food coloring or a small amount of natural dye. Mix slowly until the color distributes evenly. Small amounts make subtle, cozy hues.
- Prepare your mold or mat. Spread a silicone mat or parchment on a flat tray. Work carefully; the next pour will determine thickness. A thin, even layer becomes a delicate suncatcher.
- Pour with steady hands. Tilt the pot slightly and pour slowly. Aim for an even film about one to two millimeters thick. The sound of the pour is low and calm.
- Add pressed items gently. Place dried flowers, leaves, or beads onto the wet surface. Press them lightly with a fingertip or the back of a spoon. Notice the coolness against your finger.
- Smooth and remove air. Tap the tray lightly to release bubbles and smooth the surface. A soft tapping sound accompanies a more even finish.
- Let it cool undisturbed. Set the tray somewhere dry and out of direct sunlight. The film needs time to firm. Cooling takes one to three hours depending on thickness and humidity.
- Peel carefully. When the film feels cool and slightly springy, lift a corner slowly. If it resists, wait a bit longer. The film should peel cleanly from silicone or parchment.
- Make a hanging hole. Use a skewer or straw to poke a small hole near the top while the piece remains flexible. If it is already stiff, you can carefully heat a skewer and melt a tiny hole, but do this with caution.
- Trim and tidy. Use small scissors to tidily shape the edges. A smooth edge refracts light more evenly. The little snips sound like a quiet final note.
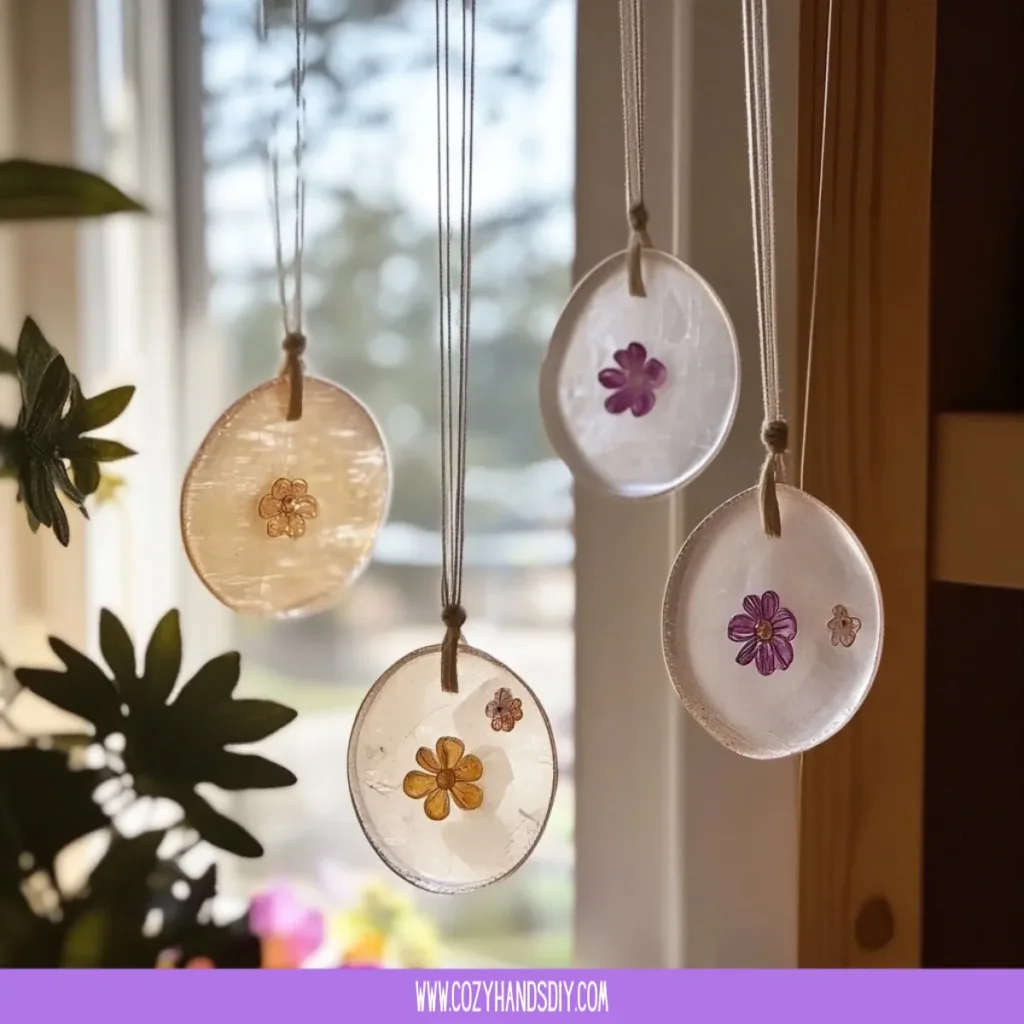
- Hang and watch. Thread a loop of thread or ribbon and hang your piece in a window. Watch how light moves through petals and beads. The sunlight accentuates texture and color.
- Store extras gently. If you make more than one, stack them with parchment between layers. Keep them away from heat and direct sun when not displayed.
These steps repeat well. I learned to let the mixture cool a bit before pouring because a too-hot pour makes bubbles and uneven surfaces. I also learned to press tiny leaves flat before adding them; they release less moisture and keep the film clearer.
Bringing DIY Bioplastic Suncatchers Into Your Space

Hang one in a breakfast window and watch early light catch tiny veins in a leaf. Place another near a reading nook where afternoon sun warms a slow, glowing patch on the wall. These pieces make quiet companions in corners where you want a little light-play.
I like to group two or three suncatchers at different heights. They create a subtle rhythm when they move with a draft. The movement makes gentle clinking if beads touch, which feels like a soft chime rather than a noise.
You can integrate these into seasonal displays. For spring, use pale petals and pastel dyes. For late autumn, choose rust-colored leaves and warm amber hues. The suncatchers adapt to mood and season in small, meaningful ways.
If you want to combine blooms and transparency in a crafted string, our post about sun catchers with flowers shares ideas for arranging pressed botanicals and balancing composition for best light.
These pieces also work well on a small mobile above a bedside table. They do not demand attention, but they reward notice. When you pass the window, the light will catch one corner and invite you to pause.
Keeping It for Later
Most bioplastic suncatchers last well if you keep them away from excessive moisture and heat. Glycerin keeps them flexible, but prolonged dampness can attract softness or warping. Store them flat in a dry box with sheets of parchment between layers.
If a piece becomes slightly tacky in humid weather, set it in a dry room with a fan for a few hours. The air helps restore its feel. Avoid using strong cleaners on the surface; a soft cloth and gentle dusting work best.
Repairs happen. If a small edge cracks, you can remelt a tiny dab of clear gelatin mixture and press it into the crack, smoothing with a fingertip. Let it cure fully before rehanging.
If you prefer an archival touch, consider a thin coat of a clear, water-based sealer. Test on a scrap piece first. Some sealers change the matte or glossy look, so choose one that preserves the subtle glow you like.
When storing with other crafts, keep suncatchers away from oils and solvents. Oils from hands can transfer over time and slightly alter the surface. Wash hands before handling delicate pieces to protect their clarity.
Gentle Tips & Variations
- Invite color slowly: Start with a single drop of food coloring for soft, translucent shades. Add more in small increments for deeper tones. The color deepens as the film sets, so go gently.
- Press before you place: If you collect petals from your garden, press them for a few days between paper to remove moisture. Drier petals sit flatter and keep the film clearer.
- Try texture layers: Make two thin films and sandwich a decorated middle layer. This adds depth and a feeling of suspended space without adding bulk.
- Use natural dyes: Infuse a little brewed tea, onion skins, or beet juice into part of the water for muted, organic tones. These dyes change over time, which adds a living quality to your piece.
- Make small study pieces: Practice with tiny shapes before committing to a large sheet. Small samples let you refine thickness, color, and timing.
These ideas grew from my making sessions. Once, I overfilled a mold with a delicate hydrangea and learned that small petals need extra pressing. Another day I mixed too much glycerin and the film felt overly supple; I adjusted by reducing by half the next time. These small lessons become part of what you know.
FAQs About DIY Bioplastic Suncatchers:
u003cstrongu003eWhat is the difference between gelatin and agar for these suncatchers?u003c/strongu003e
u003cpu003eGelatin gives a slightly more flexible, warmer-feeling film. Agar creates a firmer, more glass-like sheet and serves as a plant-based option. Both work; choose gelatin for a soft touch and agar for a clear, crisp finish.u003c/pu003e
u003cstrongu003eAre these suncatchers waterproof?u003c/strongu003e
u003cpu003eThey stand up to light splashes, but they do not handle prolonged soaking. Keep them away from humid bathrooms or open water. If you need waterproofing, test a thin coat of a suitable clear sealer on a scrap sample first.u003c/pu003e
u003cstrongu003eIs the mixture safe for kids to help with?u003c/strongu003e
u003cpu003eChildren can join many parts of the process, such as arranging dried flowers or choosing colors. Keep them clear of the hot pot and use oven mitts when carrying warm trays. Supervise all steps involving heat and sharp tools.u003c/pu003e
u003cstrongu003eHow long do they take to dry?u003c/strongu003e
u003cpu003eDrying time depends on thickness and humidity. Thin films can set in one to three hours. Thicker or moister pieces may take longer. Patience helps; checking too soon can cause tearing.u003c/pu003e
u003cstrongu003eCan I add glitter or small beads?u003c/strongu003e
u003cpu003eYes, small beads work well and add a cheerful catch of light. Use only a tiny amount of glitter or iridescent bits, as too much can cloud the film. Natural elements like tiny seeds or mica flakes make subtle, safe additions.u003c/pu003e
A Quiet Closing Thought
This project unfolds gently. It rewards slow hands and attentive eyes. You will learn to feel the moment when the mixture turns glossy, the touch when a petal sits just right, and the small joy of a finished piece catching light in a window.
Trust the rhythm of the process. Start small, notice textures and scents, and give yourself permission to experiment. Each suncatcher becomes a quiet marker of time spent making with care.
Conclusion
If you want a clear, step-by-step variation that explains the chemistry in a child-friendly way, I recommend the guide at How To Make A Bioplastic Suncatcher – Chemistry for Kids which breaks the steps into approachable pieces and includes photos.
For botanical-focused inspiration and a slightly different technique using plant textures, see the thoughtful exploration at Botanical Bioplastic Sun Catchers – Wineberry Woods. It offers ideas for arranging more complex botanical compositions.
PrintDIY Bioplastic Suncatchers

Create beautiful suncatchers using a simple bioplastic mixture that captures sunlight and textures from nature.
- Prep Time: 15 minutes
- Cook Time: 30 minutes
- Total Time: 45 minutes
- Yield: 4 suncatchers
- Category: Craft
- Method: Crafting
- Diet: Vegan
Ingredients
- 2 tablespoons gelatin or agar flakes
- 1 teaspoon glycerin
- 1 teaspoon white vinegar
- 1 cup warm water
- Food coloring or natural dyes (optional)
- Dried flowers, leaves, or small beads (optional)
- Parchment paper or silicone baking mat
- String, thread, or ribbon for hanging
- Spoon for stirring
- Small saucepan
Instructions
- Measure and warm your water in a saucepan.
- Sprinkle gelatin or agar slowly while stirring.
- Add glycerin and vinegar to the mixture.
- Heat gently to combine until clear and glossy.
- Color the mixture if desired.
- Prepare your mold or mat for pouring.
- Pour with steady hands into the mold.
- Add pressed items gently onto the wet surface.
- Smooth and remove air bubbles from the mixture.
- Let it cool undisturbed for 1 to 3 hours.
- Peel carefully when firm.
- Make a hanging hole using a skewer or straw.
- Trim edges for neatness.
- Hang the suncatcher in a window and enjoy.
- Store extras flat with parchment in between.
Notes
Experiment with colors and different pressed items. If using with kids, keep them away from hot surfaces.