Turquoise Crystal Seashells
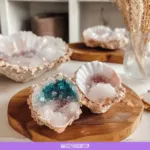
Create beautiful turquoise crystal seashells with a calming DIY process that uses simple materials and sensory techniques.
- Prep Time: 15 minutes
- Cook Time: 60 minutes
- Total Time: 75 minutes
- Yield: 1-5 seashells
- Category: Craft
- Method: DIY Crafting
- Cuisine: N/A
- Diet: N/A
Ingredients
- Small seashells (clean and dry)
- Turquoise mica powder or pigment
- Clear epoxy or slow-setting craft resin
- Fine clear glitter or glass microbeads (optional)
- White craft glue or PVA glue
- Fine sand or baking soda (optional)
- Small mixing cups and stir sticks
- Soft brushes (small paint brushes)
- Tweezers or toothpicks
- Disposable gloves and a mask if using resin
- Small tray or parchment paper for drying
Instructions
- Clean and dry each shell slowly and with care.
- Mix a small batch of epoxy or resin in a cup.
- Tint the resin with a small pinch of turquoise mica powder.
- Apply a thin layer of glue where you want crystals to grow.
- Brush a thin layer of tinted resin over the glued areas.
- Sprinkle fine glitter, microbeads, or sand into the wet resin.
- Let the piece sit in a dust-free place until tacky, then repeat.
- Finish with a clear topcoat of resin when you like the texture.
- After full cure, gently clean edges and display.
- If you want a sensory edge, glue a small loop to the back for hanging.
Notes
This project is safe for beginners when using glue; ensure proper ventilation and safety precautions when using resin.
Find it online: https://www.cozyhandsdiy.com/turquoise-crystal-seashells/