

A small bowl of pale sand sits on my lap as afternoon light filters through the curtains, and I hold a tiny turquoise crystal seashell between my fingers. The shell feels smooth, the crystals sparkle like shallow waves, and my breath slows as I turn it in the light. Making Turquoise Crystal Seashells asks for gentle attention, soft motions, and a few simple materials that respond in quiet, reliable ways; if you love slow, sensory craft projects, this one pairs nicely with a baking soda crystal growing tree that grows bright, tactile formations and invites long, still moments of watching and waiting a lovely companion on a calm crafting day baking soda crystal growing tree.
Why Turquoise Crystal Seashells Feels Comforting to Create

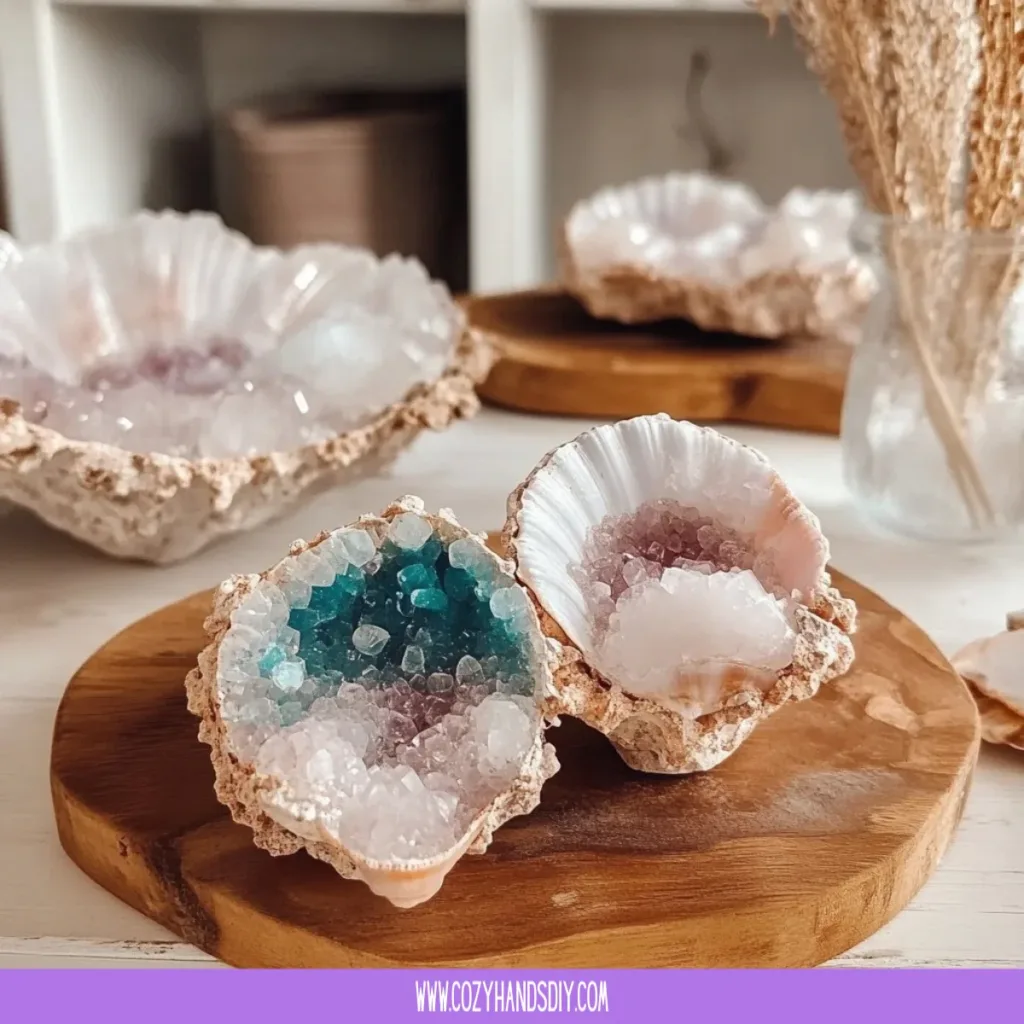
This project slows time in an easy way. You grind, mix, brush, and watch and each action offers a small, satisfying result. The turquoise color reads like ocean light. The shells keep a real, natural edge while the crystals add a steady, quiet sparkle.
When you make one, you notice textures: the cool curve of a shell, the fine grit of crystal powder, the soft tug of glue as it sets. The work asks for both patience and play. You can let your hands move slowly and still end with something beautiful to hold.
This craft also fits well with a calm home rhythm. You can set a tiny station on a kitchen table, leave materials out between sessions, and return without pressure. The steady steps and slow changes help focus the mind and soften the day.
A Gentle Look at the Process
Before you gather anything, imagine the flow. You will clean shells, prepare a crystal-infused paste, apply it in small layers, and let each layer set. Each stage gives a sensory cue: a wet brush, a grainy sprinkle, a quiet sit while things harden.
Think of the movements as simple and repetitive. Mix, brush, place. Each pass adds a little texture and depth. You will see the turquoise deepen as crystals form and catch light. It feels like a slow collage between sea and stone.
If you enjoy watching minerals grow and change, you may like similar projects, such as the baking soda crystal growing trees that show how simple ingredients make structured, delicate forms baking soda crystal growing trees.
Materials You’ll Need
- Small seashells (clean and dry). Any small, open shells work. Easy to find at craft stores or beach collections.
- Turquoise mica powder or pigment. Gives that soft ocean color; powdered form blends smoothly.
- Clear epoxy or a slow-setting craft resin. Choose a low-fume formula and follow safety notes below.
- Fine clear glitter or glass microbeads (optional). Adds extra sparkle.
- White craft glue or PVA glue. Useful for initial adhesion and safety for kids.
- Fine sand or baking soda (optional). For adding a grainy base texture. Substitute-friendly.
- Small mixing cups and stir sticks. Disposable works well for convenience.
- Soft brushes (small paint brushes). For delicate placement and smoothing.
- Tweezers or toothpicks. For precise dots and tiny placement.
- Disposable gloves and a mask if using resin. Safety first when working with epoxy.
- Small tray or parchment paper for drying. Keeps surfaces safe and tidy.
If you like colorful, slow projects, try the baking soda rainbow crystal forest for a different palette and texture study baking soda rainbow crystal forest.
STEP-BY-STEP DIRECTIONS

- Clean and dry each shell slowly and with care.
Rinse shells to remove grit, then pat them dry and let them air on a tray until cool and fully dry. - Mix a small batch of epoxy or resin in a cup.
Stir gently, watching for streaks and avoiding air bubbles; the resin should feel smooth and warm as it mixes. - Tint the resin with a small pinch of turquoise mica powder.
Stir until the color looks soft and even; add more pigment in tiny amounts to keep the shade gentle. - Apply a thin layer of glue where you want crystals to grow.
Use a soft brush to paint glue into the shell’s curves; this base keeps the crystal mix in place and feels smooth under the brush. - Brush a thin layer of tinted resin over the glued areas.
Work slowly and in small sections; the resin will level out and create a shallow pool that catches light. - Sprinkle fine glitter, microbeads, or sand into the wet resin.
Use a light hand and tweezers for placement; you will feel the tiny grains settle as they meet the resin. - Let the piece sit in a dust-free place until tacky, then repeat.
Each layer deepens color and texture; breathing slowly between layers helps you notice subtle shifts. - Finish with a clear topcoat of resin when you like the texture.
This seals the surface, gives a soft sheen, and keeps the crystals in place; cure according to product instructions. - After full cure, gently clean edges and display.
Trim any stray beads with tweezers and wipe the shell with a soft cloth; the cured resin will feel glassy and cool. - If you want a sensory edge, glue a small loop to the back for hanging.
A soft ribbon or leather cord makes the shell ready for a mobile, ornament, or gentle wall cluster.
If you enjoy making heart-shaped crystal forms, you might try a small baking soda crystal heart project after your shells dry to explore a different way crystals bloom in layers baking soda crystal heart growth.
Where This DIY Fits Into a Calm Routine

These shells make lovely pauses in a slow day. Place them on a bedside table so the morning light plays through their tiny facets. Keep one in a small bowl near a reading chair and touch it between pages to bring your attention back to the present.
You can use the making time as a gentle ritual. Start a kettle, set a small timer, and spend a warm ten minutes mixing color or brushing a single layer. The ritual can anchor your day without demanding long blocks of time.
Group a few finished shells on a tray with a small candle and a favorite pebble. They create a cozy, reflective corner that feels intentional and soft. The shells also make personal gifts that carry the maker’s calm attention.
Making This DIY Last
Store finished shells in a shallow box lined with soft tissue or cotton. Keep them away from direct sunlight to avoid pigment fading. If you used resin, they will be quite durable, but avoid heavy knocks or drops.
If a shell collects dust, wipe it gently with a soft cloth rather than rinsing. For heavier residue, use a slightly damp cloth and dry immediately. Keep any glue or resin instructions and safety data if you think you will revisit the form or mix the materials again.
To reuse or rework a piece, you can sand a cured resin surface lightly with very fine sandpaper and add another thin coat of tinted resin. Work slowly and in a well-ventilated space for best results.
Gentle Tips & Variations
- Invite texture slowly: try one layer of sand then a dusting of glass beads. Each addition changes how the light moves across the shell.
- Mix color in small amounts: a little mica does a lot; you can create subtle gradations by layering thinner tones.
- Make a mini series: create shells in a range of turquoise shades and display them like ocean tiles. Small changes feel meaningful.
- Switch adhesives for safety: use white PVA glue for projects with children and reserve resin for adult-only sessions with proper ventilation.
- Add a mindful pause between steps: count five slow breaths before each layer to keep your pace calm.
These ideas are invitations. Let one or two feel right; the project stays cozy when you keep it simple.
What I’ve Learned While Making This
I find that the clearest moment of joy comes when a tiny crystal cluster first catches the light. That first sparkle feels like a small reward for quiet focus. Over the years I learned to trust slow layers rather than rush to cover everything at once.
Resin rewards patience. Thin, even coats reduce bubbles and give a natural glassy finish. Mica and pigments mix predictably, so test small amounts before tinting a whole batch. When you slow your motions and watch, small surprises appear tiny beads nestling in a corner, a thread of gold glitter like a sunray.
I also learned to prepare my space. A clean tray, dedicated brushes, and a comfortable chair keep the making gentle. When I tidy between steps, I feel less pressure and more pleasure.
FAQs About Turquoise Crystal Seashells
Is this project safe for beginners?
Yes. Choose glue and pigment for a very beginner-friendly start. If you use resin, follow safety directions, wear gloves, and work in fresh air. Start small and practice on one shell.
Can I use real sea shells collected from the beach?
You can, as long as they are clean and allowed to be collected where you live. Wash shells gently, let them dry fully, and avoid specimens that are fragile or protected.
How long does each piece take to finish?
Active making often takes 30 to 90 minutes spread across sessions. Drying and curing add more time, so plan for a few hours to a few days depending on materials.
Will the color fade over time?
Pigments can fade with long exposure to bright sunlight. Keep finished shells in soft light or shaded displays to preserve the turquoise glow.
Can children join in?
Yes, with supervision and material choices that fit their age. Use PVA glue and mica powders rather than resin for child-friendly sessions, and make the steps short and tactile.
A Quiet Closing Thought
When you make a Turquoise Crystal Seashell, you give yourself permission to be slow. You invite small sensations smooth shells, soft brushes, tiny sparkles into a single, calming activity. The shells become little pockets of remembered stillness. Sit with one after it finishes, feel its weight, and let that gentle quiet travel through your hands and into your day.
Conclusion
If you want more visual inspiration, I often look at curated shells and sea glass arrangements like the delicate patterns in this teal and turquoise seashell art that echoes the same soft palette teal and turquoise seashell art. For supplies and inspiration for ocean-themed jewelry or tiny beads to include in your shells, the SUNNYCLUE ocean jewelry making kit offers a good starter selection for color and texture experiments SUNNYCLUE 1 Box 284Pcs ocean kit.