

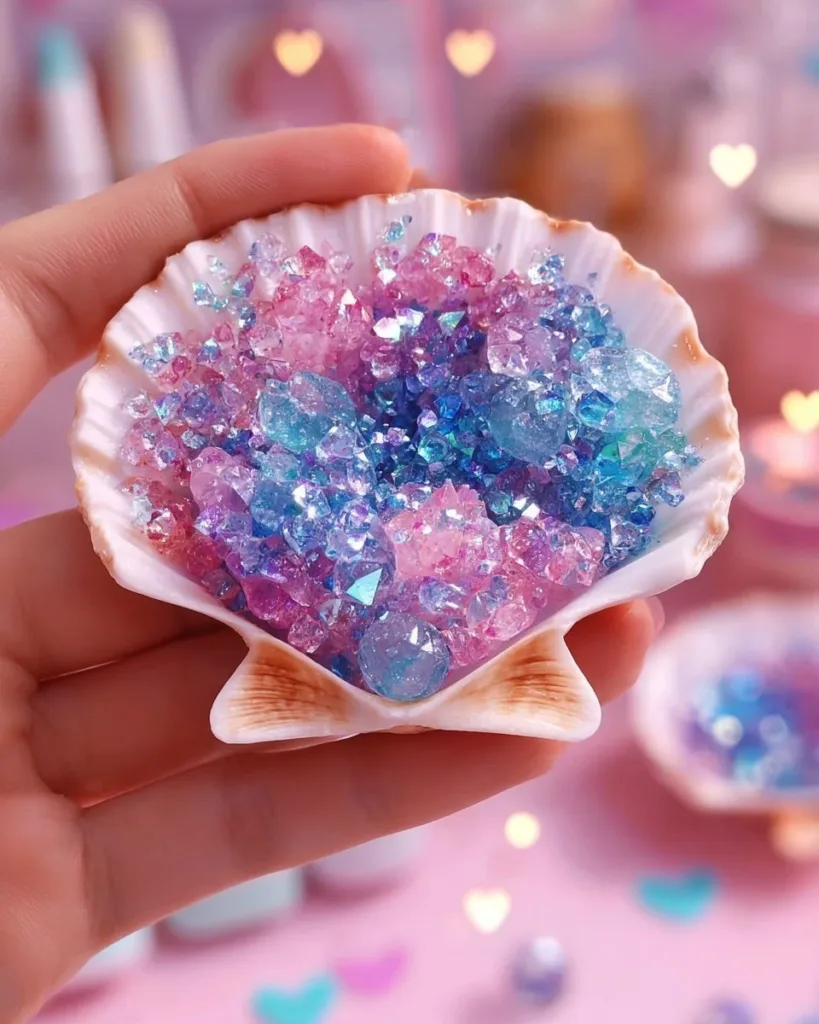
The late afternoon sun slips through a window and warms the small tray of shells on my work table. I press a thumb to a cool, ridged shell and feel the smooth rise where the tiny crystals have begun to bloom. Making Seashell Crystal Art invites that slow attention, the gentle clink of shells, and the quiet breath between stirring and waiting. If you want to see a finished piece for inspiration, have a look at our Seashell Crystal Art project page to meet other warm, textured finished pieces.
The Quiet Joy of Making Seashell Crystal Art

This project gives you a soft invitation to slow down. Seashell Crystal Art personalizes small memories with tactile beauty. The process asks you to notice tiny changes: how a clear solution clouds when it cools, how a crystal starts as a pinprick and becomes a glittering ridge. That attention becomes its own comfort.
Working this way helps you feel grounded. You move slowly and deliberately. You sense temperature, texture, and weight. You listen to quiet household sounds while a solution breathes off water and leaves mineral lace. For many makers, that gentle rhythm feels like a little meditation. It reorients attention to a small, manageable task and rewards patience with something visible and lasting.
The materials keep the mood calm. Seashells carry the sea’s memory in their curves. Crystals add light and quiet sparkle without loud color. The finished pieces catch morning light on a windowsill or sit in a bowl by a lamp, inviting hands to revisit them. Many people use them as small keepsakes or as part of a mindful corner where they sit, breathe, and feel connected to making again.
A Gentle Look at the Process
This craft moves in soft stages. First you prepare the shells and the solution, then you place the shells where they will meet evaporation and crystal formation. You check in slowly and small changes reveal themselves. The world of crystal growth follows a simple rhythm: dissolve, cool, and allow the mineral to find form.
You will notice sound and feel as you work. A faint hiss when you pour hot water, the light weight of a shell in your palm, the quiet clatter when shells touch in a tray. You will observe how the solution beads on a shell or runs in a pale stream. Those moments matter. They teach you the pace that helps good crystals grow.
If you enjoy other gentle crystal experiments, our note on the baking soda crystal growth technique shows a related way to watch structure form slowly and beautifully.
Materials You’ll Need
- Seashells – clean and dry, various sizes, easy to find at craft shops or collected thoughtfully
- Alum powder or Epsom salt – alum yields sparkly, faceted crystals; Epsom salt makes softer, feathery forms (choose one)
- Hot water – to dissolve the mineral fully
- Clear glass or ceramic container for mixing – heat-safe, nonreactive
- Shallow tray or drying rack – for the shells to sit while crystals grow
- Small spoon or stir stick – wooden or heatproof plastic
- Tweezers or gloved fingers – optional for handling delicate shells
- White glue or diluted PVA – optional, to fix seed crystals or add texture
- Food coloring or liquid watercolor – optional, sparing use for gentle tint
- Fine brush or dropper – for placing solution or color precisely
- Paper towels and a small towel – for gentle cleanup and drying
- A thermometer (optional) – if you want to notice how temperature affects growth
- Protective gloves and safety glasses – recommended when handling hot solutions for safety
Each item supports the calm nature of the project. Alum and Epsom salt dissolve in hot water and then form crystals as that water cools and evaporates. A shallow tray gives the shells space and airflow so growth stays steady. The extras like glue or color remain optional invites to gentle customization.
Step-by-Step Directions
- Gather and clean your shells in warm water and a gentle brush; rinse away sand and let them dry until they feel room temperature and slightly cool.
- Prepare a tidy workspace with a tray lined with paper towels and a place to set cooling glass bowls; soft cloth under the bowl helps steady it.
- Measure a generous amount of alum or Epsom salt into the mixing container and pour in just enough very hot water to dissolve it, stirring slowly until the solution looks clear.
- If you want a hint of color, add one drop of liquid watercolor or food coloring and mix gently; remember, less color often reads as more peaceful.
- Hold a shell between fingers or with tweezers and dip the inside or the areas you want to crystalize into the warm solution, letting a thin coat cling to the surface.
- For more textured results, touch a fine brush into diluted glue and paint thin lines on the shell first; the glue gives crystals a place to cling and can create delicate ridges.
- Place the treated shells on the tray or drying rack where they will not touch each other and where air can move freely around them.
- Leave the shells undisturbed in a warm, dry spot; check them after a few hours and then once or twice a day, noticing small crystalline points take hold and grow larger.
- If you see run-off or too much pooling, blot edges gently with a paper towel and reposition the shell so evaporation happens evenly.
- When you reach the texture and coverage you like, let the shells dry fully for 24 hours, then brush away any loose crystals or residue with a soft brush.
- If you want stronger attachment, seal the shells with a very thin layer of clear matte varnish applied with a soft brush; this keeps delicately formed crystals in place without making the surface glossy.
- Sit quietly with the finished pieces for a while. Pick one up and feel the cool ridges, then decide how you want to display or gift them.
Each step encourages slow movement, small adjustments, and plenty of looking. The careful pauses let you enjoy the quiet evolving patterns rather than rush for the finish.
Using Seashell Crystal Art in Everyday Life

Display these pieces where light can catch their facets and where they will not face heavy handling. A simple ceramic bowl on a side table or a wooden tray near a window works beautifully. They also sit well beside a small stack of notebooks, anchoring a writing nook with a tactile reminder to breathe and be present.
You can place one shell on a bedside table to catch the first morning light. A small cluster makes a calm centerpiece for a meditation altar or a tea corner. If you enjoy seasonal touches, swap them into a glass cloche or arrange them in a low bowl with driftwood and dried grasses.
Make gifts from a single, carefully finished shell. Wrap it in tissue and tuck it into a small box with a handwritten note about the making. The receiver holds the story of your slow attention as well as the physical piece.
If you want a playful idea, thread a shell with a tiny loop of wire and hang it in an indoor plant. The movement and shadow it casts add a living, gentle presence to the plant’s calm air.
For a step-by-step on combining crystal textures with paper hearts or layered pieces, take a look at our layered crystal heart tutorial for inspiration on mixing forms.
How to Store or Reuse Seashell Crystal Art
Store finished shells in a dry, stable environment away from direct humidity and heavy sunlight. Humidity can soften or dissolve delicate crystals over time, and intense sun can fade any added color. Use a shallow box lined with acid-free tissue or cotton to protect ridges and points.

If you want to reuse a shell for another experiment, soak it in warm water to dissolve the crystals gently. Pat it dry and let it air dry completely before you try a new treatment. You can remove crystals and start again with a different mineral or a new color to learn how each ingredient changes the texture.
For longer preservation, consider placing shells inside a small display case or a lidless jar with silica gel packets nearby. The gel helps keep moisture low without sealing the object completely, which preserves surface texture.
When gifting or transporting, cushion each shell individually. A small zip bag with a soft tissue wrap prevents shifting and breakage. Treat each piece like a tiny sculpture that prefers calm handling and gentle placement.
If you are curious about combining crystal work with other keepsake crafts, our simple crystal heart craft offers ideas for merging small objects into cohesive displays and storage-friendly shapes.
Gentle Tips & Variations
- Try different minerals casually – Use alum for pointy, gem-like crystals and Epsom salt for more delicate, feathery textures. Each material changes how light plays across the shell.
- Paint before you grow – A thin wash of white glue mixed with a tiny bit of pigment makes the color sit beneath crystals for a soft, layered look.
- Seed slowly – For larger crystals, place a tiny dry crystal or grain on the shell before dipping. It gives the growth a starting point and often yields more defined shapes.
- Use temperature to pace growth – Warmer rooms speed evaporation and growth. Cooler rooms make structure take longer and often finer. Choose what pace feels better to you.
- Make a little ritual of checking – Open a tea, put on a favorite quiet playlist, and sit for five to ten minutes to observe. The act of checking becomes part of the calm practice.
These variations invite playful curiosity. Treat them like suggestions rather than rules. The project wants your touch and your sense of what feels right.
FAQs About Seashell Crystal Art
Is this safe to do with children nearby?
Yes, with supervision and simple precautions. Use gloves if you handle very hot water and keep powders away from curious mouths. Choose Epsom salt if you want a softer chemical profile and keep stirring and heating steps to an adult.
How long will the crystals take to grow?
You will see tiny crystals in a few hours. Substantial, visible growth often appears over 24 to 72 hours. Patience rewards you; slow, steady evaporation tends to create the most elegant forms.
Can I use real seawater to grow crystals?
Seawater contains salts but also organic matter that can cloud solutions and slow clean crystal growth. If you like the sea connection, you can rinse shells in seawater and then use a fresh mineral solution for the crystal process.
Will the crystals fall off if I handle the shell often?
Delicate crystals can shed with frequent handling. If you plan to touch them often, seal lightly with a clear matte varnish to keep them in place. For keepsakes meant to be handled, consider making a duplicate that stays sealed.
What affects the color of the crystals?
The mineral itself usually appears white or clear. Dyes tint the solution and can color crystals subtly. Use tiny amounts of dye for a soft shade and test on a spare shell first.
A Gentle Note Before You Go
Making Seashell Crystal Art asks you to notice the small, luminous things that form when water and mineral meet. The work teaches patience and rewards slow watching. It gives your hands a quiet task and your home a little piece that holds light in its ridges.
Enjoy the tactile time. Let the process unfold at a comfortable pace and choose materials that feel safe and familiar. If you keep one small ritual from this project, let it be the simple act of pausing to observe.
Conclusion
If you enjoy decorative seashell forms with artful glass-like finishes, this elegant Murano glass art vessel blends seashell patterning into a beautiful object for a calm, reflective space.
For thoughtful keepsake options that combine seashell motifs with a more formal vessel, consider the Seashell Crystal Art cremation urn as an example of how seashell imagery translates into lasting memory objects.
PrintSeashell Crystal Art

A gentle craft project that invites you to create beautiful, crystalline designs on seashells using alum or Epsom salt.
- Prep Time: 15 minutes
- Cook Time: 60 minutes (crystal growth time varies)
- Total Time: 75 minutes (plus drying time)
- Yield: Approximately 5 shells with crystals
- Category: Craft
- Method: Crafting
Ingredients
- Seashells – clean and dry, various sizes
- Alum powder or Epsom salt
- Hot water
- Clear glass or ceramic container for mixing
- Shallow tray or drying rack
- Small spoon or stir stick
- Tweezers or gloved fingers (optional)
- White glue or diluted PVA (optional)
- Food coloring or liquid watercolor (optional)
- Fine brush or dropper (optional)
- Paper towels and a small towel
- A thermometer (optional)
- Protective gloves and safety glasses
Instructions
- Gather and clean your shells in warm water and a gentle brush; let them dry.
- Prepare a tidy workspace with a tray and soft cloth.
- Measure alum or Epsom salt into the mixing container and add hot water, stirring until clear.
- If desired, add a drop of food coloring or watercolor and mix gently.
- Dip the shell into the warm solution, allowing a thin coat to cling.
- For textured results, paint thin lines with diluted glue before dipping.
- Place treated shells on the tray where they won’t touch each other.
- Leave the shells in a warm, dry spot, checking them daily as crystals form.
- If too much pooling occurs, blot with a paper towel.
- Let shells dry fully for 24 hours, then brush away any loose crystals.
- Seal with clear matte varnish for stronger attachment if desired.
- Enjoy your finished pieces and find a special place to showcase them.
Notes
This project encourages slow movement and observational skills. Consider different minerals for varied textures.