

A slow shower of light catches the sugar grains as I pour them into warm water, each tiny crystal floating like a promise. The idea for this Rainbow Sugar Crystal Eruption comes from that hush of waiting, watching a glossy solution cool and the first glint of color as dye threads through it. My hands remember the warmth of the pan, the soft hiss as the sugar dissolved, and the quiet thrill of the first crystal forming on the string. That small, steady moment can open an hour of calm making.
Why Rainbow Sugar Crystal Eruption Feels Comforting to Create

This project invites you to slow down in a way that feels gentle and sensory. Watching sugar transform from a soft, grainy pile into sharp, glittering crystals gives you time to notice small things. You feel the warmth of the pot, you hear the thin fizz as the solution settles, and you watch color bloom slowly through clear liquid.
Creating a rainbow of crystals asks for small, mindful acts. You stir in color drop by drop. You tie a string and smooth its knot with your thumb. Each deliberate movement keeps attention anchored in the present. I like to sit by a window when I set my jars, so the afternoon light makes the crystals look like tiny stained glass.
If you want an alternative pace, I keep a recipe nearby when I want to speed things up and still feel grounded. The steps there help me make deliberate changes without losing the calm that this craft brings. For another gentle take on this idea, I sometimes compare notes with the method in growing rainbow sugar crystal recipes when I need a refresher on timing and patience. growing rainbow sugar crystal recipe
How This DIY Comes Together
This is a soft rhythm of heat, color, and waiting. You dissolve lots of sugar into warm water until it can hold no more. As the mixture cools, sugar leaves the liquid and gathers on surfaces that offer tiny anchors. That gathering becomes crystals.
The movement in this craft is gentle. You pour, you stir, you wait. The solution sings quietly when it cools, a change you notice more by sight than sound. I sometimes hum a short tune while I work. It keeps my hands relaxed and my attention kind.
If you try a faster method, a rapid-growing approach can show you how temperature and saturation speed the process. I have used that occasionally when I want a quicker result and still want to keep the same calm focus. rapid growing method
Materials You’ll Need
- Granulated sugar (plain white sugar works best; easy to find)
- Clean glass jars or heatproof containers, one per color
- Water
- Food coloring or liquid watercolors, several colors for the rainbow
- Wooden skewers, pencils, or popsicle sticks
- Cotton string or thin kitchen twine
- Clothespins or clips to suspend strings
- Small paper clips or a metal washer to weigh the string
- A small saucepan for heating the solution
- Measuring cups and a spoon for stirring
- A tray or towel to protect your work surface
- Safety items: oven mitts or a kitchen towel for handling hot things
Notes on substitutes and finding things: You can use small mason jars or recycled jam jars. If you prefer less bright color, use less dye at each step. If you want more texture, try thicker twine. For ideas that combine related materials, I sometimes look at guides for baking soda crystal projects to see how different bases change texture. baking soda rainbow crystal forest supplies
Step-by-Step Directions
Prepare your workspace and jars.
Put a tray or towel down to catch drips.
Set jars apart and label them with colors if you like.Tie a string to a skewer or pencil.
Leave the string long enough to hang into the jar without touching the sides.
Attach a small paper clip to the end to weigh it down gently.Warm water in the saucepan.
Use low to medium heat and feel the gentle rise of steam.
Do not leave the pan unattended and keep children at a safe distance.Add sugar gradually and stir slowly.
Add sugar one small handful at a time until it dissolves.
Continue until the solution looks glossy and almost syrupy.Test for saturation gently.
Drop a little syrup onto a cold plate and let it sit.
If it begins to crystalize quickly, it is ready.Divide the hot solution into jars.
Pour carefully so you do not splash.
Work slowly; the smooth pour calms the hands.Add food coloring to each jar.
Drop in a few drops until the color pleases you.
Stir very slowly to swirl the color without capturing air.Suspend the strings into each jar.
Clip the skewer across the jar mouth so the string hangs centered.
Make sure the string does not touch the jar sides.Move the jars to a quiet place to cool.
A shelf or windowsill works well and lets light catch the crystals.
Cover loosely with a paper towel to keep dust away.Watch and wait with small rituals.
Check once or twice a day to see the crystals form.
If a crust forms on top, gently break it to let more growth continue.Lift and dry your crystal strings.
When they look full and sparkly, lift the string slowly.
Let them dry on a tray for a few hours to harden into crystal ropes.Arrange and enjoy your rainbow eruption.
Cluster colors together or let them hang separately.
Take a slow moment to notice texture and light.
Enjoying the Finished Piece


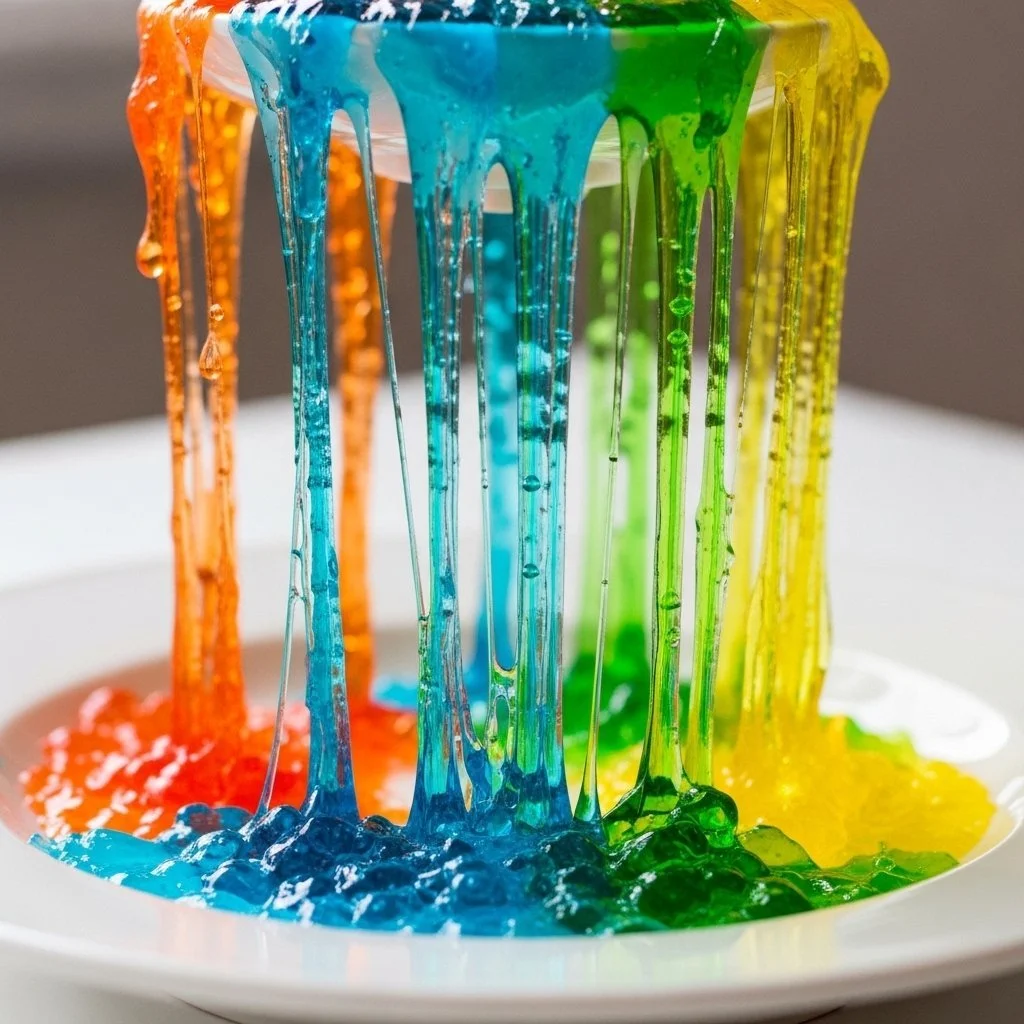
When the crystals finish, they look like tiny sculptures made of glass and sugar. They catch light like little gems. I like to hang a string near a lamp for a soft sparkle in the evening. You can also drape several strings together to create a luminous mini curtain.
Touch reveals a sharp, glassy texture that gives a satisfying contrast to the soft cotton of the string. If you used thicker twine, you will feel a rough, hearty crust where crystals cradled the fibers. If you want to keep them as a temporary display, set them in a shallow bowl where sunlight can pass through the colors.
I often place a small tray with one or two finished pieces on a bedside table. Looking at them before sleep helps me settle into a quiet state. The careful, tactile work that led to these crystals becomes part of the way I gather myself.
Making This DIY Last
Sugar crystals like their quiet conditions. To keep them crisp, store them in a dry, cool place away from humidity and direct sunlight. A clean, dry box or a shallow wooden crate lined with tissue keeps them safe.
If you would like to reuse parts of the project, consider the following. The glass jars clean easily with hot water and a little washing up liquid. Rinse and soak to remove any syrupy residue and they are ready for another project. The wooden skewers or clips dry quickly and return to service.
Do not try to eat the crystals after they have been sitting out for a long time, especially if you used non-food-safe dyes or handled them a lot. This craft feels most honest when you treat the finished pieces as objects of beauty and touch, not as snacks.
What I’ve Learned While Making This
Making this project several times taught me the value of small adjustments. Stirring too fast traps air and can make crystals smaller. Pouring the solution too cool gives tiny crystals that look like frost. Gentle heat and steady motion encourage larger, clearer crystals.
I learned to enjoy the pauses. Leaving a jar undisturbed produces cleaner, larger formations. I also learned that color behaves differently depending on concentration. Bright dye in a less saturated solution sometimes creates a soft watercolor effect, while rich dye in a very saturated syrup yields deep, jewel tones.
Invite variations as experiments. Try different string materials, or arrange two colors in one jar by pouring carefully so they meet but do not mix immediately. These little experiments give you quiet discoveries and keep the work feeling alive.
For more recipe ideas that play with the same sense of wonder, I sometimes revisit a baking soda rainbow crystal forest recipe to see how changes in base materials create different textures and rhythms. baking soda rainbow crystal forest recipe
Gentle Tips & Variations
- Invite texture: Try a thin wooden dowel wrapped with a bit of yarn for crystals to cling to. The yarn catches crystals in a soft way and gives a different tactile finish.
- Soften the glow: Use pastel food colors and weaker solutions to make delicate, frosted crystals instead of bold, sharp gems.
- Make a tiered display: Grow crystals on multiple strings then hang them at different heights for a small, slow-moving mobile.
- Add scent thoughtfully: A drop of vanilla or citrus essential oil near, but not in, the jar can make the workspace smell comforting. Do not add oils to the solution as they may interfere with crystal formation.
- Practice safety: Let hot pans cool on their own and use mitts. If you craft with children, supervise closely and make pouring your step while they help with gentle stirring or color choices.
Frame each suggestion as an invitation. Try one at a time and notice how the rhythm of making changes. Each small change offers a new kind of calm.
FAQs About Rainbow Sugar Crystal Eruption
Q: Will the crystals dissolve if they touch water?
A: Yes. Sugar crystals dissolve in water. If you live in a humid place, they can become sticky over time. Keep finished pieces dry and away from steam, like near a kettle.
Q: Can I eat these crystals?
A: Technically they are sugar, but because you often handle them with fingers and use dyes, I do not recommend eating them after display. If you plan to make edible versions, use food-safe dye and keep hygiene in mind from the start.
Q: How long does it take for crystals to grow?
A: You usually see growth in 24 to 48 hours. Larger, clearer crystals can take several days. The process rewards patience. I find checking once a day keeps the ritual calm.
Q: Why did my crystals stay small and fuzzy?
A: Fast cooling or too much stirring can create many tiny nuclei instead of a few larger crystals. Try a steadier heat and less movement. Also ensure your solution was fully saturated when you poured it.
Q: Can I reuse the sugar solution?
A: Once it cools and forms crystals, it loses the same clarity and saturation. You can gently reheat and add more sugar to reach saturation again, but I often start fresh for the cleanest results.
Final Reflections on Making Rainbow Sugar Crystal Eruption
This project gives you time to notice small changes. It asks for calm hands and patient watching. Each bowl of solution becomes a quiet experiment in light and color. The finished crystals feel like captured moments of attention, small rewards for doing nothing hurried and everything careful.
Return to this craft whenever you need a slow, sensory practice. Let the making be your small ritual: a warm pot, a steady stir, a jar settled by the window. Keep the mood soft and the expectations gentle. The joy comes in the waiting, and the colors arrive like a quiet surprise.
Conclusion
If you want a companion resource for different approaches to sugar crystal science, I find the guide Grow Dazzling Sugar Crystals: A Sweet Science Experiment for Kids helpful for clear background and child-friendly experiments. For an alternative craft perspective and inspiration for creating eruptive, colorful displays, this piece Rainbow Sugar Eruption – The Buzzy B offers lively ideas and visuals.
May your next jar catch the light in a new way, and may the making bring a small, steady calm to your day.
PrintRainbow Sugar Crystal Eruption

A gentle, sensory project to create beautiful sugar crystals in various colors, perfect for a calming experience.
- Prep Time: 10 minutes
- Cook Time: 15 minutes
- Total Time: 24 hours
- Yield: Several beautiful crystal strings
- Category: Dessert
- Method: Crafting
- Cuisine: American
- Diet: Vegetarian
Ingredients
- 2 cups Granulated sugar
- 1 cup Water
- Food coloring or liquid watercolors (several colors)
- Cotton string or thin kitchen twine
- Wooden skewers, pencils, or popsicle sticks
- Clothespins or clips to suspend strings
- Small paper clips or a metal washer to weigh the string
- A small saucepan for heating the solution
- Measuring cups and a spoon for stirring
- A tray or towel to protect your work surface
- Safety items: oven mitts or a kitchen towel
Instructions
- Prepare your workspace and jars.
- Tie a string to a skewer or pencil, making sure it hangs into the jar without touching the sides.
- Warm water in the saucepan over low to medium heat.
- Add sugar gradually, stirring slowly until dissolved.
- Test for saturation by dropping syrup onto a cold plate.
- Divide the hot solution into jars carefully.
- Add food coloring to each jar and stir gently.
- Suspend the strings into each jar using clips.
- Move the jars to a cool place to let them crystallize.
- Watch and wait, checking daily for crystal formation.
- Lift and dry the crystal strings once they are full and sparkly.
- Arrange your rainbow eruption for display.
Notes
Store crystals in a dry, cool place away from humidity. For reusable jars, clean with hot water and soap.