

Creating a Rain Cloud in a Jar invites a gentle sense of wonder into your space. As you watch the soft, swirling colors descend into the clear water, you can almost hear the quiet patter of raindrops against a window on a cozy day. This little experiment brings warmth, tranquility, and a moment of peace. Each droplet seems to carry a whisper of nature, allowing you to connect with your feelings and find calm amidst the busyness of life.
The Heart Behind This DIY

Engaging with a Rain Cloud in a Jar brings a unique sense of comfort and joy to the creative process. This DIY project transcends mere craft; it acts as a meditative experience that helps ground our thoughts. The beauty lies not only in the final display, but also in the gentle rhythms of creation.
As you gather your materials, consider how each item contributes to the experience. The smooth glass of the jar, the texture of cotton balls, and the vibrant colors of the water combine to create a sensory masterpiece. This project invites you to slow down, to focus on the textures, sounds, and movements, encouraging a sense of presence in the moment.
Through the simple act of creating a rain cloud, you allow yourself the gift of mindfulness. The calming swirl of colors can evoke feelings of nostalgia and warmth. When you have a moment to watch the colors blend and rise, you can find stillness in the chaos of everyday life. This is a moment just for you, a soft reminder to take a breath and be present.
A Gentle Look at the Process

Creating a Rain Cloud in a Jar provides a gentle flow that mimics the serene nature of rain itself. The process begins with gathering materials, each holding potential for the next steps. As you pour colored water into the jar, you witness how the colors dance and mingle, bringing forth a sense of wonder.
When you take the time to layer the cotton and colored water, you can feel the soft texture beneath your fingers, inviting a tactile experience that soothes the mind. Each action comes together in a slow rhythm, allowing you to connect deeply with the creation. The sounds of water shifting, the quiet splash when colors meet, and the anticipation of what the final piece will look like all contribute to a fulfilling crafting moment.
Materials You’ll Need
Gathering your materials for the Rain Cloud in a Jar sets the stage for your creative journey. Here’s a simple list of what you will need:
- A clear glass jar (easy to find, any size will do)
- Cotton balls or cotton fluff (soft and cozy)
- Food coloring (vibrant colors, choose your favorites)
- Water (room temperature works well)
- A small cup or container for mixing (helps in pouring)
- A spoon (gentle mixing tool)
Feel free to explore substitutions. If you don’t have food coloring, you could experiment with natural dyes or even fruit juices for softer hues. The key is to create a comfortable atmosphere that allows for expression and calm.
Step-by-Step Directions

- Start by filling your clear glass jar with room-temperature water, leaving a bit of space at the top.
- In a separate small cup, mix a few drops of food coloring with some water, creating your vibrant rain color.
- Carefully pour the colored water into your jar, aiming for the center so it gently sinks below the surface.
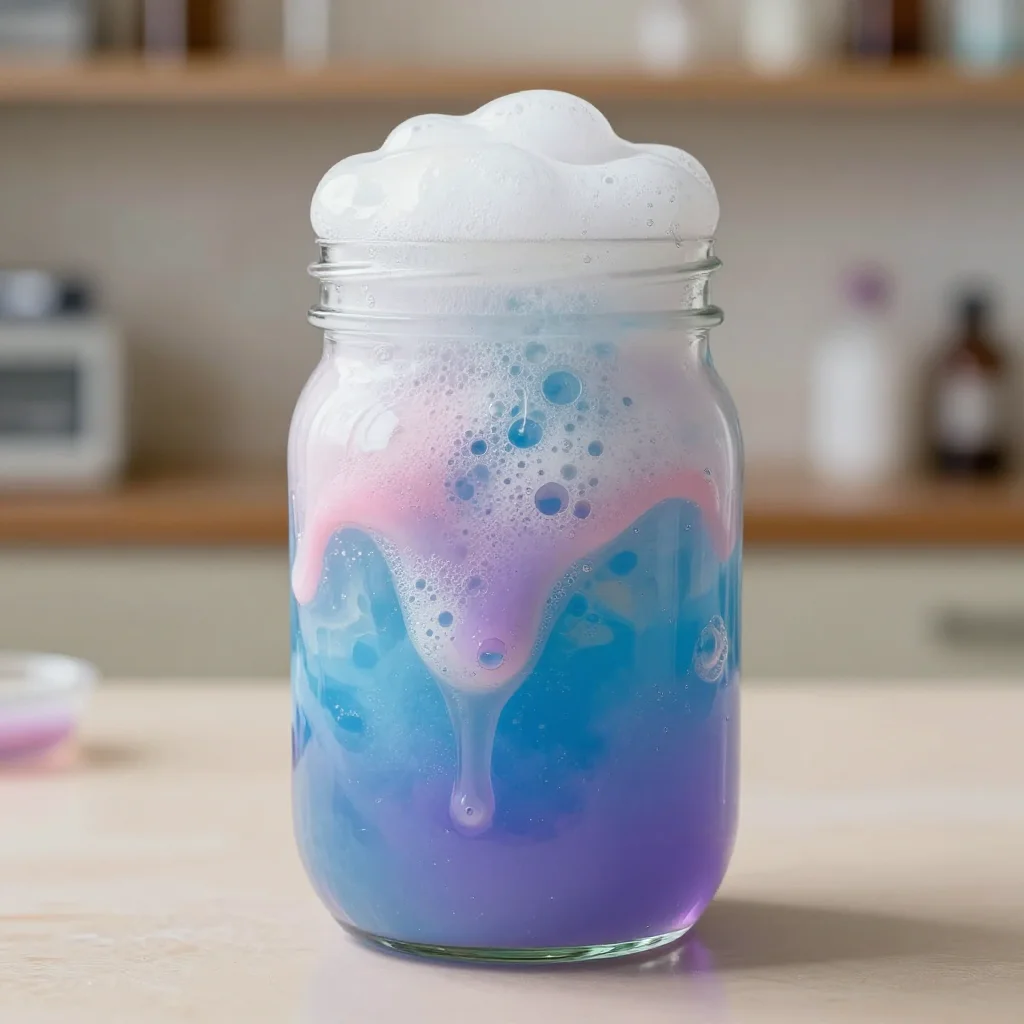
- Take your cotton balls and fluff them gently, then place them on top of the water, allowing them to float. This symbolizes the cloud resting above the rain.
- Slowly add more colored water, letting it flow over the cotton balls. Watch how the colors disperse and swirl gently.
- Observe the effects as the colors dance and mix. You might want to engage with the sensory experience here, noticing how the colors blend, creating a soothing view.
Each step provides an opportunity to breathe deeply and enjoy the creation process. Allow yourself to be drawn into the moment, taking pleasure in the tactile experience of the cotton and the visual play of colors.
Enjoying the Finished Piece
As you complete your Rain Cloud in a Jar, it transforms into more than just a project; it becomes a tranquil addition to your space. Display it on a windowsill or a bedside table where sunlight can catch the colors, illuminating the jar beautifully.
The jar can serve as a daily reminder to pause. Whenever you’re feeling overwhelmed, take a moment to gaze at the colors and the way they shift. The gentle motion can invite calmness and reflection, providing an opportunity to breathe deeply and recenter.
You might even decide to integrate this piece into a cozy corner where you can sit with a warm drink, letting the soothing visuals of your rain cloud accompany you in moments of quietness or contemplation. It could even become a part of a ritual, where you spend a few minutes each day to simply observe its beauty and tranquility.
Making This DIY Last
To keep your Rain Cloud in a Jar looking fresh, consider a few caring practices. Store the jar in a place where it will not be exposed to direct sunlight for extended periods, as this can fade the colors over time.
If you notice that the water level decreases, feel free to top it off with fresh room temperature water. If the colors fade, you can create anew, bringing more vibrance to the experience. Enjoy the opportunity to refresh the jar over time, treating it as a living piece of art that evolves with you.
Gentle Tips & Variations
As you delve into crafting your Rain Cloud in a Jar, consider a few gentle ideas for personalization.
- Experiment with different colors. Mixing colors brings its own charm and a sense of playfulness. You may find combinations that evoke specific feelings or memories for you.
- Add glitter to the water for a touch of sparkle. This can enhance the visual display and make the whole experience even more enchanting.
- Try using different sizes of jars. A larger jar provides more space for creativity, while smaller jars can create a delightful series to display together.
Feel free to approach these suggestions as playful invitations rather than strict rules. The process itself is meant to be enjoyable and reflective of your personal style.
FAQs About Rain Cloud in a Jar
What happens if I mix too many colors?
Mixing many colors might create unexpected shades. It can be a fun surprise, but just be mindful of how they blend. Sometimes, using fewer colors can create a more vibrant effect.
How can I use this project in a classroom setting?
This project serves as a wonderful teaching tool for understanding weather patterns, and it can be a calm, engaging activity for students. You can discuss the science of clouds and rain as they create.
Can I use this without food coloring?
Absolutely! Natural alternatives like watered-down fruit juices can work well, though they may offer muted tones. This allows for a lovely exploration of hues and their origins.
Conclusion
Creating your Rain Cloud in a Jar is not just about the finished piece but the mindfulness and reflection that accompany each step. Take your time to enjoy the soothing textures and colors, knowing that there’s no rush.
For a deeper dive into variations of this craft, consider exploring this delightful science experiment or learn more about the concept with these engaging ideas. Both are sure to inspire further creativity and calmness in your crafting journey. Let your hands guide you as you find joy in the simple act of creating.
PrintRain Cloud in a Jar

Create a calming Rain Cloud in a Jar using simple materials, perfect for mindfulness and relaxation.
- Prep Time: 10 minutes
- Cook Time: 0 minutes
- Total Time: 10 minutes
- Yield: 1 jar
- Category: DIY Craft
- Method: Crafting
- Cuisine: N/A
- Diet: N/A
Ingredients
- A clear glass jar
- Cotton balls or cotton fluff
- Food coloring
- Water
- A small cup for mixing
- A spoon
Instructions
- Start by filling your clear glass jar with room-temperature water, leaving a bit of space at the top.
- In a separate small cup, mix a few drops of food coloring with some water to create your vibrant rain color.
- Carefully pour the colored water into your jar, aiming for the center so it gently sinks below the surface.
- Take your cotton balls and fluff them gently, then place them on top of the water, allowing them to float.
- Slowly add more colored water, letting it flow over the cotton balls.
- Observe the effects as the colors dance and mix.
Notes
Feel free to explore color variations or add glitter for extra sparkle. Consider using natural dyes if food coloring is not available.