

There’s something magical about dipping your hands into colors swirling across a surface, watching them dance gracefully atop water. The world quiets as the vibrant hues intermingle, create patterns, and bring forth the serene act of ornament water marbling. Each ripple evokes a soft whisper of creativity, a moment where time seems to pause. This gentle process invites you to be fully present, allowing you to engage all your senses and reflect on the beauty of simplicity.
The Heart Behind This DIY

Ornament water marbling fosters a calming atmosphere, allowing you to transition into a space of intention. As you prepare your materials, you may notice the smoothness of the water and how the colors spread and blend, creating a visual melody. This act of creation provides a delightful escape, offering both a break from the busy world and an opportunity to focus on the present moment.
The very nature of marbling stimulates the senses. You’ll feel the coolness of the water against your fingers, hear the gentle splashes as colors mingle, and see the unique formations that arise with each delicate movement. The experience encourages a sense of mindfulness, reminding us how creativity can ground and soothe us. Whether you share these ornaments or keep them for yourself, the process becomes a source of calming joy and reflection.
A Gentle Look at the Process

As you embark on the journey of ornament water marbling, envision the flow of colors gracefully twirling across the surface. Each step feels like a dance, with soft movements creating a rhythmic experience. Gather your materials, and let the gentle sounds of water guide your hands. The anticipation builds as you prepare to immerse yourself in a world where every swirl reveals new surprises.
You will blend pigments with water, dipping your ornaments into the vibrant surface and lifting them back out to reveal unique creations. The process is tactile and visual, allowing your creativity to take flight. With each ornament you create, you embrace the natural unpredictability of water marbling, reminding yourself that perfection lies in the experience rather than the outcome.
Materials You’ll Need
- Clear glass or plastic ornaments (easy to find online or at craft stores)
- Acrylic paint or nail polish (both work beautifully for this project)
- A shallow dish or tray filled with water (this creates the marbling surface)
- A stick or toothpick (to swirl colors)
- Gloves (to keep your hands clean and secure)
- Paper towels (for drying the ornaments)
- A protective surface for your workspace (to catch any spills)
Feel free to substitute materials based on availability, but keep in mind that acrylic paint and nail polish each offer their unique qualities for marbling.
Step-by-Step Directions

-
Prepare your workspace by laying down a protective covering to catch any splashes. Surround yourself with a calming atmosphere.
-
Fill your shallow dish or tray with water, just below the rim. The water should be deep enough to submerge the ornaments without overflowing.
-
Choose your paint or nail polish colors. Drop small blobs of your chosen color onto the water’s surface. They will float and spread, creating a kaleidoscope.
-
Use your stick or toothpick to gently swirl the paint, creating exciting patterns. The colors can be soft and delicate or bold and vibrant; let your creativity guide you.
-
Carefully dip your ornament into the water at a slight angle. Allow the surface to embrace it, capturing the colors as they cling around the shape.
-
Lift the ornament out slowly and watch in awe as the unique design finds its home. Place it on a paper towel, and let it dry completely before handling it further.
-
Repeat the process with different colors and patterns, or create a set of ornaments to cherish together. Continue until you have enough to showcase your creativity.
-
Once dry, consider sealing your ornaments with a clear spray for added protection, particularly if using acrylic paint.
Enjoying the Finished Piece
Each ornament tells a story of the colors and patterns chosen. They can adorn your holiday tree, become whimsical gifts, or simply add a pop of color to a cozy corner of your home. Their presence invokes memories of the peaceful moments spent creating, and each time you glance at them, savor the calm feelings they bring forth.
Hang them by a window to catch the light, casting gentle shadows and bright colors around your space. The reflections offer a beautiful reminder of the soothing experience you embraced while making them. Adventurous creativity can teach us to appreciate imperfections, and these ornaments embody that spirit.
Making This DIY Last
While the joy of creation fills the air, the care of your finished ornaments is essential. If you used acrylic paint, store them in a cool, dry place away from direct sunlight to maintain their vibrancy. Keep them safe from bumps and accidents by wrapping them in soft cloths or using small containers.
If you wish to reuse them, consider gently soaking them in warm soapy water to remove the paint and start anew. This gives you the chance to create different designs each year, making the experience a lovely tradition.
Gentle Tips & Variations
-
Invite family or friends to join in the making. Share color choices and techniques to create a community of creativity.
-
Experiment with different color combinations. For a serene palette, choose pastels; for high energy, select bold, vibrant hues.
-
If working with children, supervise their handling of glue or hot-drying elements, but let them explore the artistic expression freely.
-
Consider adding glitter to your color choices for a sparkling effect when the ornaments catch the light.
-
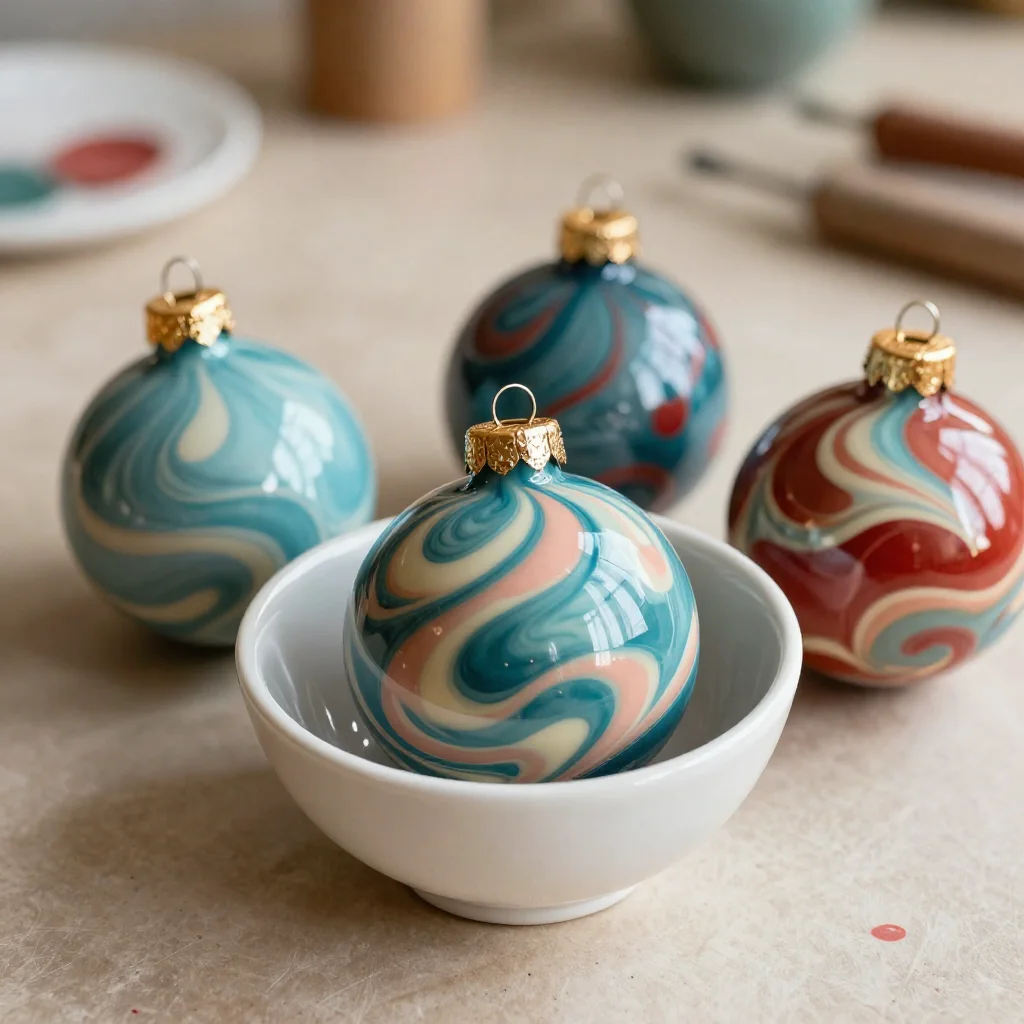
Display your ornaments in a bowl when not in use. This keeps them safe while adding beauty to your space, making a sensory display of creativity.
FAQs About Ornament Water Marbling
What types of paint work best for marbling?
Acrylic paint and nail polish are both excellent options for marbling. They offer fluidity and vibrant colors. Just remember that nail polish may have a stronger smell.
Can I use other materials for marbling?
Yes, you can experiment with several mediums. Just ensure they float and create the desired marbling effect. Using materials like gel inks or food coloring can also yield beautiful results.
What if my colors don’t swirl as I hoped?
Every marbling experience is unique. If colors don’t swirl well, try adjusting the amount of paint or changing the order you add colors. Embrace the unexpected results as part of the creative process.
A Gentle Note Before You Go
Creating ornament water marbling invites a calming presence into our lives. Each step in the process can become a mindful meditative moment, encouraging us to slow down and savor creativity. As you hang each ornament, remember the joy and relaxation found in its making. This DIY offers a chance to connect with your creativity, allowing it to flourish in your home and heart.
For more inspiration and ideas, you might enjoy exploring other DIY projects such as baking soda colorful cloud ornaments and baking soda galaxy ornaments. Each project shares a sense of discovery and delight, encouraging your cozy creativity to grow.
Conclusion
As you explore the gentle art of ornament water marbling, let the experience bring you a moment of peace in your day. Each ornament stands not just as a decoration but as a reminder of the time spent creating with intention. The simple joys of crafting can enrich our lives and spaces, intertwining beauty and mindfulness. To deepen your understanding of this art, you may find inspiration from different sources. The fascinating techniques in Nail Polish Marbled Christmas Ornaments and the thoughtful insights in Marbling Plastic Ornaments can elevate your journey into ornament marbling, nurturing your creativity further. Embrace this path of calm crafting as it brings your unique touches into the world.
PrintOrnament Water Marbling

A calming DIY project that combines creativity and mindfulness through the colorful art of water marbling on ornaments.
- Prep Time: 10 minutes
- Cook Time: 0 minutes
- Total Time: 10 minutes
- Yield: Varies
- Category: Craft
- Method: DIY
Ingredients
- Clear glass or plastic ornaments
- Acrylic paint or nail polish
- A shallow dish or tray filled with water
- A stick or toothpick
- Gloves
- Paper towels
- A protective surface for your workspace
Instructions
- Prepare your workspace by laying down a protective covering to catch any splashes.
- Fill your shallow dish or tray with water, just below the rim.
- Choose your paint or nail polish colors and drop small blobs onto the water’s surface.
- Use your stick or toothpick to gently swirl the paint, creating patterns.
- Carefully dip your ornament into the water at a slight angle.
- Lift the ornament out slowly and place it on a paper towel to dry.
- Repeat the process with different colors and patterns.
- Once dry, consider sealing your ornaments with clear spray for added protection.
Notes
Invite friends to join in the making and explore various color combinations. Consider adding glitter for a sparkling effect.