

The sun filters softly through the window, casting a warm glow on a cozy workspace filled with colors and textures. You feel the gentle pull of creativity as you consider making marbled bouncy balls, a delightful project that engages your hands and calms your mind. This DIY not only offers the joy of creation but also the sensory satisfaction of squishy textures and vibrant colors blending into playful forms. You may also find Diy Bouncy Balls Turn Into Joy useful.
Why Make This Marbled Bouncy Balls
Creating marbled bouncy balls holds a special charm. The process invites you to slow down, focus on the materials, and lose yourself in the art of making. Each step is an opportunity to engage your senses as you squeeze and mold, watching colors swirl together. This DIY project encourages mindfulness and presence, making it an ideal activity for both children and adults alike. The tactile experience of blending different colors adds a comforting rhythm that can be deeply soothing amidst a busy day. If you’re seeking a calming craft, making these bouncy balls is an excellent choice. You can explore more ideas on how crafting can bring tranquility in calm bouncy balls.

A Gentle Look at the Process
As you start this DIY, each movement becomes an intentional part of the experience. You’ll feel the smoothness of the materials, hear the gentle squish as you work, and delight in the visual rhythm of colors melding together. This engaging process starts with simple steps and unfolds into something unexpectedly delightful. Embrace the journey as a chance to savor the moment, cherishing the sensory details that make crafting so rewarding. You may also find Diy Calm Color Bouncy Balls useful.
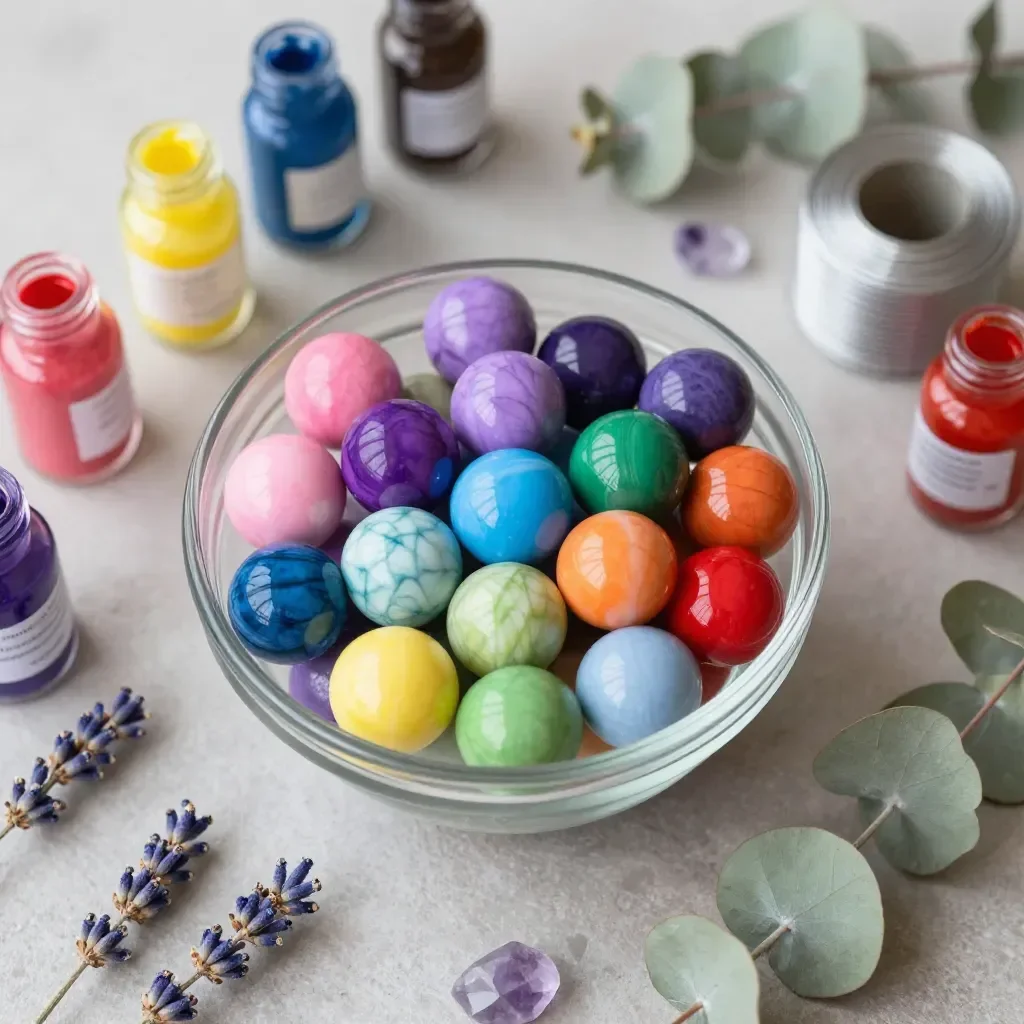
Materials You’ll Need
For this delightful project, gather the following materials:
- Liquid school glue
- Baking soda
- Contact lens solution (with boric acid)
- Food coloring (multiple colors for marbling)
- Small mixing bowl
- Spoon for stirring
- Measuring cups
- A surface protector (like wax paper or parchment)
These items are typically easy to find, making this DIY accessible and enjoyable. If you wish to explore new textures, consider adding glitter for an added sensory surprise.
Step-by-Step Directions
- Start by measuring out 1/2 cup of liquid school glue into your mixing bowl. The smoothness is inviting, and the smell may remind you of childhood craft days.
- Next, add 1 tablespoon of baking soda to the glue. Stir gently until the mixture is well combined. The texture will become slightly thicker but still smooth.
- Now, it’s time to incorporate color. Add a few drops of your chosen food coloring to the mixture. You can experiment with different combinations to see how they blend. Stir slowly to create a marbled effect without fully mixing the colors.
- To activate your mixture, add 1 to 2 tablespoons of contact lens solution. You’ll notice the ingredients begin to react and form a gel-like consistency. Continue stirring until it thickens and becomes less sticky.
- Once your mixture has reached the right consistency, knead it gently with your hands for a minute. This part is delightful as you feel the transformation from a gooey mixture to a smooth, pliable ball.
- Roll the mixture into balls of your desired size. Each ball should feel soft and slightly bouncy, perfect for playing or simply enjoying in your hands.
- Allow your marbled bouncy balls to sit for at least 30 minutes to firm up. During this time, notice how the colors develop and change as they dry.

Enjoying the Finished Piece
After you’ve completed your marbled bouncy balls, there are many ways to enjoy them. You might want to take these delightful creations outdoors, feeling the sun’s warmth as you bounce them on the grass. Alternatively, you can designate a cozy corner in your home for display, showcasing the vibrant colors and unique patterns you created. They can serve as soothing stress relief during a busy day or act as a playful decoration in any space. These bouncy balls can truly become a part of your calm routine, integrating well with activities that promote mindfulness.
Keeping It for Later
To ensure your marbled bouncy balls last, store them in a cool, dry place. You might consider using a small container or a resealable plastic bag to keep them protected from dust and moisture. If you notice they start to lose their bounce over time, simply reshape them by hand, bringing back their delightful form.
Gentle Tips & Variations
- Consider varying the colors for a unique pattern every time. You can even create themed balls based on seasons or holidays.
- If you want to add texture, mix in soft craft foam pieces before rolling the mixture into balls.
- Bring your friends or family into this crafting experience. Sharing the joy of making can deepen connections and create cherished memories.
- Lastly, if you want to further explore sensory projects, I suggest checking out the ways bouncy balls can create calm.

FAQs About Marbled Bouncy Balls
Q: How long do the marbled bouncy balls last?
A: When stored properly, these bouncy balls can last several weeks.
Q: Can I use other types of glue?
A: It’s best to use school glue to ensure the right texture and bounce, but you may experiment with other nontoxic glues.
Q: What if my balls are too sticky?
A: If the mixture is too sticky, add a little more baking soda or contact lens solution until it reaches the desired consistency.
Q: Are these balls safe for younger children?
A: They’re mostly safe as long as kids are supervised. Ensure no children put them in their mouths.
Conclusion
In the spirit of mindful creation, making marbled bouncy balls not only brings joy but also fosters a sense of tranquility. This tactile craft can be a comforting anchor in your day. If you are looking for more tools to assist in your sensory play, you might find interesting kits available on platforms like Amazon and various bouncing balls at SmileMakers. Take your time exploring the world of DIY crafts and find joy in every moment spent creating.
PrintMarbled Bouncy Balls

A delightful DIY project for creating colorful marbled bouncy balls that engage the senses and promote mindfulness.
- Prep Time: 10 minutes
- Cook Time: 30 minutes
- Total Time: 40 minutes
- Yield: 4-6 bouncy balls
- Category: Craft
- Method: DIY Crafting
- Cuisine: N/A
- Diet: N/A
Ingredients
- 1/2 cup liquid school glue
- 1 tablespoon baking soda
- 1 to 2 tablespoons contact lens solution (with boric acid)
- Food coloring (multiple colors for marbling)
- Small mixing bowl
- Spoon for stirring
- Measuring cups
- A surface protector (like wax paper or parchment)
Instructions
- Measure out 1/2 cup of liquid school glue into your mixing bowl.
- Add 1 tablespoon of baking soda to the glue and stir gently until well combined.
- Add a few drops of food coloring to the mixture, stirring slowly to create a marbled effect.
- Incorporate 1 to 2 tablespoons of contact lens solution to activate the mixture.
- Knead the mixture gently with your hands for about a minute until it turns smooth and pliable.
- Roll the mixture into balls of your desired size.
- Allow the balls to sit for at least 30 minutes to firm up.
Notes
Consider adding glitter for an extra sensory surprise. Store your bouncy balls in a cool, dry place to keep them lasting longer.