

A warm pool of light rests on my worktable as I hold a small, faceted crystal between my fingers. The glass feels cool and smooth. Tiny rainbows spread across the surface when I tilt it, and I breathe a little slower. Making Rainbow Crystals invites that slow breath, the kind that comes when light and texture meet and the hands find a quiet rhythm. I first learned a few simple methods on my own table and later refined them into a practice that feels safe and soothing. If you want to explore other gentle crystal projects, visit the Rainbow Crystals project page for more ideas and soft inspiration.
Why Rainbow Crystals Feels Comforting to Create

Creating Rainbow Crystals asks you to be present with small things. The process unfolds slowly. You watch solution become structure. You listen to the gentle fizz of a stir, the quiet clink of glass, the soft plink when a crystal releases free from a string.
The work connects sight, touch, and sound. You notice how the solution clears as crystals form. You feel the weight of an arm as you steady a jar. You see color refract across a window ledge. These sensory cues anchor the mind. They help you return, again and again, to the simple act of making.
I remember the first batch I grew at dusk. The kitchen smelled faintly of citrus from a candle. I checked the jar and found tiny points of color had gathered where I had lowered the string. I felt a small, steady calm. That moment taught me that the value of Rainbow Crystals lives in both the slow watching and the deliberate hands-on steps.
This craft also fits into cozy routines. Tuck a jar into an evening ritual, pair the project with a cup of warm tea, or let the growing act as a short, mindful break. If you like exploring similar sensory crafts, you may enjoy the baking soda approach I sometimes use in the baking soda rainbow crystal forest when I want a softer, earthier texture.
How This DIY Comes Together
The process moves in gentle cycles: dissolve, cool, wait, and watch. You start in motion with stirring and measuring. Then you pause and let the mixture rest. The waiting phase asks for patience. You check quietly, without rushing.
You will notice textures shift. A clear solution gains tiny sparkles. Beads will feel crusted as crystals coat them. Light will change how each piece looks. At first, surfaces look matte. Over time, they become translucent and bright. That slow reveal gives you small moments of satisfaction.
When I make Rainbow Crystals, I speak to the materials as I work. The act of naming a step helps me feel grounded. I also place the jar where late light can find it. Watching the crystals catch sunlight becomes part of the practice. For a different sensory twist, try pairing this with a few drops from a fragrant recipe from my DIY aromatic gems post to scent the space while you wait.
Materials You’ll Need
- Clear glass jar or heatproof container, medium size (easy to find)
- Clean glass beads or small metal shapes for crystal growth (substitute-friendly: stones or pipe cleaners)
- String or thin fishing line (holds weight, optional waxed thread)
- Wooden skewer or pencil to suspend the string (simple and effective)
- Hot water, nearly boiling (handle with care)
- Borax, alum, or Epsom salt depending on the method you choose (each gives different crystal shapes)
- Food coloring or small drops of liquid watercolor for gentle color (optional)
- Measuring cup and spoon (measuring keeps results consistent)
- Small funnel (optional, helps pour without spilling)
- Tongs or heat-resistant gloves for safety (comfort and safety)
- A tray or towel to catch spills (calm workspace helps focus)
- Paper and pen to note proportions and times (a light record makes repetition easier)
Notes: Borax grows classic faceted crystals that catch light well. Alum tends to form clearer, glass-like crystals. Epsom salt produces more feathery or needle-like structures. If you want softer textures or a non-chemical route, try the baking soda method mentioned earlier.
Step-by-Step Directions
- Prepare your workspace. Lay a towel on the table and set the jar on the towel. Keep gloves and tongs nearby for handling hot containers.
- Measure hot water into the jar. Pour slowly. Notice the warmth and the steam; breathe with it. Use caution when working with near-boiling water.
- Add the crystal-forming substance by spoonfuls. Stir slowly and steadily until the powder dissolves. The solution should look clear and smooth.
- If you want color, add a drop or two of food coloring now. Stir gently until the color blends. Watch the color spread like a small sunrise in the jar.
- Tie a bead or shape to the end of the string. Leave a short tail at the knot so the bead hangs free without touching the jar sides.
- Suspend the bead in the solution using a pencil or skewer balanced on the jar rim. Make sure the bead hangs at least an inch above the bottom so crystals can grow all around it.
- Cover the jar loosely with a paper towel or cloth. This keeps dust out while allowing air to move. Place the jar in a quiet, undisturbed spot.
- Wait and watch. Check once every few hours at first, then once a day. You will see crystals form where the solution cools and evaporates.
- When crystals reach the size you like, slowly lift the bead from the jar using tongs. Let excess solution drip back into the jar.
- Place the finished piece on a soft towel to dry. Let it rest until the crystals harden and feel cool and matte to the touch.
Safety note: Always handle hot water carefully. Keep children supervised and use heat-resistant tools. I keep a small pitcher of cool water nearby in case I need to rinse quickly.
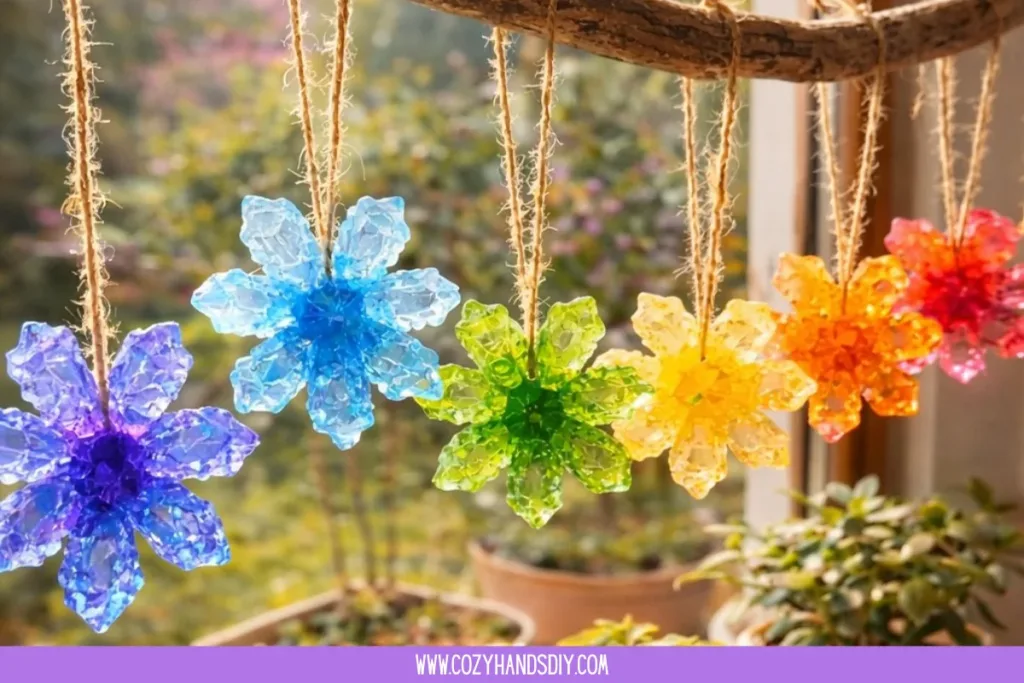
Bringing Rainbow Crystals Into Your Space

Once your Rainbow Crystals reach a look you love, you can place them where light finds them. Hang a crystal near a window and let the sun push color across a table. Set a cluster in a shadowed corner to catch small glints when you pass by.
I like to make tiny arrangements. A shallow dish with three different crystals feels like a miniature landscape. The contrast between matte textures and glossy light creates a quiet harmony. You can tuck a crystal into a bookshelf niche or float a small cluster in a shallow bowl of water to intensify the refraction.
Use them in ritual or routine. Keep one beside your journal as a tactile prompt to pause before you write. Store a few crystals near a cozy chair to remind you to sit and breathe. If you enjoy mixing crafts, consider pairing a crystal display with the soft layers of a rainbow density jar on a low shelf for a contemplative corner.
Rainbow Crystals also make thoughtful gifts. Wrap a single piece gently in tissue paper and place it in a small box. A hand-written note about the making process adds meaning. The recipient will hold not just an object but the calm that came from its creation.
How to Store or Reuse Rainbow Crystals
Store crystals in a dry, cool place away from direct sunlight if you want to preserve delicate colors. Prolonged, intense sunlight can fade some dyes. Place them in a shallow box with soft padding for longer-term keeping.
If crystals break or chip, you can repurpose fragments. Use small shards as accents in resin projects or to top homemade candles for a sparkly edge. Larger pieces can sit in a decorative bowl with sand or salt as a textured base.
If you used strong chemical salts and want to reuse beads or glass shapes, soak them in warm water until the crystals loosen. Scrub gently with a soft brush. Rinse well before using again. That gentle cleaning habit helps you reduce waste and invites a second, quieter round of making.
When storing solution left in a jar, label it and keep it out of reach of children and pets. If you plan to reuse the solution, strain it to remove particulates and store it in a sealed container in a cool area.
Gentle Tips & Variations

- Try layering colors by letting one crystal grow partially, then changing the solution color and continuing growth. The subtle bands create a soft, watercolor look.
- Use natural light to watch shifts over a day. Move a finished crystal from morning to evening light to discover new facets. This small ritual slows time in the best way.
- Swap beads for soft materials like string wrapped in yarn to get fuzzier crystal forms. The yarn fibers encourage a different, friendlier texture.
- Experiment outdoors on cool evenings in late spring. A slight temperature shift can change crystal speed and form. I sometimes set a jar on a porch table to let the night air play a role.
- Keep a small notebook with one line notes on proportions and outcomes. Over time, that gentle record becomes a map of what works for you and what you love most.
These suggestions remain invitations. Let curiosity guide you rather than rigid rules. The calm comes when you allow small failures and gentle discoveries.
FAQs About Rainbow Crystals
How long will it take for crystals to form?
Crystals can start forming within a few hours and continue developing over several days. I often check after six hours, then once a day. The pace depends on temperature, concentration, and the material you use.
Are the materials safe for children?
Many materials like Epsom salt and alum are commonly used at home but need adult supervision. Borax needs careful handling and should stay away from small children and pets. Always supervise and use gloves or tongs when working with hot solutions.
Why did my crystals look cloudy instead of clear?
Cloudiness can come from undissolved particulates, rapid cooling, or dust. Strain your solution if it contains bits. Stir until complete dissolution and let the jar sit undisturbed to grow clearer formations.
Can I make crystals in different colors?
Yes. Small amounts of food coloring or liquid watercolor will tint the crystals lightly. Stronger dye can affect crystal clarity, so add color conservatively and test on one jar first.
What if my crystals fall apart when I lift them?
Let them dry more in the jar. If they still break, try growing them a bit longer or suspending them to avoid contact with the jar bottom. A gentle, slow lift helps preserve delicate structures.
A Quiet Closing Thought
This project invites you to slow down and notice small changes. The act of watching a crystal grow teaches patience and gentle attention. Each tiny facet holds a quiet story of solution, time, and light. You do not need perfection. You need presence.
When you sit with the jar, notice how your breathing matches the work. Let your hands move slowly. If you come back tomorrow and things look different, welcome that change as part of the practice. Making Rainbow Crystals becomes less about the finished object and more about the steady, soothing rhythm of doing.
Conclusion
If you want a step-by-step science-friendly guide to grow colorful crystals at home, try the clear instructions in Grow Your Own Rainbow Crystals which pairs well with a gentle crafting mindset. For supplies or ready-made colorful crystals, browse options on Rainbow Crystals – Amazon.com and choose materials that feel right for your pace and space.
PrintRainbow Crystals

A soothing DIY project that invites mindfulness through the creation of colorful crystals in various forms.
- Prep Time: 15 minutes
- Cook Time: 30 minutes
- Total Time: 45 minutes
- Yield: 1 batch of crystals
- Category: Craft
- Method: DIY Crafting
- Cuisine: N/A
- Diet: N/A
Ingredients
- Clear glass jar or heatproof container, medium size
- Clean glass beads or small metal shapes for crystal growth
- String or thin fishing line (optional waxed thread)
- Wooden skewer or pencil to suspend the string
- Hot water, nearly boiling
- Borax, alum, or Epsom salt (depending on method)
- Food coloring or liquid watercolor (optional)
- Measuring cup and spoon
- Small funnel (optional)
- Tongs or heat-resistant gloves for safety
- A tray or towel to catch spills
- Paper and pen to note proportions and times
Instructions
- Prepare your workspace by laying a towel on the table and setting the jar on it.
- Measure hot water into the jar, pouring slowly. Be cautious with the near-boiling water.
- Add the crystal-forming substance by spoonfuls, stirring until it dissolves completely.
- If using, add a drop or two of food coloring and stir gently.
- Tie a bead or shape to the end of the string, ensuring it hangs freely.
- Suspend the bead in the solution using a pencil or skewer, ensuring it hangs above the bottom.
- Cover the jar loosely with a paper towel or cloth to keep dust out.
- Check on the crystals every few hours at first, then once daily.
- Once crystals are the desired size, carefully remove the bead and let excess solution drip back.
- Place the finished piece on a towel to dry and harden.
Notes
Borax grows classic faceted crystals, alum forms clearer crystals, and Epsom salt produces feathery structures. Consider variations and gentle tips for the best results.