

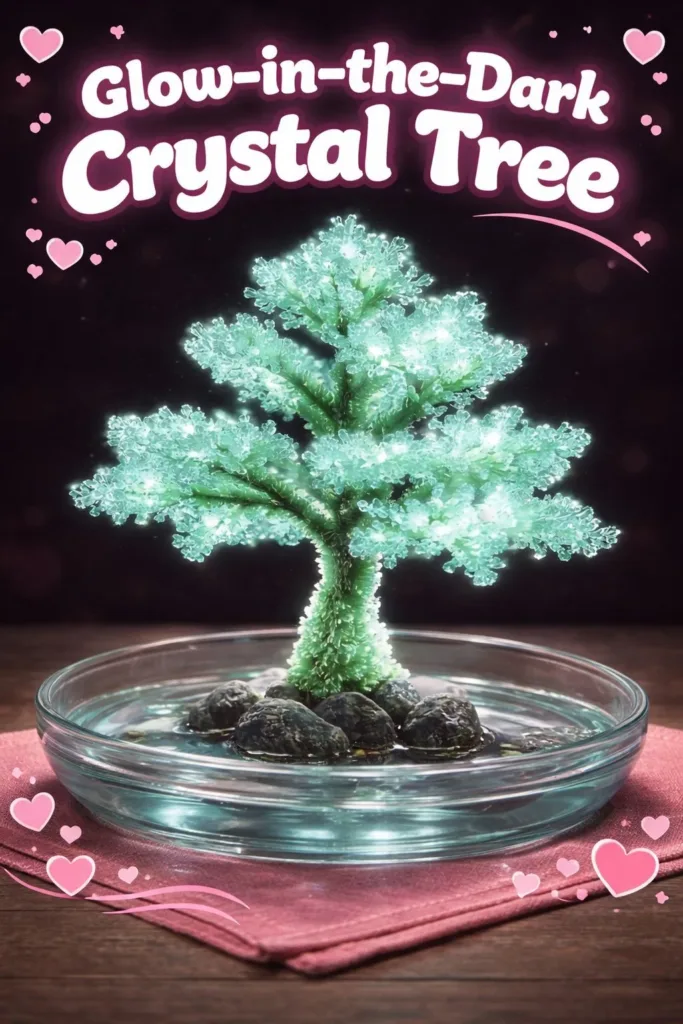
A slow evening light slips through the curtains and catches tiny crystal edges on a small tree I made at the kitchen table. The crystals glow faintly after a stretch under lamp light, and the room feels like a soft secret. I breathe in the warm, resin-scented air and run my fingers along a branch that holds a cool, glass-like bead. Making this Glow-in-the-Dark Crystal Tree often feels less like a craft and more like an act of gentle noticing.
Why Glow-in-the-Dark Crystal Tree Feels Comforting to Create

This project invites quiet attention. You measure, mix, and shape with hands that feel the weight and texture of each material. The practice of slowly forming branches, letting the crystals bloom and set, gives a steady rhythm to the work.
I find the glow part most soothing. Charging the crystals under a lamp, then lowering the lights and watching the faint luminescence offers a slow reveal. It feels like a small, private sunrise each night. Making this tree can help you step away from rushing thoughts and ground into simple, tactile tasks.
This craft also fits well into a cozy space. You can tuck it on a shelf, use it as a soft night light, or place it beside a journal. If you have enjoyed other calming crystal experiments, you might like the gentle process shown in this baking soda crystal growing tree tutorial that uses similar hands-on rhythms and slow surprises.
How This DIY Comes Together
I like to think of the process as a small performance of textures and pauses. You start with a wire armature that feels springy and cool. You wrap the base with a slow-setting paste, which brings a smooth, almost ceramic feeling. Then you coax crystals to form, watching them take shape with tiny, patient changes.
You will hear subtle sounds as you work: the soft scratch of wire against tabletop, the thud of a bead being placed, the gentle scrape when you smooth a coating. These sounds help mark time and invite a steady pace.
Visually, the tree evolves in three stages. First, the skeleton appears as a simple silhouette. Next, you add the coating that becomes the branches and trunk. Finally, the crystals bloom and catch light. Each stage offers a different quiet pleasure and a chance to slow down. If you enjoy exploring similar crystal textures and forms, the slower experiments in baking soda crystal growing trees may feel familiar and comforting.
Materials You’ll Need
- Thin craft wire (18 to 22 gauge), about 3 to 6 feet total (easy to shape)
- Small base (wood disc, stone, or jar lid) to anchor the tree (sturdy and steady)
- Air-dry clay or epoxy putty for the trunk and base (substitute-friendly)
- Clear resin or a thick PVA glue that dries clear (for crystal adhesion and gloss)
- Glow-in-the-dark pigment powder or pre-made glow beads (optional; choose a gentle strength)
- Small glass beads, quartz chips, or salt crystals to act as crystal buds (textured, reflective)
- Tweezers and round-nose pliers (precision and gentle shaping)
- Small paintbrush for glue and pigment work (soft-bristled)
- Sandpaper (fine grit) for smoothing base and trunk (use gently)
- A small tray or silicone mat to contain drips (easy to clean)
- Disposable mixing cups and stirring sticks for resin or glue (safety and neatness)
- Protective gloves and well-ventilated space if you use resin (safety is calm-making)
- A desk lamp or sunlight for charging glow pigment (soft, warm light works well)
A note on materials: I often choose glass beads for their cool, smooth touch and the way they catch lamp light. Glow pigment comes in different strengths; start with a small amount to keep the glow soft and natural.
Step-by-Step Directions

- Gather your workspace and materials. Lay a soft cloth or silicone mat; the texture pleasant and steady. Put on gloves if you use resin and open a window for fresh air.
- Form the wire armature. Bunch several wires together, twist at one end for a trunk, and separate the top into branches. Feel the wire bend and spring as you shape it.
- Secure the trunk to the base. Press the twisted end into clay or epoxy putty on the base and smooth around it. Let this set until firm beneath your fingers.
- Build branch texture with clay or putty. Apply small ropes of clay along each branch, smoothing with your fingertips so the surface feels natural and slightly textured.
- Prepare your adhesive or resin. Mix carefully and slowly, scraping sides for a thorough blend. The mixture should feel smooth on the stick before you use it.
- Add glow pigment to a small portion of resin if using. Mix until the color distributes evenly, then set aside a clear portion for contrast. Watch the pigment settle and the mixture thicken.
- Apply adhesive where you want crystals. Use a toothpick or small brush to dab tiny amounts along branch tips and nodes. Keep your touch light and calm.
- Place beads or crystals with tweezers. Pick up each bead and set it into the adhesive. Pause between placements to adjust spacing and enjoy the tactile rhythm.
- Coat with a thin gloss layer once beads set. Use clear resin or glue to seal and add depth. Brush slowly for a smooth finish and avoid air bubbles by stroking in one direction.
- Charge the glow parts under lamp light. Leave the piece in soft light for 15 to 60 minutes depending on pigment strength. Then dim the room and watch the gentle glow emerge.
- Let everything cure fully. Allow at least 24 hours for resin or glue to harden. Use this waiting time to tidy your space and savor the small ritual of letting something rest.
- Do a final check and smooth edges if needed. Use fine sandpaper to very lightly buff any rough areas, and wipe with a soft cloth to remove dust.
Bringing Glow-in-the-Dark Crystal Tree Into Your Space

Place your finished tree where it meets soft light and quiet. A bedside table, a reading nook, or a small shelf near a lamp feels most at home. The glow reads as a gentle presence rather than a bright light, so it blends well in calm routines.
I often set mine near a stack of notebooks and a candle on slow afternoons. The tree offers a soft visual anchor during journaling or tea time. In the evening it can become a small night companion, glowing quietly as you move through a bedtime ritual.
If you make several, consider grouping them for a tiny horizon of soft light. Different sizes create a miniature landscape that invites the eye to wander slowly. You can also float one in a shadowbox or glass cloche to capture and gently dim its glow for a quieter effect.
Keeping It for Later
Treat this tree like a small, delicate object. Keep it out of direct sun for long stretches to protect any pigments, and avoid placing it where curious hands might tug at the beads.
To store, wrap the piece in soft tissue and place it in a shallow box with a layer of padding. Humidity can affect some adhesives, so keep it in a dry place. If you need to move it, lift from the base rather than the branches to preserve your careful shaping.
If a bead loosens, reattach it with a small dab of clear glue. For resin surfaces that dull over time, a tiny, well-ventilated polish with a soft cloth and a drop of clear resin can restore shine. Always allow touch-ups to cure fully before handling.
Calm Customization Ideas
- Invite color in small ways. Add a hint of pastel pigment to a few crystals for a subtle, cozy palette. Think of soft lavender or warm peach rather than bright tones.
- Use natural materials. Swap glass beads for small quartz chips, sea glass, or tiny shells for a more organic texture. The irregular shapes feel tactile and quiet.
- Try a miniature scene. Glue a tiny paper bird, a moth charm, or a small felt mushroom at the base to give the tree a hidden friend. These small details create a story that rewards slow looking.
- Make a nightlight version. Use a low-power LED under the base to gently charge the glow pigment from beneath. Keep wiring neat and secure, and always prioritize safety when adding electricity.
- Experiment with scale. Create a few tiny saplings and one larger focal tree. The contrast between sizes offers a comforting sense of depth and thoughtfulness.
I offer these ideas as invitations. Each change shifts the sensory feel a little, and the best choices are the ones that calm you as you make them.
What I’ve Learned While Making This
I learned that patience shapes the final piece as much as technique. When I rush the adhesive or try to place beads too quickly, the look loses its quietness. Slow hands let the resin settle smooth, and steady breaths help steady my fingers.
I also discovered the value of small failures. A branch that bent oddly taught me to leave space between beads so light could pass through. A color that glowed too bright reminded me to dilute pigment for softness. These gentle lessons feel like tuning an instrument rather than correcting a mistake.
Safety matters in small ways. I always work in a well-ventilated area with gloves when I use resin. I keep a small first-aid kit nearby for minor scrapes, and I label storage containers so I do not confuse materials. These routines help me stay calm and confident.
FAQs About Glow-in-the-Dark Crystal Tree
Will the glow last all night?
Most glow pigments fade slowly over hours. They give a soft glow for a while and then gently dim. If you want longer glow time, choose a stronger pigment or charge the piece under a brighter light for longer. Remember, a soft fade often feels more restful than a harsh light.
Can I use real crystals instead of beads?
Yes. Real crystals like quartz chips work beautifully and add weight and texture. They may change the balance of the branches, so secure them well and adjust spacing to let light pass between pieces.
Is resin safe to use at home?
Resin can be safe with care. Work in a ventilated area, wear gloves, and follow the product instructions. If you prefer lower-fume options, a clear PVA glue or slower-setting epoxy can be gentler. Choose the material that helps you feel calm and safe.
How do I clean dust from the finished tree?
Use a soft, dry brush or a microfiber cloth to gently remove dust. Avoid water on glow pigments if possible. If needed, very lightly dampen a cloth and pat the surface, then let it air dry completely.
Can children help make this?
Children can join in parts of the process, such as choosing beads or shaping non-toxic clay. Keep resin and strong adhesives for adult hands, and supervise closely when small parts are involved.
A Gentle Note Before You Go
Finishing a Glow-in-the-Dark Crystal Tree feels like giving yourself a small, steady gift. The making process slows the mind, and the finished piece offers quiet light and texture in your space. Each tree carries the memory of your hands and the hush of the time you spent making it.
If you like, leave a small note about your piece what you felt while making it, a color you loved, or a moment you noticed. Tuck that note under the base or in the storage box. These tiny records make the object feel more personal and more treasured.
Conclusion
If you would like to see a handcrafted version that blends a crystal tree motif with glow beads, this SOYUZU Orange Dream Catcher With Crystal Tree Of Life & Glow Beads showcases a decorative approach you might find inspiring for color and form.
For a different scale and handcrafted style, consider exploring this Glow In Dark Crystal Tree – 10 Inches, Handmade Nigeria as a reference for how glow materials behave in larger pieces.
Thank you for spending this quiet making moment here. I hope the process brings you a steady breath, warm textures under your fingers, and a faint, comforting glow at the end of the day.