

The late afternoon light slipped through the kitchen window, warm and honeyed, and I cupped a small warmed tray in my hands. The sheet of newly formed bioplastic lay cool and slightly tacky, its pressed leaf leaving a soft green shadow on the surface. Making DIY Bioplastic Suncatchers feels like holding a quiet conversation with light and texture, one slow fold at a time.
I often return to this simple craft when I want to slow down. If you feel like starting with color first, try this colorful recipe for bioplastic suncatchers to warm up your hands and imagination.
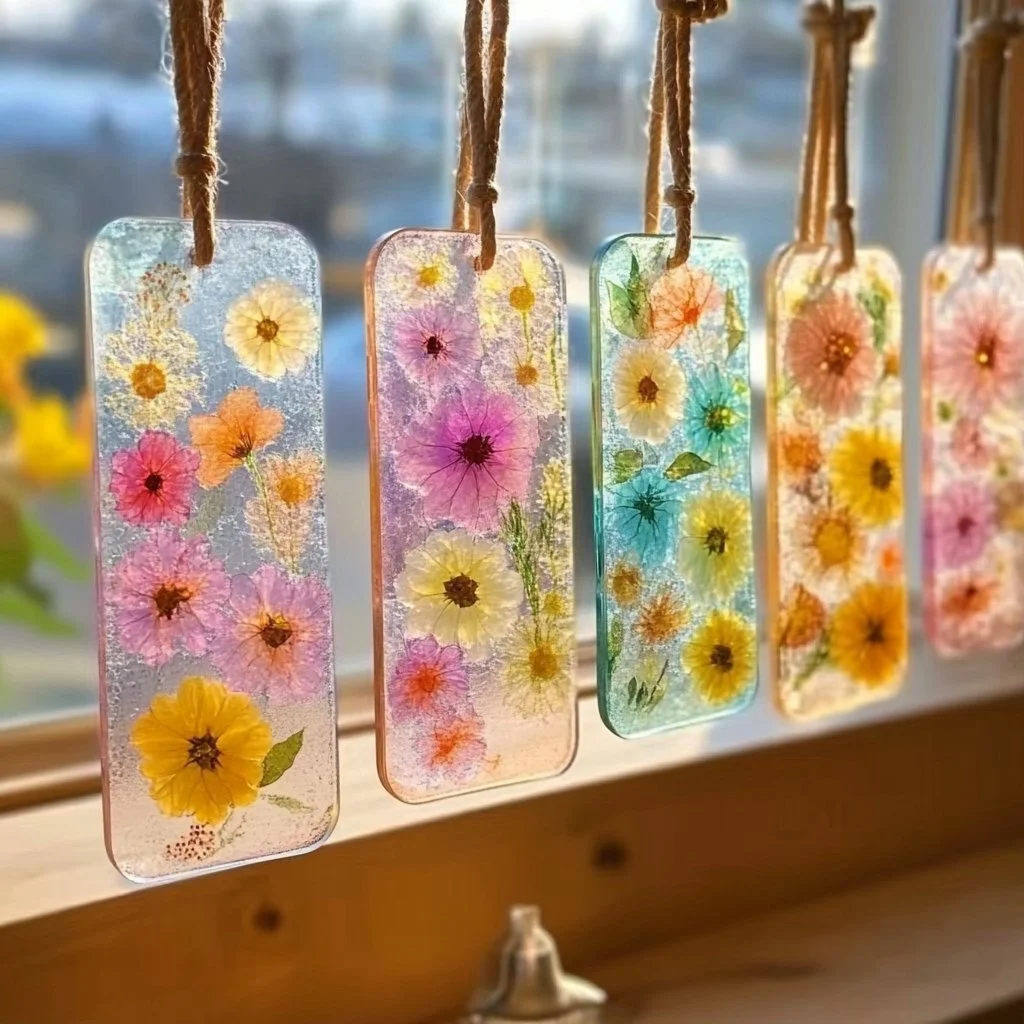
The Quiet Joy of Making DIY Bioplastic Suncatchers

There is something very calming about watching a thin, clear sheet take shape from a small pot on the stove. The process asks you to notice heat, smell, and movement. You stir slowly, you strain carefully, and you press leaves or petals with deliberate, gentle hands.
When the sun touches the finished piece, colors deepen and tiny textures sing. The visual reward feels earned because the work calls for patience, small careful motions, and a little curiosity. This craft helps you focus on one thing at a time. It asks you to be present with soft noises: the quiet tick of a timer, the faint hiss of a pan, the whisper of paper under a leaf.
If you like exploring other variations, I sometimes compare shapes and color ideas from an earlier collection that inspired my own experiments; you might find those notes helpful as you decide how bold or subtle to go with your next piece. See more on simple shapes and botanicals in this collection of ideas at simple botanical suncatcher variations.
A Gentle Look at the Process
The flow of this craft moves from liquid to film. You mix ingredients, warm them until they unify, then pour or spread to form a thin layer. As it cools, it becomes a flexible sheet you can cut, pierce, and hang.
You will feel the change in texture. The mixture goes from silky to thick to soft set. You will listen for small cues: the mixture losing its cloudiness, the moment steam eases, the cool whisper as the sheet comes off the tray. Each step has a rhythm. The making invites slow repetition and quiet attention.
Before you begin, find a small clear space where you can let pieces dry undisturbed. A windowsill with gentle sun or a low shelf with airy flow works well. A tidy workspace supports the calm pace this craft asks for.
Materials You’ll Need
- Gelatin powder or cornstarch (choose one base; gelatin makes a clearer, more flexible film, cornstarch makes an opaque, textured sheet)
- Food-grade glycerin (optional, makes pieces softer and less brittle)
- Filtered water or distilled water (easy to control)
- Small saucepan (nonreactive, low heat works best)
- Silicone baking mat or glass tray (for pouring and cooling; silicone is less likely to stick)
- Measuring spoons and small cup (simple, even measures help consistency)
- Fine mesh strainer (removes bits and gives a smooth sheet)
- Assorted botanicals, pressed flowers, leaves, or small translucent papers (optional; these add texture and pattern)
- A straw or skewer to pierce holes for hanging (small, easy tool)
- Cotton twine, embroidery thread, or thin ribbon for hanging (choose soft fibers)
- Parchment paper or paper towel (for gentle pressing or lifting; optional)
- Scissors and a sharp craft knife (for trimming edges; optional)
- Timer and oven mitts or heat-safe cloth (safety first)
I usually keep a small tray of pressed leaves nearby. They feel warm in my fingers when I press them into the sheet, and they leave an imprint that still surprises me the next morning. If you want a more detailed homemade approach, you can find additional craft notes in this homemade craft guide.
Step-by-Step Directions
- Measure and mix your base gently.
Stir one tablespoon of gelatin or two tablespoons of cornstarch into half a cup of cold water until it smooths out.
Keep movements slow so air bubbles stay low and the mixture stays calm. - Warm the mixture over low heat.
Place the pan on low and stir slowly. You will feel the mixture thicken and the steam will rise lightly.
Stop when it becomes glossy and cohesive; avoid boiling so it does not splatter. - Add glycerin for flexibility if you like.
Stir in a small half teaspoon of glycerin to make the final sheet softer.
Glycerin works because it keeps the protein or starch chains from locking too tightly, which helps the material bend without breaking. - Strain the warm mixture into your prepared tray.
Use a fine mesh strainer to catch any lumps and keep the surface smooth.
Pour in a gentle steady stream so the warm liquid spreads evenly. - Arrange botanicals or small items onto the warm film.
Press leaves or petals lightly with a fingertip or the flat of a spoon.
The warmth helps the textures settle into the film and form a clear impression. - Let the sheet cool and set undisturbed.
This can take from a few hours to overnight depending on thickness and humidity.
You will see it go from glossy to matte as water evaporates and the network solidifies. - Lift and trim the cooled piece with calm motions.
Slide the corner of a piece of parchment under the edge and lift slowly.
Trim jagged edges with scissors and pierce a small hole for hanging using a straw or skewer. - String your suncatcher and hang where it can catch light.
Tie a soft loop of cotton or thread and hang near a window or light source.
The light will reveal textures and deepen colors in a gentle way.
I learned early to keep my movements unhurried. The first time I rushed a pour, small ripples formed and left waves in the finished piece. When I slowed, the surface came out glassy and quiet. For more inspirations that embrace nature as a design partner, try the ideas in this guide to nature’s window art at nature’s window ideas.
Enjoying the Finished Piece


Place a suncatcher in a small cluster to watch how light changes the mood of a room.
One piece may throw a cool, washed shadow in the morning and glow warm in the evening.
You can hang a single small disk in a jar lid and tilt it toward light to enjoy shifting color.
I like to change the display by season. In spring I hang pieces with bright petals near the kitchen sink. In late autumn I move more textured, muted pieces to a reading corner where they catch low light. The finished objects feel intimate because they carry the trace of my hands: the faint ridges where I pressed a leaf, the tiny air bubble that caught in the corner. They keep a quiet record of the moment I made them.
You can also use small suncatchers as gift tags, window garlands, or gentle ornaments on a house plant. Each use invites a mindful pause when you notice texture and light together.
How to Store or Reuse DIY Bioplastic Suncatchers
Keep finished pieces in a flat, dry place to avoid bending.
A shallow box lined with soft paper works well. Stack with parchment between pieces if you keep more than one.
Avoid storing near heat sources because high temperatures can soften the bioplastic and change its shape.
If a piece becomes a bit brittle, a tiny brush of glycerin along the edge can revive pliability.
If a piece attracts dust, wipe it gently with a soft, slightly damp cloth and air dry.
You can reuse leftover pour bits by remelting in low heat and pressing again, though repeated reheating will change texture.
I once kept a small batch in a kitchen drawer and discovered they had curled slightly after a warm week. I accepted the change and used them as textured accents on a plant hanger instead. They found a new home that way.
Gentle Tips & Variations
- Try mixing a small amount of powdered color pigment or natural dye into the warm mixture to nudge color gently.
Think of color as a whisper, not a shout. A little goes far. - Press textured papers or thin fabric into the film for subtle patterning.
This invites a soft surprise when light finds the weave or grain. - Make tiny holes at different points to create a mobile effect.
When the pieces turn, they catch light in new ways and offer a slow, moving display. - Invite a child to press safe leaves while you pour and strain.
Focus on the sensory moment: the cool leaf, the warm pan smell, the quiet stir of liquid. Keep them a safe distance from the stove and handle hot tasks yourself. - If you want a stronger piece for ornament use, try combining a thin backing of clear contact paper.
This adds durability but changes the biodegradable nature of the piece. Consider this when choosing materials.
These are gentle suggestions meant to spark curiosity. Choose what feels calm and right for your space and materials.
What I’ve Learned While Making This
I make bioplastic suncatchers when I need to slow down and notice small changes.
The craft taught me to trust timing more than precision. Sometimes a sheet sets faster than expected. Sometimes humidity delays the process. I learned to listen and adjust.
I also learned that materials tell you what they need. Gelatin wants lower heat and more careful handling; cornstarch tolerates a little more motion but yields a different look. Glycerin gives forgiveness and flexibility. Watching the mix shift from cloudy to clear taught me to be patient and to value small sensory cues.
Safety matters. I now keep a cloth and oven mitts nearby, and I never let small hands near the pan while it warms. I also label storage boxes with the date, because natural materials can change over time.
FAQs About DIY Bioplastic Suncatchers
Q: Will my bioplastic suncatcher break in hot weather?
A: Bioplastic can soften with prolonged heat. Avoid placing pieces where they will sit in direct, strong midday sun or near radiators. In warm climates, use thinner sheets and keep them in shaded windows.
Q: Can I use these outdoors?
A: Short term, yes. Expect that botanicals and the film itself will weather. Wind and moisture can cloud or break the pieces. For longer life, hang them in a sheltered spot like a covered porch.
Q: Are these safe for kids to make?
A: Yes with supervision. Children can press botanicals and help with arranging. An adult should handle heating and pouring. Keep hot pans away from small hands and explain each step calmly.
Q: How long do bioplastic suncatchers last?
A: Lifespan varies. Gelatin-based sheets can last months if kept dry and out of heat. Cornstarch variations may last longer but feel different in texture. Expect natural change and treat that as part of the piece’s story.
Q: Can I make large panels?
A: You can, but large pieces take longer to dry and may curl. Work in thin layers or use a broader, flatter tray to keep thickness even.
A Quiet Closing Thought
Sit with your finished suncatcher for a moment and notice how the light changes its face.
Allow the craft to be both a small object and a way to return to calm.
If you choose to make more, let each one be a slow practice, a simple ritual of seeing texture and light anew.
Conclusion
If you would like a clear, science-friendly walkthrough that explains the basic chemistry and steps, this guide offers a thoughtful how-to: How To Make A Bioplastic Suncatcher guide. For inspiration using pressed botanicals and nature-focused layouts, this tutorial shares beautiful examples and seasonal approaches: Botanical Bioplastic Sun Catchers tutorial.
Thank you for making with a gentle hand today. May your next small suncatcher bring a quiet moment of light into your home.
PrintDIY Bioplastic Suncatchers

Create beautiful bioplastic suncatchers that catch the light and showcase nature’s textures.
- Prep Time: 15 minutes
- Cook Time: 30 minutes
- Total Time: 45 minutes
- Yield: Multiple suncatchers
- Category: Craft
- Method: Crafting
- Cuisine: N/A
- Diet: N/A
Ingredients
- 1 tablespoon of gelatin powder or 2 tablespoons of cornstarch
- 1/2 cup of filtered water or distilled water
- 1/2 teaspoon of food-grade glycerin (optional)
- Assorted botanicals, pressed flowers, leaves, or small translucent papers (optional)
- Cotton twine, embroidery thread, or thin ribbon for hanging
- Parchment paper or paper towel (optional for pressing)
- Scissors and a sharp craft knife (optional for trimming)
- Timer and oven mitts or heat-safe cloth (for safety)
Instructions
- Measure and mix your base gently: Stir together gelatin or cornstarch with cold water until smooth.
- Warm the mixture over low heat until it thickens and turns glossy.
- Add glycerin for flexibility, stirring it into the warm mixture.
- Strain the warm mixture into your prepared tray to remove any lumps.
- Arrange your botanicals or small items onto the warm film.
- Let the sheet cool and set undisturbed for a few hours to overnight.
- Lift and trim the cooled piece with calm motions, cutting jagged edges as needed.
- String your suncatcher and hang it where it can catch light.
Notes
Ensure to supervise children when making, especially during the heating process. Store finished pieces in a flat, dry place.