

A slow afternoon light falls across my work table as I pour a warm, sweet syrup into a glass jar. Tiny bubbles rise and settle. Colors gather like soft, careful notes. Making a DIY Rainbow Density Jar feels like listening to a small, quiet song made of sugar, oil, and patience. If you enjoy calm jar projects, you might like my DIY Cotton Candy Glow Jars for another gentle making moment.
The Quiet Joy of Making DIY Rainbow Density Jar

Holding a jar as the layers fall into place gives a small, steady calm. You watch how liquids that do not mix still arrange themselves by weight. Each layer moves slowly, like a tiny landscape forming inside glass. The textures feel reassuring: the smooth glass, the soft pour, the quiet clink of spoon on jar.
This project asks you to move with intention. It slows you down in a gentle way. You measure, stir, and wait. You notice sensory details you might otherwise miss: the warmth of the syrup in your hands, the faint scent of sugar, the glossy look of oil under light. Those small moments are the heart of the process.
Beyond calm, the DIY Rainbow Density Jar shows a simple truth: differences can sit side by side and stay beautiful. That visual sense of order and softness helps people focus, soothe a busy mind, or enjoy a mindful break. The jar makes an ordinary table feel quietly magical.
How This DIY Comes Together
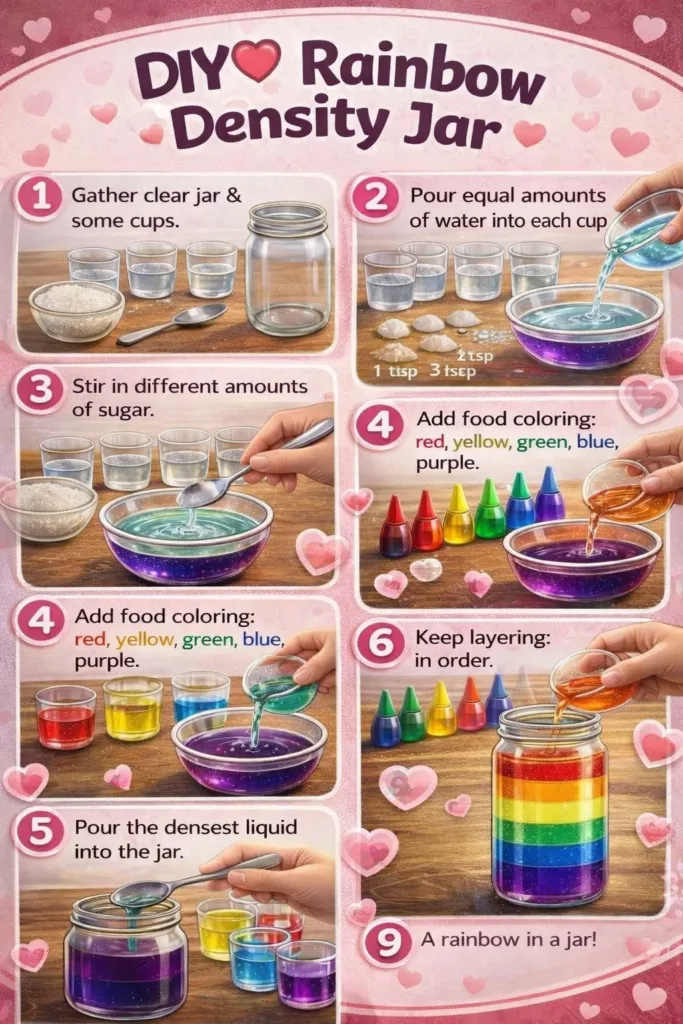
Before you gather supplies, imagine the flow. You will create several solutions with different sugar amounts and colors. Each solution will pour into the jar in a slow, steady stream. Heavier mixtures sink and settle below lighter ones, forming clear, separate bands.
The making rhythm stays soft. You heat water for dissolving sugar, stir until the liquid turns syrupy, then cool the mixtures while you choose colors. Pouring feels like meditation. You tilt the jar to guide a layer or let the liquid land on a spoon for a slower drop. The visual rhythm matters. Watch for the moment each layer meets the last and breathe.
If you like exploring science through cozy crafts, the technique pairs well with experiments from other projects, such as the baking soda rainbow crystal forest, where patience and gentle observation shape beautiful results.
Materials You’ll Need
- Clear glass jar with a tight lid (mason jar or recycled jam jar), clean and dry
- Granulated sugar (common table sugar), easy to find
- Warm tap water, for dissolving sugar
- Food coloring in several colors, liquid or gel work
- Light vegetable oil or baby oil (optional) for a top layer that floats
- Spoon for stirring, nonreactive (wood or plastic)
- Measuring cups and spoons, for simple ratios
- Small pitchers or bowls to mix each colored solution
- A pipette or turkey baster (optional) for delicate pouring
- A small funnel or the back of a spoon to slow the pour
- Labels or masking tape and a marker, optional for noting densities
Notes: you can use honey instead of sugar for a denser layer, or corn syrup for very clear bands. Oil is optional but adds a smooth top and a different texture. If you prefer non-food coloring, try natural dyes, but the colors may be softer.
Step-by-Step Directions

- Prepare your workspace and jar.
Clear a small area, set the jar on a towel, and keep my spoon and pitchers nearby. Warm hands help steady the pour. - Make your densest sugar solution first.
Measure 1 cup of hot water and stir in 1 and 1/2 cups of sugar until glossy and mostly dissolved. Let it cool a little. The thick syrup will form the bottom layer. - Color the syrup.
Add a few drops of food coloring and stir until the color spreads. Use bold tones for clearer bands. Smell the warm, sweet steam as you stir. - Mix softer-density solutions.
For the next layers, use 1 cup water with 1 cup sugar, then 1 cup water with 3/4 cup sugar, and so on. Make at least five solutions that decrease in sugar amount. Cool each solution before pouring. - Pour the bottom layer gently.
Tip the jar slightly and pour the densest, coolest syrup down the side so it slides and settles. Pour slowly and listen for the soft sound of liquid against glass. - Add each layer slowly.
For the next color, pour slowly over the back of a spoon or down the jar side. Let each layer find its place. Pause and watch the meeting line where colors touch. - Use oil for a floating top layer, if desired.
Gently pour a thin layer of light oil at the top. It will sit above the water layers and add a silky sheen. Try a drop or two of color into the oil for interesting beads. - Seal and let it rest.
Tighten the lid and set the jar where it gets soft light. Wait at least an hour to see the layers settle. The jar will feel calm and still when it rests. - Observe and adjust.
If a layer blends, let the jar sit until it recovers some separation. Small bubbles rise slowly; they add gentle motion. Note the sugar ratios you used for future jars. - Clean up with care.
Wash bowls and spoons with warm water. Store extra solutions refrigerated if you plan another jar within a day.
Bringing DIY Rainbow Density Jar Into Your Space

This jar finds a quiet home on a shelf, a bedside table, or a windowsill where soft light can pass through the colors. Set it on a small wooden tray with a candle or a stack of small notebooks for a cozy vignette. The jar offers a slow, changing scene as light shifts across the day.
Use the jar as a mindful pause. Sit with it for a few minutes, breathe slowly, and watch the colors. Let the steady bands anchor a short break from screens or busy thoughts. If you place the jar on a low shelf, children can watch it safely under supervision. For a more tactile version, keep the jar closed and use other sensory items like a small bowl of sugar or ribbons to engage the hands.
If you enjoy pairing sensory projects, the soft glow and textured snow in our DIY Snowstorm Winter Jar makes a soothing companion for evening routines.
How to Store or Reuse DIY Rainbow Density Jar
Keep the jar sealed when you are not actively observing it. A tight lid slows evaporation and keeps layers crisp. Store the jar in a cool, shaded spot to protect colors from fading.
If you want to reuse the jar, pour out the layers and rinse the glass with warm water. Warm water loosens sugar quickly. For sticky residue, soak the jar in hot water and a little dish soap for 15 minutes, then wipe gently. You can remake a new jar with fresh solutions or repurpose the cleaned jar for seeds, small tools, or a tiny plant.
If a jar becomes cloudy over time, that usually means tiny particles or traces of color mixed. You can reset the jar by washing thoroughly and starting fresh. For long-term keepsakes, choose a jar you can seal well and avoid frequent opening.
Gentle Tips & Variations
- Invite texture with syrups: Use honey or corn syrup for a richer, heavier base. Honey adds a different scent and glossy texture. Try one layer with honey to feel the weight difference.
- Slow the pour with a spoon: Rest a spoon against the jar side and pour over it. That extra slow action helps layers remain distinct and gives you time to watch each color settle.
- Try natural color palettes: If you prefer softer tones, use natural dyes like beet juice, turmeric, or blueberry water. The look will be earthier and more muted.
- Make a tiny desktop version: Use small spice jars or sample bottles for portable, desk-friendly jars. They concentrate the colors and fit nicely on a shelf.
- Add tiny objects sparingly: For a more tactile display, place a small shell or bead inside before the last pour. Avoid anything that can trap bacteria if you plan to keep the jar long term.
These ideas invite gentle experimentation. Treat each change as an exploration, not a must. Notice what calms you most: a bright rainbow, a soft palette, or the slow act of pouring.
FAQs About DIY Rainbow Density Jar
Will the sugar separate over time?
The sugar stays dissolved in each layer, so the bands remain for a long time if you keep the jar sealed. Over months, slight diffusion can soften the lines. Store the jar away from heat and strong sunlight to keep the colors crisper.
Can children help make this jar?
Yes, with supervision. Older children can measure and stir; an adult should handle hot water. Use cool, pre-mixed solutions for younger helpers and let them pour under guidance. Keep small tools and color bottles out of reach when not in use.
What if the layers blend when I pour?
Pause and let the jar sit. If a layer blends, you can gently tilt the jar to encourage separation, or chill the jar briefly; cooler liquids separate more cleanly. Using the back of a spoon also slows the flow to prevent mixing.
Is this safe to eat?
The jar uses edible ingredients like sugar and food coloring, but it is a display item, not intended as food. If you use oils that are not food-grade, avoid tasting. Keep it as a visual, sensory object rather than a snack.
How many colors should I use?
Use as many as you like. Five to seven bands create a satisfying rainbow. Fewer layers offer a more minimalist look. Let the number of layers match the calm you seek.
A Gentle Note Before You Go
Making a DIY Rainbow Density Jar gifts you a small space of stillness and a visible lesson in gentle order. The act of measuring, coloring, and pouring invites focused hands and a quiet mind. Each jar becomes a tiny vessel of calm that you can visit in a busy day.
When you finish, take a slow look at your work. Notice how the colors sit next to one another. Give yourself a moment to appreciate the patience you offered. Small projects like this remind us that making can feel soft and meaningful, not hurried.
Conclusion
For a simple science-based explanation of how different densities stack to form bright layers, the Ontario Science Centre offers a clear guide on how to Make a Rainbow in a Jar that complements this cozy approach. For a step-by-step density experiment focused on sugar solutions, see the helpful tutorial on Rainbow In A Jar Density Experiment.