

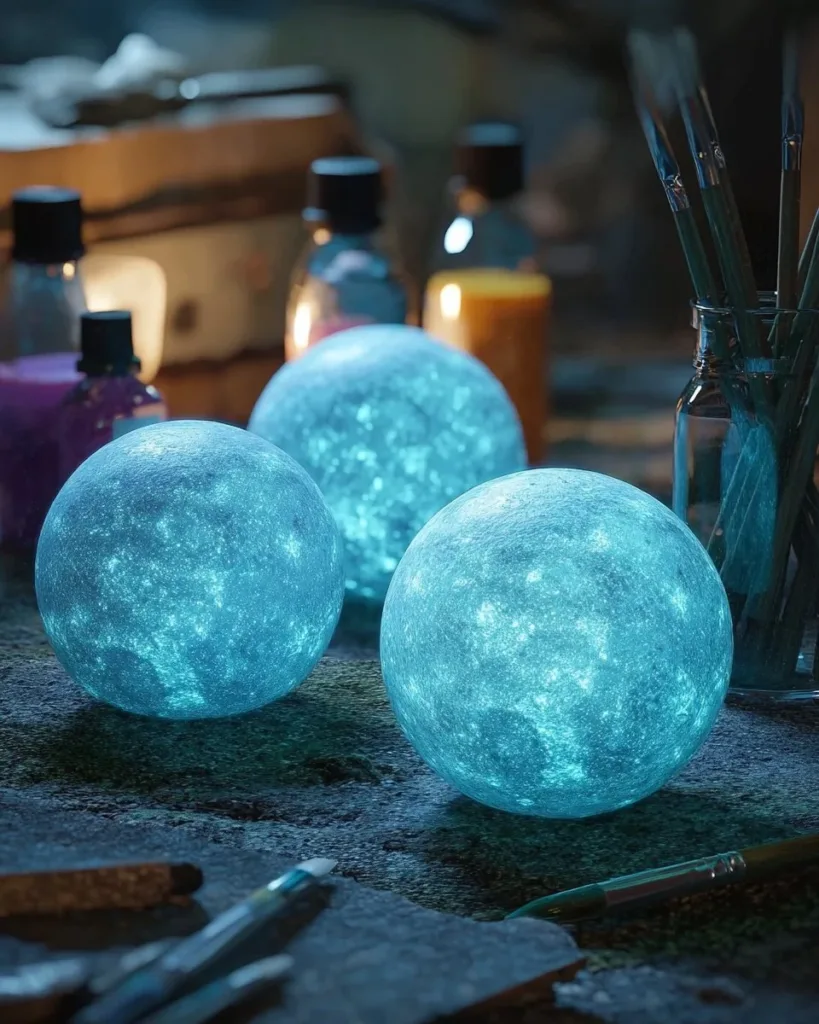
I sit with a small bowl of cool, slightly sticky clay in my hands, feeling the smooth curve of each formed pebble. A single lamp hums nearby and, when I lift one tiny rock to the light, it drinks the glow and holds it like a secret. These are my DIY Moon Rocks That Glow and Bounce, little orbs of texture and soft light that invite slow curiosity, gentle tossing, and quiet watching as their glow returns after a few minutes under a lamp. If you enjoy the hush of soft glow jars, this project will feel like a companion: tactile, warm, and easy to return to.
The Quiet Joy of Making DIY Moon Rocks That Glow and Bounce

There is a calm in making something that both shines and moves. Shaping the moon rocks slows your hands and organizes your senses. The materials give you little rewards: the soft drag of a spoon through glue, the fine whisper of powdered glow settling, the playful spring when a finished rock hits the table. This project helps a restless mind focus without pressure. It asks for attention in small bursts: mix, roll, wait, and watch.
Making these rocks blends light and touch in a way that feels restorative. When you press a cooled rock, the skin gives, then rebounds. When you dim the lights, the glow blooms back to life. You will find this calming because it asks for gentle rhythms rather than perfection. Each rock learns its own shape. Each glow has its own bright memory. In living rooms or quiet corners, these pieces create tiny rituals: a five-minute charge under sunlight, a slow toss between palms, a soft display in a shallow bowl.
A Gentle Look at the Process
Before you gather jars and powders, imagine the rhythm. You will mix smooth glue and water until they hum with possibility. You will stir in glow powder and salt so the mix keeps a soft weight. A borax solution or a safer crosslinking option comes next, coaxing the liquid into something elastic and warm. The kneading feels like shaping soft clay. The final step asks patience: a short rest, then gentle charging under light.
Sound plays a quiet role. The shake of a measuring spoon, the muted splash of water, the soft clap as two rocks meet. Texture plays the main part. The wet mix goes from silky to slightly tacky to bouncy. The visual arc moves from clear and glossy to matte and stone-like. When you make these often, you learn the sweet spot where a rock will glow evenly and bounce without being sticky. I learned that by touch and by small tests, not by a clock.
I also like to use small pauses between steps. If your day feels full, let the rock sit mid-knead on a soft towel while you breathe for a few moments. The project likes those breaks. You will finish feeling steadier than you began.
In another quiet corner of our site we explore the springy joy of bead and marble bounces, and you may enjoy that for extra inspiration: magic marble bounce balls.
Materials You’ll Need
- White school glue (PVA), 4 ounces per batch — easy to find at craft stores
- Water, room temperature — tap works fine
- Borax powder or a borax substitute like sodium tetraborate solution — optional safety notes below
- Phosphorescent glow powder (non-toxic) — charges in light and glows in dark
- Fine cornstarch or arrowroot, 1–2 tablespoons — helps texture and reduces stickiness
- Small mixing bowls and spoons — ceramic or plastic work
- Measuring spoons and a small scale if you like precision
- Gloves (optional), for sensitive skin or tidy fingers
- A tray lined with parchment or a soft towel for shaping
- A shallow bowl or jar for charging under a light source
- A small airtight container for storage
Notes: You can substitute borax with commercial crosslinkers that are labeled safe for kids if you prefer. If you want a sandier texture or a quieter weight, keep cornstarch on hand. For a different sensory surface, try rolling finished rocks in a little fine sand or glitter that is sealed with a tiny dab of glue.
If you like working with pliable landscape materials, you might enjoy combining these rocks in a sensory tray with homemade sand from our kinetic sand recipe: DIY kinetic sand.
Step-by-Step Directions
Gather your tools and lay them out.
Wear gloves if you prefer. Keep a towel nearby for gentle messes.Pour 4 ounces of white glue into a bowl.
Feel its soft, sticky weight. Add one tablespoon of water and swirl until smooth.Sprinkle in a teaspoon of glow powder.
Stir slowly so the powder blends and the mix looks evenly luminous.Add one tablespoon of cornstarch and mix.
The mix will thicken and feel less slick. Pause to notice the change.Prepare your borax solution: dissolve half a teaspoon of borax in one cup of warm water.
Stir until clear. You will use this sparingly.Slowly add the borax solution, a few teaspoons at a time, while stirring.
The mix will start to form strings and then clump. Stop when it becomes rubbery.Scoop the clump onto your tray and begin kneading.
Press, fold, and roll until it feels smooth and springy. Keep motions slow.Shape the dough into pebble shapes.
Roll between palms to warm and seal the surface. Make sizes you like.Charge the rocks under a lamp or sunlight for 5 to 20 minutes.
Watch the glow deepen. Test one in a dark room and adjust charging time.Let the rocks rest for an hour before storing or playing.
When cool, place them in an airtight container to keep them soft.
Each step invites a small, sensory moment. When you pour, notice the sound. When you knead, notice the resistance. When you charge them, look at the soft halo of light they hold.
A gentle safety note: borax works by crosslinking polymers and can cause irritation if mishandled. Use gloves if you have sensitive skin, keep the mix away from small children, and wash hands after play. If you prefer to avoid borax, you can experiment with commercial bouncy ball activators designed for crafts or use a small amount of saline eye solution with baking soda as an alternative crosslinker, though results vary. The key is to add activator slowly until the right elasticity appears.
Using DIY Moon Rocks That Glow and Bounce in Everyday Life


These moon rocks fit into quiet moments. Use one as a slow fidget while you read, letting the light remind you to breathe. Place a small cluster in a shallow dish near a lamp to make a soft nighttime nook. They work beautifully in a sensory tray alongside fabric swatches, a tiny brush, and a small bowl of warm water for gentle cleaning.
You can bring them to a bedside table as a small, calm night light. Charge a few before bed and tuck them in a shallow bowl. When you wake to low light, the stones will hold a sweet, dim glow that feels like a secret held close. They also work well on a low shelf in a child play area; encourage soft tossing and gentle play rather than high throws to protect surfaces and maintain the peaceful mood.
If you host a simple crafting session, let people choose one rock shape to take home. Place a few in a jar labeled with brief care notes. They make quiet gifts: tactile, luminous, and small.
For seasonal displays, combine moon rocks with pine cones, dried flowers, and soft textiles. The contrast of matte stone-like surfaces and soft cloth creates a pleasing balance that invites touch and breathing.
How to Store or Reuse DIY Moon Rocks That Glow and Bounce
Store finished rocks in an airtight container to keep them soft. A small zip-top bag or a plastic box works well. Add a folded paper towel if you notice slight moisture; it will absorb extra humidity and keep surfaces less sticky.
If a rock dries and becomes hard, you can often soften it by placing it in a sealed container with a moist paper towel for a day. Check gently and remove when it reaches a pliable feel. If a rock becomes sticky, dust it lightly with cornstarch and knead until tackiness lessens.
You can reuse cornstarch or leftover glow powder carefully. Sift cornstarch back into a jar and keep glow powder sealed in a dry container. If a rock loses glow intensity over time, recharge it under bright light or sunlight. The glow will recover most effectively after a full charge cycle.
When you decide to recycle a very tired rock, break it into pieces and compost any purely cornstarch-based bits. For polymer-rich scraps, place them in a non-recycling trash bin, as most home recycling centers do not accept PVA-borax gels. Always discard responsibly and keep materials out of reach of pets.
If you make many rocks, consider labeling containers with dates so you can track freshness. Rotating through a few favorites keeps the experience novel and mindful.
Gentle Tips & Variations
- Invite color slowly. Try adding a tiny pinch of mica powder or non-toxic pigment to create a moon rock with a warm shimmer. Use small amounts to keep the texture right.
- Make them tactile. After shaping, roll a few rocks in fine sand, tiny beads, or soft flocking for different surfaces and sensory interest.
- Try a softer formula. Reduce borax slightly and add more cornstarch for a less bouncy, more kneadable rock that still glows. This variation suits quiet, hands-on fidgeting. For alternative visual craft ideas that pair nicely with glow pieces, explore mandala suncatcher techniques on our site: mandala bioplastic suncatchers.
- Make a charging ritual. Place rocks in a shallow ceramic dish by a strong lamp and play gentle music while they charge for 10 to 20 minutes. The ritual makes the glow feel intentional and restorative.
- Experiment with sizes. Tiny pebble-sized rocks are perfect for pockets and sensory jars. Larger rocks become small worry stones for slow thumbs.
These ideas exist as invitations, not rules. Try one or two and notice how they change your enjoyment. If a variation does not work for a rock, that is information, not a failure.
For another playful, bouncy experiment that uses color and texture differently, you may like our magic marble bounce balls recipe for inspiration: magic marble bounce balls.
FAQs About DIY Moon Rocks That Glow and Bounce
Q: Are these rocks safe for children?
A: They feel safe for supervised older children, but they present small parts and chemical crosslinkers. Keep them out of reach of babies and toddlers and always supervise play. Use gloves if skin is sensitive. If you prefer, use commercial activators labeled for kids.
Q: How long will the glow last?
A: After charging, most glow powders give a bright initial glow that fades across a few hours. Recharge under a lamp or sunlight for five to twenty minutes to revive the brightness. The glow powder itself can last a very long time if stored dry.
Q: What if my rocks end up sticky or crumbly?
A: Sticky results mean you added too much activator. Dust with cornstarch and knead to absorb tackiness. Crumbly results usually mean not enough binder. Add a small dab of glue and knead gently until cohesive.
Q: Can I wash these rocks?
A: Avoid submerging them in water. A damp cloth will work for light cleaning. Water can break down the polymer structure and reduce bounce.
Q: Do I need special lights to charge the glow?
A: No. Sunlight and bright LED lamps work best. A desk lamp gives a quick charge. Avoid intense heat and prolonged direct sunlight, which can warm and distort softer materials.
Q: Can pets play with these?
A: Do not let pets chew or swallow them. The materials can upset digestion, and glow powders are not intended for ingestion.
A Quiet Closing Thought
These little moon rocks invite slow attention. The making matters as much as the finished piece. When you shape, charge, and store them with care, they become more than toys. They become moments you can carry in your pocket or set on a shelf to remind you that small light and soft motion can steady a day. Let the process be gentle. Let your hands guide the work. Return to it whenever you need a quiet, glowing pause.
Conclusion
If you would like another approachable tutorial that inspired the feel of these rocks, this guide offers a playful, stepwise take on similar glow crafts: DIY Moon Rocks – The Buzzy B. For ideas on soft, moldable companions you can mix into sensory trays alongside your rocks, this recipe explores a different kind of luminous dough: Out Of This World Moon Dough – New Recipe.
PrintDIY Moon Rocks That Glow and Bounce

Create tactile moon rocks that glow in the dark and bounce, perfect for playful sensory experiences.
- Prep Time: 15 minutes
- Cook Time: 60 minutes
- Total Time: 75 minutes
- Yield: 10 moon rocks
- Category: Craft
- Method: Crafting
- Cuisine: N/A
- Diet: N/A
Ingredients
- White school glue (PVA), 4 ounces
- Water, room temperature
- Borax powder or commercial crosslinkers (optional)
- Phosphorescent glow powder (non-toxic)
- Fine cornstarch or arrowroot, 1–2 tablespoons
- Small mixing bowls and spoons
- Measuring spoons and a small scale (optional)
- Gloves (optional)
- A tray lined with parchment or a soft towel
- A shallow bowl or jar for charging
- A small airtight container for storage
Instructions
- Gather your tools and lay them out.
- Wear gloves if you prefer. Keep a towel nearby for gentle messes.
- Pour 4 ounces of white glue into a bowl.
- Add one tablespoon of water and swirl until smooth.
- Sprinkle in a teaspoon of glow powder.
- Stir slowly so the powder blends evenly.
- Add one tablespoon of cornstarch and mix until thickened.
- Prepare your borax solution by dissolving half a teaspoon in one cup of warm water.
- Slowly add borax solution while stirring until the mix becomes rubbery.
- Scoop the clump onto your tray and knead until smooth.
- Shape the dough into pebble shapes.
- Charge the rocks under a lamp or sunlight for 5 to 20 minutes.
- Let the rocks rest for an hour before storing or using.
Notes
You can substitute borax with commercial crosslinkers safe for kids. To keep the rocks soft, store in an airtight container and use a paper towel if moisture builds up.