

Creating a DIY handprint dough keepsake can evoke a quiet moment of joy, where the texture of soft, pliable dough becomes an intimate connection to precious memories. As little fingers press into the warm dough, they’re leaving behind imprints that carry the essence of childhood. This is more than just a craft; it’s a way to create something tangible and lasting while savoring the joy of crafting together. The simple act of formation, combined with the tactile pleasure of dough in hand, makes this a meaningful family experience. It’s a gentle reminder to slow down and appreciate the present, as you create DIY handprint dough keepsakes that preserve tiny handprints into lasting memories. You may also find Diy Bouncy Balls Turn Into Joy useful.
The Heart Behind This DIY
The beauty of creating DIY handprint dough keepsakes lies in their sentimental value. Each small handprint is a snapshot of a moment in time, a reminder of how quickly children grow and change. This project encourages a pause, inviting families to come together in a calming environment, nurturing them both creatively and emotionally. It promotes mindfulness as you work with textures and shapes, allowing everyone to engage fully in the moment. You may also find Diy Colorful Foam Turns Into Calm useful.
Making these keepsakes is not just about the final product but the experience shared during the process. Children can feel a sense of accomplishment when they see how their little hands leave a mark in the dough, which can then be transformed into a meaningful art piece. Moreover, this is a lovely way to celebrate special occasions, from birthdays to holidays. You can even customize the dough with colors and scents, making the experience even more delightful. For additional creative ideas, take a look at how you can combine memories with other sensory projects like calming lavender play dough.

How This DIY Comes Together
Visualize the delicate rhythm of this crafting session. The process begins with gathering materials that invite touch and creativity. As you knead the dough, the soft texture squishes between your fingers, while gentle sounds are created — a quiet symphony of crafting. There’s a sense of flow as each step unfolds, guiding you through a quiet experience where time slows down. You may also find Adorable Diy Easter Bunny Cups useful.
Before you even begin mixing, it’s helpful to set up a comfortable workspace. This could be a kitchen table or a cozy corner in your home. The visual appeal of your materials — shining bowls, bright colors, and the soft glimmer of the dough — will set the tone for a peaceful crafting session. This mindful preparation enhances the process, allowing for a soothing atmosphere where creativity can shine.
Materials You’ll Need
Gathering your materials is a gentle step that contributes to the overall experience. Here’s a list of what you’ll need:
- All-purpose flour (easy to find)
- Salt (a common kitchen staple)
- Water
- Food coloring (optional, for a fun twist)
- Baking sheet (for drying)
- Rolling pin (for flattening)
- Cookie cutters or optional molds
- An oven (for baking, if required)
These materials are not only essential for making the dough but are also part of the calming experience that unfolds as you create your keepsakes together.
Step-by-Step Directions
Prepare Your Workspace: Start by clearing a flat surface, ensuring it’s clean and ready for crafting. Lay down some parchment paper or a protective cloth for easy cleanup.
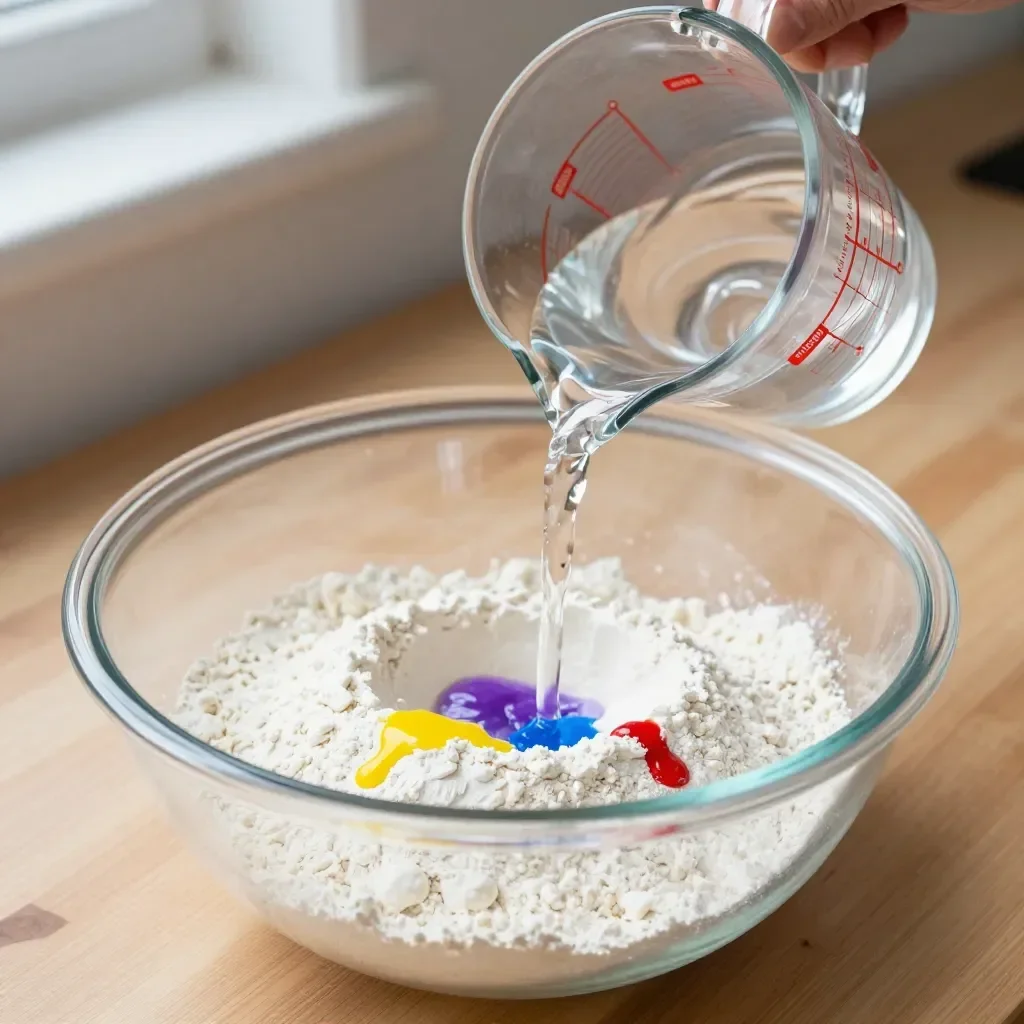
Mix the Ingredients: In a large bowl, combine 2 cups of flour, 1 cup of salt, and 1 cup of water. Stir until it forms a dough. Feel the texture as it begins to come together.
Knead the Dough: Transfer your dough to the prepared workspace. Knead it gently for about 5 minutes until it’s smooth and pliable. Notice the warmth and softness as you work.
Add Color: If you wish to color your dough, separate it into smaller portions and add a few drops of food coloring. Knead each piece until the color is evenly distributed. The colors will brighten your crafting session.
Create Handprints: Roll the dough out to about half an inch thick. Use cookie cutters or your hands to create shapes, then press your child’s hand into the dough to form a print. This part can spark giggles and chatter.
Dry Your Creation: Place the handprints or shapes on the baking sheet. If you choose to bake them, set your oven to 200°F (93°C) and let them bake for about 2 hours until dried — or let them air dry for 24 hours.
Finish and Enjoy: Once dry, you can paint or decorate your keepsakes further if desired. Take a moment to appreciate the crafted pieces and the memories cradled within them.

Enjoying the Finished Piece
The joy of creating DIY handprint dough keepsakes extends to how you can appreciate them after their creation. Each handprint can become a cherished decoration in your home. Consider displaying them on a shelf, hanging them as wall art, or incorporating them into seasonal decorations. These little artworks can spark fond memories and conversations whenever they catch your eye.
You might also gift them to family members or close friends, sharing the love and joy captured within the prints. With thoughtful presentation, such as adding ribbons or a contextual note, they can become heartfelt gifts that celebrate the spirit and joy of family connections.
How to Store or Reuse DIY Handprint Dough Keepsakes
To keep your handprint creations safe and lovely for years to come, storage is important. If you’ve air-dried them, they can last indefinitely if kept in a moisture-free area. Consider using a decorative box or a display case to keep them dust-free.
If using baked dough, it should be sturdy but may still benefit from gentle handling. They can be further decorated each year, adding new layers of memories. Taking care of these pieces creates a sense of continuity, connecting past moments to present nostalgia.
Gentle Tips & Variations
Here are a few gentle invitations to make this project even more personal and enjoyable:
Infuse Scents: Add a few drops of essential oils to the dough for a sensory-rich experience. Scents like vanilla or lavender can enhance the calming atmosphere.
Seasonal Crafts: Adapt the shapes and colors based on upcoming holidays, creating special seasonal decorations that reflect family traditions.
Sibling Collaborations: Encourage siblings to work together on designs, fostering teamwork and creativity. They can combine their prints to form unique art pieces.
Marking Growth: Repeat this project yearly or at significant milestones, allowing the keepsakes to serve as reminders of growth over time.

FAQs About DIY Handprint Dough Keepsakes
Can I use this dough for other crafts?
Yes, the dough can be shaped and used for other fun projects, like ornaments or creative shapes, making it versatile for different crafting ideas.
What if my handprints look messy?
Embrace the imperfections! Each mark tells a story. Messy handprints are often the most heartwarming.
How should I clean the tools after crafting?
Most materials are simple to clean with warm, soapy water. Make this a part of the experience; gently wash the tools together to conclude the activity.
Can I make this dough ahead of time?
Yes, you can make the dough in advance. Store it in an airtight container for up to a week in the refrigerator to keep it fresh.
A Gentle Note Before You Go
Taking the time to create DIY handprint dough keepsakes is about more than crafting; it’s about fostering connection and cherishing the present. As you engage in this calming practice, focus on the textures, sounds, and the laughter shared around the table. Allow the process to bring warmth to your heart, creating lasting memories that will forever whisper the beauty of childhood. Remember to savor the quiet moments between the making, as they are just as important as the keepsakes themselves.
PrintDIY Handprint Dough Keepsake

Create meaningful handprint dough keepsakes with your children, preserving precious memories through crafting.
- Prep Time: 15 minutes
- Cook Time: 120 minutes
- Total Time: 135 minutes
- Yield: varies
- Category: Crafts
- Method: Crafting
- Cuisine: N/A
- Diet: N/A
Ingredients
- 2 cups all-purpose flour
- 1 cup salt
- 1 cup water
- Food coloring (optional)
- Baking sheet
- Rolling pin
- Cookie cutters or molds
Instructions
- Prepare Your Workspace: Clear a flat surface and lay down parchment paper for easy cleanup.
- Mix the Ingredients: In a large bowl, combine the flour, salt, and water, then stir until it forms a dough.
- Knead the Dough: Transfer the dough to your workspace and knead gently for about 5 minutes until smooth.
- Add Color: If using food coloring, separate the dough and add drops of color, kneading until evenly distributed.
- Create Handprints: Roll the dough to 1/2 inch thick, use cookie cutters or press hands into the dough to make prints.
- Dry Your Creation: Place shapes on a baking sheet and bake at 200°F for about 2 hours, or air dry for 24 hours.
- Finish and Enjoy: Once dry, paint or further decorate the keepsakes as desired.
Notes
To enhance the experience, consider infusing scents with essential oils or adapting shapes for seasonal crafts.