

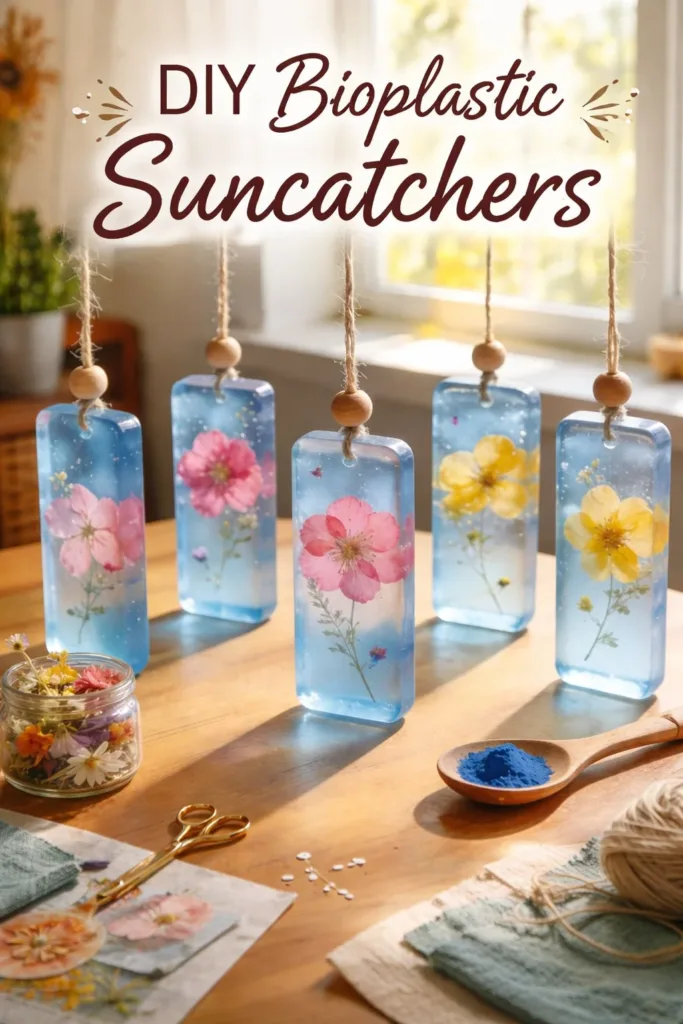
A warm sliver of afternoon light slides across my table, pooling on a sheet of clear bioplastic until it trembles with color. I trace a leaf embedded in the warm curve, feeling the faint ridges through my fingertips and the slow cool of the plastic as it settles. Making DIY Bioplastic Suncatchers has taught me to breathe with the rhythm of small, hands-on moments, to listen to the soft hiss of simmering water and the quiet clink of glass jars. Each piece keeps its memory of touch and light, and I invite you to make one with that same steady attention.
The Quiet Joy of Making DIY Bioplastic Suncatchers

This project brings a gentle kind of joy. It does not demand speed or perfection. It asks that you notice the weight of a spoon, the glossy way a powdered ingredient dissolves, the way pressed petals float like tiny maps inside the warm sheet. Making bioplastic suncatchers slows the mind because the materials respond slowly and clearly.
You work with warmth and coolness, soft textures and crisp edges. The process rewards patience: a piece that begins as cloudy, thick liquid becomes a thin, translucent pane that catches light in quiet ways. The slow transformation is calming and oddly intimate. When you hang a finished suncatcher, you hang a small, hand-shaped memory into the room.
If you like ideas for color and form, I have a colorful DIY bioplastic suncatchers recipe that explores playful palettes and layered effects. Use it when you want to lean into color and texture.
A Gentle Look at the Process
The flow of making these suncatchers moves in soft, repeatable cycles. You season the water with a powdered binder, stir until the surface becomes glossy, and pour slowly into molds. The movement feels rhythmic: scoop, tilt, breathe. Small rituals help. I often set a timer, stir in a steady loop of counts, and hum a favorite tune without meaning to.
You will notice sounds, like the steady clink of a metal spoon and the faint patter of water hitting a ceramic bowl. You will notice scent: a faint starch-like smell that fades as the pieces cool. You will notice changes in texture. The liquid feels slightly viscous and then stretches into a thin, pliable sheet. You handle warm, slightly tacky sheets before they firm into brittle glass-like panes.
If you want a different perspective or extra inspiration for step-by-step photos, this gentle DIY bioplastic suncatchers tutorial part 2 shows close-up views of each stage and might help you feel less uncertain in the early moments.
Materials You’ll Need
- Tapioca starch or cornstarch (easy to find, substitute-friendly)
- Distilled water or filtered water (keeps results consistent)
- White vinegar or lemon juice (a small amount helps the mix set)
- Glycerin (optional, for added flexibility)
- Natural dyes, powdered pigments, or food coloring (optional)
- Small pressed flowers, leaves, or thin fabric scraps (dry and flat)
- Baking sheet or heatproof tray (lined with a silicone mat or parchment)
- Parchment paper or a silicone mat (nonstick surface)
- Nonstick spray or a light oil (optional, for easy release)
- Measuring spoons and cups (or a kitchen scale for precision)
- Small saucepan and whisk or silicone spatula
- Heatproof molds or cookie cutters (for shapes)
- A straw or a thin skewer (to make hanging holes while warm)
- Fine sandpaper or a nail file (for smoothing edges later)
- String, thread, or thin ribbon for hanging
If you want materials tips and alternate supplies for child-friendly variations, see my post about materials and tips at materials and tips. It helps when you want to keep things sensorily simple or adapt for little hands.
Step-by-Step Directions
- Prepare your workspace and materials.
Set a small kettle to boil and arrange your molds on a lined tray.
Keep pressed botanicals flat and your tools within reach. - Measure your base ingredients.
Combine one part starch with four parts water in a small saucepan.
Add a teaspoon of vinegar for every cup of water. - Whisk over medium-low heat.
Stir gently and steadily until the mixture thickens and turns translucent.
Breathe slowly and notice the change from milky to glossy. - Remove from heat and add glycerin or color.
Stir in one teaspoon of glycerin per cup to add flexibility.
If you use dye, add a drop or two and mix for even color. - Pour into molds with a slow, steady hand.
Tilt your tray if you need to spread the liquid thin.
Avoid overfilling; aim for a sheet you can lift after cooling. - Place botanicals or thin materials on top.
Lay items gently so that they do not trap air pockets.
Press with a clean spoon to encourage contact without crushing. - Let the pieces set at room temperature.
Depending on thickness, wait 30 to 90 minutes until firm.
You can cool faster in a low oven around 120 F for a few minutes. - Make a hole for hanging while warm.
Use a straw or skewer to pierce a small hole near the edge.
Do this before the piece becomes rigid to avoid cracking. - Carefully peel the suncatcher from the mat.
Start at one corner and move slowly to avoid bending.
If it resists, warm slightly and try again. - Smooth rough edges by sanding.
Use fine sandpaper to feel the edges and create a safe finish.
Wash the piece gently if sanding creates dust. - String and hang your suncatcher.
Thread chosen string through the hole and knot gently.
Place it where morning or afternoon light can meet it. - Pause and notice the light.
Stand quietly and watch how color shifts and shadows play.
Allow the moment to be a small pause in your day.
Bringing DIY Bioplastic Suncatchers Into Your Space

A finished suncatcher changes the room in subtle ways. It draws attention to light and slows the pace of looking. You can hang one in a kitchen window to catch morning light and lift a quiet corner while you make tea. Arrange a few at different heights near a reading chair, where the sway and refractions offer a gentle, moving pattern.
I like to use small suncatchers as seasonal markers. In spring I press tiny cherry blossoms and hang them near a south-facing window. In late summer I pick dried grasses and let the amber tones filter afternoon sun. The pieces feel like collected moments, small archives of texture and scent.
For shared spaces, hang a few at child eye height. They invite soft conversations about color, weight, and touch. When multiple suncatchers gather, they create a luminous chorus in the window. If you prefer a minimal look, one simple pane of clear bioplastic with a single preserved leaf feels just as intentional.
If you want more ideas for displaying and rotating pieces, you might enjoy these varied display ideas and variations. They offer gentle prompts for placement, grouping, and seasonal transitions.
How to Store or Reuse DIY Bioplastic Suncatchers
Store your suncatchers flat in a cool, dry place to keep them from warping. Lay them between sheets of parchment or tissue paper inside a shallow box. Avoid stacking heavy objects on top because the pieces can bend or crack under pressure.
If a suncatcher loses its shine, wash it gently with warm water and a mild soap. Dry it flat on a towel. Avoid abrasive cleaners that can scratch the surface. For small scratches, fine sandpaper used lightly will smooth the edge and then wipe away any dust.
You can repurpose older pieces by cutting them into smaller shapes or using them as textured insets in simple frames. Warm the plastic gently and press it into shallow edges of a wooden frame to set. If a piece breaks, save the fragments for collage-style suncatchers or as colorful tokens in a jar of light.
For long-term care, keep suncatchers out of direct, intense sun for months at a time. Continuous high heat can make them more brittle. Rotate pieces between windows to give each one a rest, preserving both the color and the structure.
Small Ways to Make It Your Own

- Invite scent quietly: tuck a tiny dried herb under a pressed petal before the piece cools.
This creates a faint, hidden aroma when you hold the suncatcher up to the nose. - Layer thin papers or translucent fabric for depth.
Paper adds a soft matte texture and diffuses light differently than botanicals. - Use a gentle color wash instead of solid dye.
Dilute color and brush it into the mold before pouring for watercolor-like effects. - Make a set with a shared theme.
Collect three or five small pieces that echo a color family or a season and hang them together. - Try simple negative space.
Leave one clear area in each piece to emphasize shape and to let light pass untouched.
Treat these suggestions as invitations. Small changes alter how a piece catches light, how it sounds when it moves, and how it feels in your hands. Experiment slowly and savor the discoveries.
FAQs About DIY Bioplastic Suncatchers
Are bioplastic suncatchers safe for children to make?
Yes, with careful supervision and age-appropriate roles. Let children measure and arrange botanicals while an adult handles the hot mixture. Use low-heat cooling methods and ensure that you make the hole for hanging while the piece is pliable but not dangerously hot.
How long will a bioplastic suncatcher last?
With gentle care, several seasons is common. Avoid extreme heat or direct midday sun for long stretches. Rotate and store flat between uses to prevent warping, and clean with mild soap rather than harsh chemicals.
Can I use store-bought plastic or recycled plastic instead?
Store-bought plastics behave differently than a homemade bioplastic. The charm of this project comes from working with a simple, starch-based mix that sets translucent and fragile in a way you can comfortably handle. If you try other plastics, they may need different temperatures and safety measures.
My piece stuck to the mat; what did I do wrong?
The most common issues are uneven heat or insufficient nonstick surface. Use a fresh silicone mat or well-greased parchment, and let the piece cool until it firms but still flexes slightly. If it sticks, warm it gently and peel from an edge while supporting the sheet.
How can I avoid bubbles under pressed items?
Press botanicals gently and let them sit for a minute to release trapped air. If small bubbles appear, use a toothpick to coax them outward before the plastic fully sets.
A Gentle Note Before You Go
Take a breath and notice the light in the room where you work. The soft focus that comes with making will return if you give it time. Each small suncatcher carries the memory of your hands, the quiet sound of a spoon, and the choice to look slowly. That collection of tiny choices becomes a gentle habit, an anchor for calm across ordinary days.
Slow down for the finish. Tie a soft loop, hang the piece where sunlight meets it, and watch how the day changes in the panes you made with patient hands. This is more than a craft; it is a quiet way to let light hold your intentions.
Conclusion
If you want a science-focused, step-by-step explanation of how the ingredients interact, this clear guide explains the chemistry behind making a bioplastic suncatcher and offers precise measurements: How To Make A Bioplastic Suncatcher – Chemistry for Kids.
For a botanical approach with delicate plant placements and natural dye ideas, this thoughtful tutorial shows variations and botanical inspirations: Botanical Bioplastic Sun Catchers – Wineberry Woods.
Thank you for sharing this quiet making time. I hope the process comforts you and that you find gentle satisfaction in watching light move through the small things you create.
PrintDIY Bioplastic Suncatchers

Create beautiful DIY bioplastic suncatchers with a simple, hands-on process that captures light and joy.
- Prep Time: 15 minutes
- Cook Time: 60 minutes
- Total Time: 75 minutes
- Yield: 4 suncatchers
- Category: Craft
- Method: Crafting
- Cuisine: N/A
- Diet: N/A
Ingredients
- Tapioca starch or cornstarch
- Distilled water or filtered water
- White vinegar or lemon juice
- Glycerin (optional)
- Natural dyes, powdered pigments, or food coloring (optional)
- Small pressed flowers, leaves, or thin fabric scraps
- Baking sheet or heatproof tray (lined with a silicone mat or parchment)
- Parchment paper or silicone mat
- Nonstick spray or light oil (optional)
- Measuring spoons and cups
- Small saucepan and whisk or silicone spatula
- Heatproof molds or cookie cutters
- A straw or thin skewer
- Fine sandpaper or nail file
- String, thread, or thin ribbon for hanging
Instructions
- Prepare your workspace and materials.
- Measure one part starch with four parts water in a small saucepan. Add a teaspoon of vinegar for every cup of water.
- Whisk over medium-low heat until the mixture thickens and turns translucent.
- Remove from heat and add glycerin or color.
- Pour into molds with a slow, steady hand.
- Place botanicals or materials on top gently.
- Let the pieces set at room temperature for 30 to 90 minutes.
- Make a hole for hanging while warm.
- Carefully peel the suncatcher from the mat.
- Smooth rough edges with fine sandpaper.
- String and hang your suncatcher.
- Pause and notice the light.
Notes
Store suncatchers flat in a cool, dry place to prevent warping. Gently clean with mild soap if needed.