

I press a fingertip into a shallow bowl of warm water and feel the powder slip and bloom like quiet snow. The soft scent of baking soda sits faint and clean, the surface catching light as I stir slowly. I set a small, twig-like paper tree into the solution and watch tiny crystals settle and climb. That hush of watching something grow by hand is why I keep returning to Baking Soda Growing Trees.
Why Baking Soda Growing Trees Feels Comforting to Create

There is a calm rhythm to this craft. You mix, you wait, you watch. The textures change under your hands, from smooth liquid to grainy paste to sharp, twinkling crystals. Each stage asks for a slow breath and a mindful gaze.
Making these little trees helps you slow down because the process does not rush. Crystals need time. The pause between steps becomes a moment to notice warmth, light, and the feeling of material under fingertips. This project fits quietly into a cozy evening or a soft morning. It gives a small, steady joy as patterns form that you did not control completely.
This activity also offers a gentle blend of science and art. If you want more ideas for crystal-like projects, you might like the companion exploration I tried with a slightly different recipe on the site, where textures and color play more freely baking soda crystal growing trees. That page holds a few close photos and notes that pair well with this practice.
How This DIY Comes Together
The flow moves between tactile work and quiet observation. You fold or shape a base, mix a solution, and place the form to catch crystals. The action feels hands-on and satisfying. You hear small sounds too, like the faint fizz if you add a mild acid, or the soft clink when crystals settle on glass.
Visually, the project gives you a sequence: pale liquid, cloudy edges, then defined crystal faces. The rhythm of watching is part of the craft. You may sip tea, set the tray on a low table, and check hourly. Each check reveals subtle new growth. The steady, unhurried pace helps anchor attention.
As you work, you’ll notice how the mixture thickens and how color travels through the branches. That slow migration of pigment feels almost like watercolor breathing into paper. If you want a close variation that explores a slightly different structure, this other how-to on the site shows an alternate shape and timing baking soda crystal growing tree.
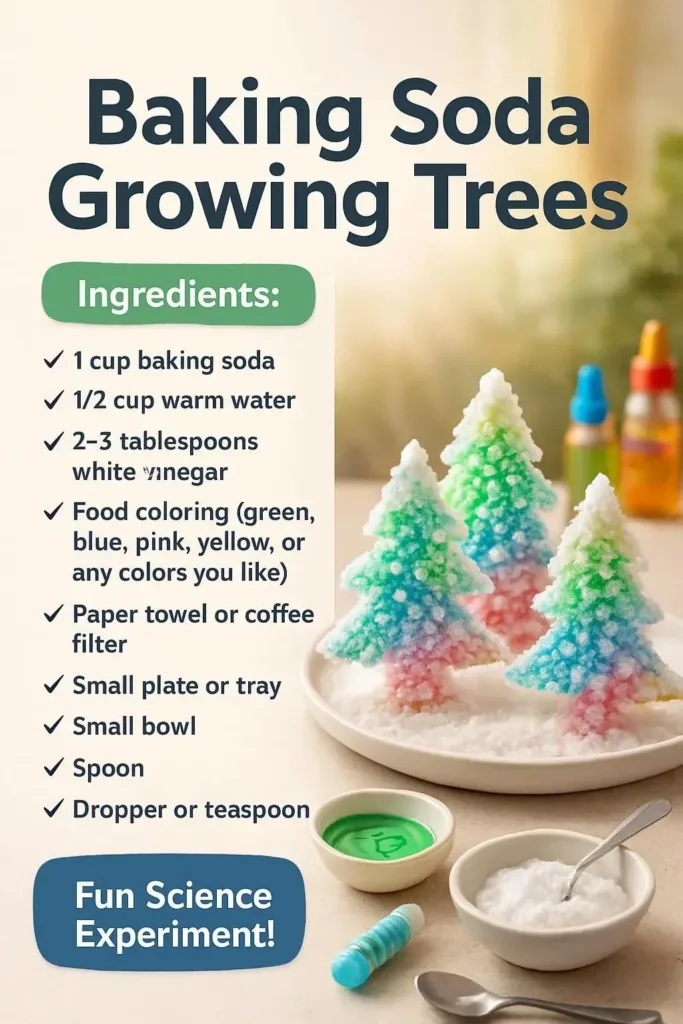
Materials You’ll Need
- Baking soda (sodium bicarbonate), easy to find at grocery stores.
- Warm water, to help dissolve and carry the baking soda.
- Clear glass or shallow dish, optional but helpful for watching growth.
- Small twig-like forms: small paper trees, pipe cleaners, or twig shapes from craft clay.
- Food coloring or watercolor for gentle tinting, optional and safe in small amounts.
- Measuring cups and spoon, simple tools.
- Tray or towel to protect your workspace, recommended.
- Small jars or cups for mixing solutions, easy to reuse.
- Protective gloves and safety glasses for sensitive skin or if you prefer extra care, optional.
- Tweezers or chopsticks for moving pieces with a light touch, helpful and nice for slow handling.
If you prefer a ready-made shape, you can use paper tree templates or preformed craft branches. I often use pipe cleaners wrapped in paper; they hold shape and show crystals beautifully. Another variation and helpful reference with a slightly different set of materials is available here baking soda growing tree crystal.
Step-by-Step Directions
Prepare your workspace.
Set a tray or towel down to protect the table.
Arrange jars, tools, and your tree form within reach.Make a concentrated baking soda solution.
Stir 1 cup warm water into about 3 to 4 tablespoons baking soda.
Stir slowly until the powder mostly dissolves and the mix looks a bit cloudy.Color the solution gently if you like.
Add a drop or two of food coloring and stir.
Keep colors soft; they spread slowly through the crystals.Shape your tree base.
Bend a pipe cleaner or clip a paper tree onto a cork or small jar lid.
Make sure it stands upright and has thin, twiggy branches.Position the tree in the solution.
Set the base so only the lowest branches touch the liquid.
Avoid submerging the whole trunk; crystals form best from the wet edges upward.Watch and wait with a gentle eye.
Place the tray in a spot with steady light, not direct sun.
Check hourly for a gentle rise of crystalline growth.If fizzing occurs, slow down and observe.
A small fizz can come from tiny reactions if any acid touches the base.
This fizz often ends quickly; let the piece settle before moving it.Lift the tree after a day to inspect.
Use tweezers or a careful hand to lift and set on paper towel.
Let excess liquid drip away while you admire the texture forming.Let the crystals dry and harden slowly.
Place the tree on a soft surface out of drafts.
Drying slowly gives clearer, more defined crystal faces.Add finishing touches if you like.
Dust a little extra baking soda where growth looks sparse.
You can glue a few larger crystals to hold a shape, using a tiny dab of white glue.Display gently.
Set the tree in a shallow dish or on a shelf with a soft cloth underneath.
Avoid high traffic spots where curious hands might nudge fragile branches.Reflect on the process.
Sit with a cup of tea and notice how your pace changed while you watched.
Let the small outcome feel like a slow, shared moment with the materials.
Enjoying the Finished Piece


Using Baking Soda Growing Trees in Everyday Life
These small trees make quiet decorations for shelves, windowsills, or bedside tables. They give off a subtle, crystalline light when a lamp shines near them. I like to place one near a reading nook where it catches the evening glow.
The pieces also work well as gentle gifts. A tiny tree wrapped in soft tissue feels like passing on a calm moment. If you use them as table accents, keep them away from plates and food. Crystals can flake slightly if they receive a bump, so choose a low-traffic corner for display.
For seasonal use, tuck a few trees into a shallow bowl with dried moss or smooth stones. The contrast between rough moss and bright crystals feels satisfying to the hand. If you want another presentation idea with a slightly different base or color approach, you can find more inspiration and photos on this related page baking soda growing tree.
Keeping It for Later
These trees live best when you store them with care. Keep them in a small box or a shallow dish lined with tissue paper. Avoid humid spots like bathrooms, because moisture can soften the crystals over time.
If a branch loses a few tiny crystals, you can brush off the loose bits gently with a soft brush. For longer storage, wrap each piece in acid-free tissue to protect the delicate faces. When you want to refresh an older tree, a light mist of the baking soda solution can sometimes encourage small new growth, but expect different results than the original forming stage.
If you plan to reuse the base forms, you can dissolve the old baking soda layer in warm water and reshape the tree for a new cycle. This reworking lets you try different colors and patterns without throwing away materials. I often revive a base and watch how a new set of crystals grows in a slightly different rhythm.
Gentle Tips & Variations
Invite scent slowly: Add a single drop of essential oil to a nearby dish, not into the crystal solution. The scent will settle into the room without changing the chemistry of your crystals.
Try different bases: Use tiny twigs, rolled paper, or thin cardboard for varied textures. Natural twigs produce uneven growth, which can feel more wild and lovely.
Play with color layering: Make two cups of solution in different shades. Dip branches first in one, let them dry a bit, then dip in the second. The layers create soft color transitions as crystals form.
Slow the process for clearer crystals: Use slightly cooler water and let evaporation happen more gradually. Slower drying often yields more defined crystal faces.
Keep a making journal: Note temperatures, amounts, and where you placed the tray. After a few tries, you will see patterns and learn what small changes make the outcomes you like.
What I’ve Learned While Making This
I learned to trust the pauses. At first, I moved things too soon and smudged the delicate points. Giving the mixture time taught me patience and a quiet kind of attention. I learned to notice tiny cues, like how the solution’s surface looks when it is ready to form new growth.
I also learned to respect safety and honest limitations. Baking soda is safe in small hands, but it can irritate eyes. I always keep a bowl of plain water nearby when I work with little ones, and I remind curious children not to taste the solution. I keep a towel and an extra set of jars so nothing spills histrionically. These small routines help the making feel calm rather than hurried.
FAQs About Baking Soda Growing Trees:
Q: Will the crystals last forever?
A: Crystals can be quite stable if you keep them dry and out of direct humidity. Over long periods, they may flake slightly or dull with dust. Gentle storage will extend their life.
Q: Can children make these trees safely?
A: Yes, with supervision. Keep young children from tasting the mixture. Have them help shape bases and watch growth. Use gloves if a child has sensitive skin.
Q: What causes the crystals to form?
A: Crystals appear when the solution becomes saturated and water evaporates. The baking soda molecules arrange into solid forms on the surface of the branches. Slow evaporation tends to make nicer crystal faces.
Q: Can I use salt or other powders instead?
A: Yes. Salt and sugar also form crystals and provide different textures. Each material behaves a bit differently, so expect varied shapes and timeframes.
Q: What if my tree fizzles or bubbles?
A: A small fizz may occur if any acid gets into the mix, such as from citrus or vinegar. That reaction is normal and often stops quickly. If it persists, move the piece to a fresh solution and let it settle.
A Gentle Note Before You Go
When you finish, take a minute to breathe with the piece beside you. Notice how the making changed your pace. Let the action of watching something grow feel like a small ritual. These trees invite slow attention rather than perfect results.
If you keep a few simple tools and a small box of baking soda, you can return to this practice whenever you need a quiet break. The shapes will vary, and that variation is part of the charm. Each tree holds a memory of the moment you made it, the warmth of your hands, and the soft light that watched the crystals form.
Conclusion
If you want a quick visual guide and an alternate method that glows in the dark, the write-up on Baking Soda Glowing Trees – The Buzzy B pairs well with this calm process. For thoughts about caring for real trees and how patient, seasonal attention shapes living branches, this informative extension piece on How do I care for apple trees on a property I just purchased? offers grounded, practical advice.
PrintBaking Soda Growing Trees

A calming DIY craft that combines science and art to create beautiful crystalline trees using baking soda and warm water.
- Prep Time: 15 minutes
- Cook Time: 0 minutes
- Total Time: 1 day
- Yield: 1 tree
- Category: Craft
- Method: DIY Craft
- Cuisine: N/A
- Diet: N/A
Ingredients
- 1 cup warm water
- 3 to 4 tablespoons baking soda
- Food coloring (optional)
- Small twig-like forms (small paper trees, pipe cleaners)
- Tray or towel for workspace protection
- Small jars or cups for mixing
- Protective gloves and safety glasses (optional)
- Tweezers or chopsticks (optional)
Instructions
- Prepare your workspace by setting a tray or towel down to protect the table.
- Make a concentrated baking soda solution by stirring 1 cup of warm water into 3 to 4 tablespoons of baking soda.
- Color the solution gently with food coloring if desired.
- Shape your tree base by bending a pipe cleaner or attaching a paper tree to a cork.
- Position the tree in the solution, ensuring only the lowest branches touch the liquid.
- Watch and wait, placing the tray in a spot with steady light and checking hourly.
- If fizzing occurs, observe and let the piece settle before moving.
- Lift the tree after a day to inspect, using tweezers or a careful hand.
- Let the crystals dry and harden slowly by placing the tree on a soft surface.
- Add finishing touches if desired, such as dusting extra baking soda on sparse areas.
- Display the tree gently in a safe spot.
- Reflect on the process and enjoy the quiet beauty of your creation.
Notes
These trees make lovely decorations and gifts. Store them in a cool, dry place to maintain their crystal formation.