

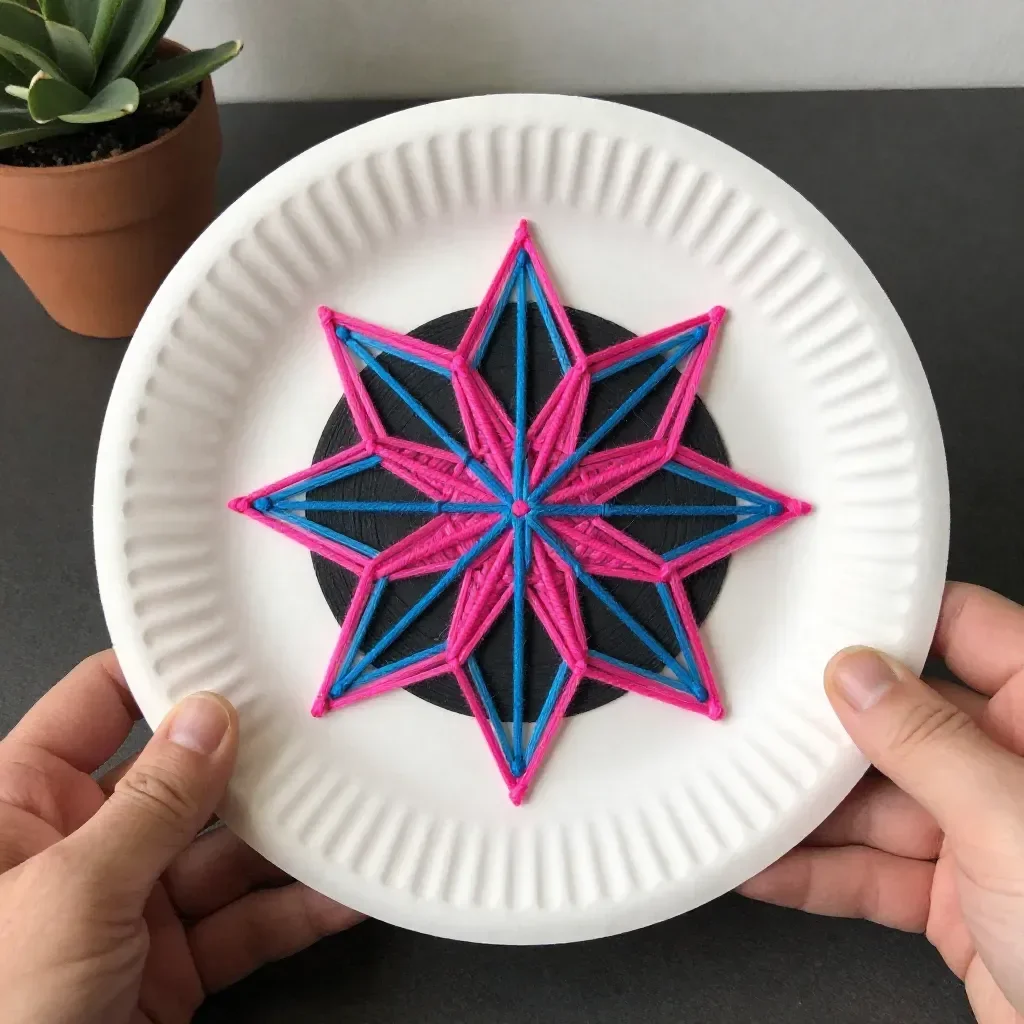
As you sit down with a comforting cup of tea, the world outside fades away, leaving only the soft whisper of your thoughts and the warmth of home. The gentle click of a needle or the tug of a string brings a feeling of calm, inviting you into a space where creativity can unfold. String Art Wheels embody this serene journey, blending tactile engagement with visual beauty. Each twist and turn of the string can create not just a lovely design but also a mindful experience, allowing you to connect deeply with the materials at hand. You may also find Baking Soda Crystal Heart Growth useful.
The quiet joy of making String Art Wheels lies in the act itself. As you focus on wrapping the string around the wheel’s contours, you engage in a rhythm that is soothing to both the mind and the body. This process invites you to slow down, creating a meditative space where distractions melt away. The tactile experience of handling the string, woven around the form, enhances your awareness of texture and movement. This project is not just about the finished piece; it’s about embracing the calmness that comes with creating something beautiful. For those who appreciate mindful making, exploring similar projects like crystal heart crafts can also be rewarding.

In embarking on the creation of String Art Wheels, you may find yourself captivated by how this simple craft allows you to express emotions, memories, and dreams. It’s more than a decorative piece; it becomes a comforting expression of self, something to cherish or to gift. The repetitive motions create a sensory rhythm that can help ground your thoughts. In today’s fast-paced world, projects like these serve as gentle reminders to pause, breathe, and nurture our inner creativity. You can embrace this calming practice and invite more similar experiences into your life. Consider exploring projects such as clear heart blossoms to add variety to your DIY pursuits.
A gentle look at the process behind String Art Wheels reveals a delicate dance between materials and intentions. It begins in a quiet space where you can immerse yourself in the soothing act of crafting. You’ll feel the smoothness of the wood or the metallic touch of a staple — each sensation guides you toward a more connected experience. Gathering your thoughts is part of the preparation as you lay out your supplies, mentally preparing for the gentle movements ahead. The experience is rhythmic, with the sounds of the string pulling taut and the soft whispers of your imagination flowing as you create.
Before you begin making String Art Wheels, gather the materials you will need so that you can create with ease and focus.
- A wooden wheel (easy to find at craft stores)
- Colorful embroidery floss or string (choose a variety for visual interest)
- A sharp needle (to make threading easier)
- Scissors (for clean cuts)
- A ruler (to measure distances if desired)
- Optional embellishments (like beads or sequins for added texture)
Each material plays a role, offering different textures and colors, inviting you to explore the depth of your creativity. Set your space with your materials, ensuring that you feel relaxed and connected to the environment. As you embark on this project, think about exploring other creative techniques, such as crystal eggshell art, to complement your crafting journey.
When you begin, follow these calm steps to create your String Art Wheels:
-
Prepare the wheel: Ensure your wooden wheel is clean and smooth. A gentle rub with a cloth will set a calm tone for your crafting space.
-
Plan your design: Before you start wrapping, consider the patterns you want to create with your string. Sketching on paper may help visualize your thoughts.
-
Thread the needle: Cut a length of string, then carefully thread it through the needle. Tie a knot at one end to secure it.
-
Start wrapping: Begin at the outer edge of the wheel. Calmly wrap the string around, making sure to space it evenly. Allow the string to glide through your fingers as you work.
-
Change colors: If using multiple colors, simply knot the end of one string and attach another, blending colors artistically. This moment can inspire creativity and a sense of playfulness in your project.
-
Secure the end: Once your wheel is fully wrapped, tie off the end of the string at the back. Make sure it is firm, so your design stays intact.
-
Add embellishments: If desired, sew or glue beads or sequins onto your finished wheel to add dimension. These small additions can evoke joy and surprise.
-
Hang and display your creation: Find a lovely spot in your space to showcase your String Art Wheel. It can be a gentle reminder of your moments of tranquility.

By using String Art Wheels in everyday life, the beauty of your creation can infuse your space with warmth and creativity. These wheels are not just decorative; they become focal points in rooms, inviting conversation and contemplation. Consider hanging them in a personal nook or a shared space where they can be appreciated daily. Each glance might bring a moment of calmness amid the rush of everyday life.
To extend the life of your String Art Wheels, take gentle care of your creations. Here are some ways to ensure they remain cherished pieces in your home:
-
Keep them dry: Avoid placing your wheels in damp areas to prevent any damage to the materials. A dry environment will ensure their longevity.
-
Wipe gently: Use a soft cloth to clean the surface. This careful handling will keep the textures and colors vibrant.
-
Rotate displays: Change the way you showcase them from time to time. This small shift can refresh the space and provide new perspectives.
When considering gentle tips or variations for your String Art Wheels, let your creativity lead you:
-
Experiment with patterns: Try different wrapping techniques or multiple layers to create a more intricate design. This is an invitation to explore the technique in a new light.
-
Mix materials: Use different types of string or even incorporate natural elements like twine to enhance the textural experience. This blend can evoke the beauty of nature within your craft.
-
Invite friends: Creating in a group can foster connection, where each participant can express their unique styles. You might find joy in sharing supplies and ideas, deepening your crafting experience.

FAQs About String Art Wheels:
What age is suitable for making String Art Wheels?
String Art Wheels can be a great activity for all ages, though adult supervision may be necessary for younger children, especially when handling scissors or needles.
How long does it take to complete a project?
The time to create a String Art Wheel varies depending on the complexity of your design, but on average, you might spend 1 to 2 hours enjoying the process.
Can I reuse the materials after I’m done?
Yes! If you decide to take apart your String Art Wheel, you can save the materials for future projects. Repeating the process can bring new insights into creative expression.
Conclusion
Creating String Art Wheels offers a unique opportunity to connect with your surroundings and embrace the art of making. This gentle craft can provide not just a finished piece but also a grounding moment in your day. For further inspiration, you might find it helpful to explore this guide on string art wall decoration or engage in discussions about challenges you face with similar projects on the Prusa Forum. Embrace the quiet moments that come with crafting and let your creativity flow.
PrintString Art Wheels

Create beautiful and calming String Art Wheels, perfect for personal expression and home decor.
- Prep Time: 10 minutes
- Cook Time: 120 minutes
- Total Time: 130 minutes
- Yield: 1 String Art Wheel
- Category: Craft
- Method: Crafting
- Cuisine: DIY
- Diet: N/A
Ingredients
- 1 wooden wheel
- Colorful embroidery floss or string
- 1 sharp needle
- 1 pair of scissors
- 1 ruler (optional)
- Optional embellishments (beads or sequins)
Instructions
- Prepare the wheel: Ensure your wooden wheel is clean and smooth.
- Plan your design: Consider the patterns you want to create and sketch them if needed.
- Thread the needle: Cut a length of string, thread it through the needle, and tie a knot.
- Start wrapping: Begin at the outer edge of the wheel, spacing the string evenly.
- Change colors: Knot the end of one string and attach another if using multiple colors.
- Secure the end: Once wrapped, tie off the end of the string tightly at the back.
- Add embellishments: Sew or glue beads or sequins as desired.
- Hang and display your creation in a lovely spot.
Notes
Keep your String Art Wheels dry and clean for longevity. Experiment with different patterns and materials for variety.