

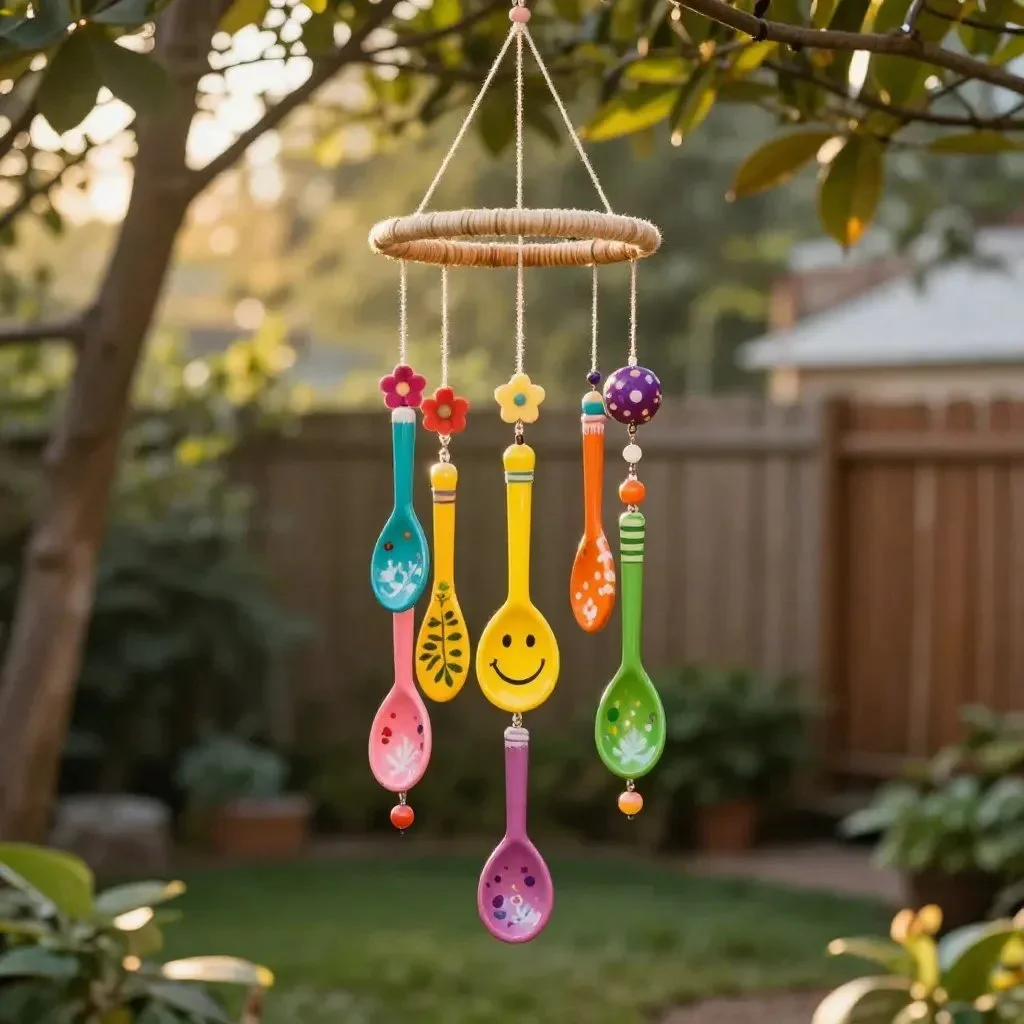
Creating Painted Wooden Spoon Garden Chimes offers a gentle rhythm to the heart, inviting you to slow down and engage your senses. The soft wood embraces your fingertips, while the colorful paint dances across the surface, filling your workspace with cheerful hues. As you envision the soft clink of spoons catching the breeze, you might anticipate the peaceful sounds they will create in your garden. This project is not just about crafting; it’s about enjoying the moment, immersing yourself in creativity, and making something beautiful that can be cherished. You may also find Baking Soda Painted Easter Eggs Baking Soda Eggs useful.
Why Make This Painted Wooden Spoon Garden Chimes
Engaging in creative activities like making Painted Wooden Spoon Garden Chimes allows us to tap into a sense of calm and focus. The act of painting the wooden spoons serves as a mindful exercise, encouraging us to be present in the moment. The vibrant colors can evoke positivity and joy, and the simple act of creating can soothe a busy mind. Whether you hang these chimes in your garden or on your porch, they become a reminder of enjoyable moments spent crafting, bringing visual warmth to any outdoor space. You may find inspiration in other calming projects, such as painted spring flowers, which share a similar essence of tranquility.

A Gentle Look at the Process
Before diving into the materials list, it’s essential to appreciate the flow of creating these garden chimes. Picture the smooth strokes of your brush as it glides across the wood, leaving a trail of color behind. Each spoon transformed becomes a melody in waiting as you attach them together, layering sound and visual beauty. The soothing act of tying knots and arranging the pieces brings a sense of rhythm, connecting everything into a harmonious whole. This gentle process fosters a focus on each step and a delightful anticipation of the final creation. You may also find Baking Soda Painted Easter Eggs useful.
Materials You’ll Need
Gathering your materials lays the foundation for a peaceful crafting session. Here’s what you will need to make your own Painted Wooden Spoon Garden Chimes:
- Wooden spoons (2 to 5)
- Acrylic paint (various colors)
- Paintbrush
- Twine or string (natural fiber preferred)
- Scissors
- Beads (optional for added charm)
- Drill with a small bit (for creating holes)
- Clear sealant (optional for protecting the paint)
Feel free to choose colors that resonate with you, making this project more personal. Acrylic paint is easy to find and works well on wood, while natural twine adds a grounding touch.
Step-by-Step Directions
Prepare Your Workspace: Choose a clean, comfortable area where you can spread out your materials. Lay down newspaper or a drop cloth to protect your surfaces.
Paint the Spoons: Dip your brush into the acrylic paint and gently apply it to the wooden spoons. Layer colors if you like, allowing one coat to dry before adding another. Embrace the process and enjoy the texture of the paint.
Drill Holes: Once the spoons are fully dry, carefully drill a small hole near the handle of each spoon. This is where you will thread the twine later.
Cut Twine: Measure and cut several lengths of twine. Each piece should be long enough to create a hanging loop with some excess for tying.
Assemble the Chimes: Thread a piece of twine through a hole in a spoon. Tie a knot to secure it. Repeat this for each spoon, spacing them evenly based on your design.
Add Beads (Optional): If you’re using beads, you can add them between spoons or at the ends of the twine for an extra decorative touch.
Create a Top Hanging Loop: Gather all twine ends together at the top and tie them securely. Make a loop for hanging.
Protect Your Creation: If desired, apply a clear sealant over the painted surfaces to protect your artwork from the elements.
Hang Your Chimes: Choose a lovely spot to display your Painted Wooden Spoon Garden Chimes. Enjoy the beautiful sounds they make in the wind.

Enjoying the Finished Piece
Finished Painted Wooden Spoon Garden Chimes can bring a delightful touch to any outdoor space. They not only serve as a whimsical decoration but also create a soft symphony as they sway gently in the breeze. Placing them near a window or in your garden invites nature’s melodies into your home, reminding you of the joy and calm found in crafting. When friends or family visit, they may admire your handiwork or even join in the creative process, nurturing the spirit of community and shared experiences. If you’re interested in more ways to decorate your garden, consider exploring rustic garden art ideas.
Keeping It for Later
To ensure your Painted Wooden Spoon Garden Chimes last through seasons, proper care and storage are essential. When not displayed, store them in a dry, safe place away from direct sunlight to prevent fading. If they become dusty or dirty, gently wipe them down with a soft cloth. Consider reapplying a clean coat of sealant every year to protect the paint and keep the colors vibrant. This way, you can continue to enjoy the soothing sounds of your chimes for years to come.
Gentle Tips & Variations
Experiment with Patterns: Allow yourself the freedom to create unique designs. Geometric patterns or floral motifs can add personal flair.
Try Natural Dyes: If you prefer a more organic look, consider using natural dyes from plants or spices. This process adds another layer of connection to the earth.
Incorporate Other Materials: Enhance your chimes by including small natural elements, like feathers or shells, for a more textured appearance.
Create a Theme: Perhaps make seasonal chimes; pastel colors for spring, warm hues for summer, and earth tones for fall to reflect the changing beauty around you.
Enjoy the Process: Remember, the joy is in the making. Allow yourself to explore and play without the pressure of perfection.

FAQs About Painted Wooden Spoon Garden Chimes
Can I use any type of paint?
While acrylic paint works great on wood, you can use other types as long as they adhere well and are safe for outdoor use. Just ensure they are weather-resistant if you plan to hang them outside.
How do I clean my garden chimes?
To clean your chimes, gently wipe them with a soft cloth. If they are particularly dirty, use a damp cloth with mild soap and water, then dry them immediately to prevent water damage.
Can I use metal spoons instead of wooden ones?
Metal can be used, but it may not create the same soothing sounds as wood. Painted wooden spoons offer a softer, more melodic quality as they chime together.
How do I hang my chimes securely?
Make sure the loop you create for hanging is tightly tied, and choose a location that offers a sturdy support, such as a tree branch or a hook designed for outdoor use.
What if my paint starts to chip?
If you notice chipping, you can touch it up with more paint or consider applying a sealant to protect your creation and extend its life.
Conclusion
Creating Painted Wooden Spoon Garden Chimes can be a rewarding endeavor that brings tranquility into your life and surroundings. As you hang these chimes, you may find that their gentle melodies inspire moments of reflection and joy in your daily routine. If you wish to explore more DIY ideas to enhance your space, check out these inspiring projects on Color Me Thrifty or Hometalk. Remember, the beauty of DIY lies in its creativity and the personal touches you bring to each piece, ensuring every project feels just right for you.
PrintPainted Wooden Spoon Garden Chimes

Create delightful Painted Wooden Spoon Garden Chimes that bring tranquility and charm to your garden with gentle melodies.
- Prep Time: 30 minutes
- Cook Time: 0 minutes
- Total Time: 30 minutes
- Yield: 1 project
- Category: Craft
- Method: Crafting
- Cuisine: N/A
- Diet: N/A
Ingredients
- Wooden spoons (2 to 5)
- Acrylic paint (various colors)
- Paintbrush
- Twine or string (natural fiber preferred)
- Scissors
- Beads (optional for added charm)
- Drill with a small bit (for creating holes)
- Clear sealant (optional for protecting the paint)
Instructions
- Prepare your workspace: Choose a clean, comfortable area where you can spread out your materials. Lay down newspaper or a drop cloth to protect your surfaces.
- Paint the spoons: Dip your brush into the acrylic paint and gently apply it to the wooden spoons. Layer colors if you like, allowing one coat to dry before adding another.
- Drill holes: Once the spoons are fully dry, carefully drill a small hole near the handle of each spoon for the twine.
- Cut twine: Measure and cut several lengths of twine for hanging.
- Assemble the chimes: Thread twine through the holes in the spoons and tie knots to secure them.
- Add beads (optional): Include beads between spoons or at the ends of the twine.
- Create a top hanging loop: Gather all twine ends together at the top and tie them securely.
- Protect your creation: Apply a clear sealant over the painted surfaces if desired.
- Hang your chimes: Choose a lovely spot to display your Painted Wooden Spoon Garden Chimes.
Notes
Store in a dry place away from direct sunlight to prevent fading. Clean with a soft cloth.