

I hold the tiny, glittering sphere between my thumb and forefinger and watch the light scatter across its surface. The Fairy Dust Bouncy Ball feels cool and slightly tacky at first, then smooth as it warms. I breathe in the faint clean scent of glue and salt and let the rhythmic plunk of a small bounce steady my breathing. This small, shimmering object reminds me that quiet making can feel like a tiny ritual.
The Quiet Joy of Making Fairy Dust Bouncy Balls

Making Fairy Dust Bouncy Balls helps you slow down without asking for perfection. The process asks only for gentle attention: measuring, mixing, rolling, and waiting. Each small action has a sensory reward. You feel the soft give of the paste as it turns into something springy. You watch glitter settle and swirl like a tiny galaxy. You hear a soft thud when a finished ball meets the tabletop. These small, calm moments add up.
This DIY fits into a slow rhythm. You do a little, pause, and return. The pace makes it easy to be present. If you have made other tactile projects, like the ones in our calm bouncy balls collection, you will recognize the same soothing loop of touch and time. For another playful variation, try a color-focused version that uses the same gentle steps and invites soft color choices.
A Gentle Look at the Process
Before you gather supplies, know that this project flows in three simple parts: mixing, shaping, and finishing. Mixing asks for patient stirring. Shaping encourages slow, mindful rolling between palms. Finishing invites a quiet inspection and a soft bounce test.
You will notice textures change as you move through each stage. The goo starts wet and sticky, then firms into a dense, squishy ball. The sensory shifts help anchor attention. If you like, set a small, calming soundtrack or let the sounds of your kitchen keep company. A warm mug nearby makes the experience extra cozy.
In my own making moments, I clear a small patch of table, lay down a soft cloth, and keep a damp towel to wipe sticky fingers. I tell myself the goal is not perfection. I aim for a handful of small objects that feel nice to hold and look at. If you like, read through our steps for calm color variations to see how little changes can change the mood.
Materials You’ll Need
- White PVA glue (school or craft glue), easy to find
- Contact lens saline solution with boric acid (this helps the glue firm), common in pharmacies
- Baking soda, common and gentle
- Fine glitter or mica powder for the fairy dust effect (optional; use small amounts)
- Food coloring or liquid watercolors for soft tints (optional)
- Small mixing bowl, smooth surface for rolling
- Spoon or small spatula for stirring
- Measuring spoons or small scale (optional; eyeballing works gently)
- A shallow tray or cloth to catch any drips
- Gloves (optional, for sensitive skin)
- A towel and soap for clean-up
A quick note on ingredients: PVA glue becomes bouncy when certain salts or borates link the long glue molecules together. Contact lens solution often contains the right ingredient in a diluted, safe form for crafting. I list gloves as optional because repeated handling can slightly dry skin for some people. If you prefer to avoid saline, a craft supply called liquid starch works similarly, though it can be more fluid to handle. You will find more ideas in our magic marble and super bouncy ball guides if you want different textures.
Step-by-Step Directions
Gather your materials and create a calm workspace.
Lay a soft cloth or tray on the table.
Keep a small cup of warm water and a towel nearby.Pour 2 tablespoons of glue into the mixing bowl.
Add a pinch (about 1/4 teaspoon) of baking soda.
Stir slowly until the mixture feels smooth.Add color and fairy dust now if you like.
A drop or two of food coloring gives a gentle tint.
Sprinkle a small pinch of glitter or mica and fold it in.Add contact solution slowly, one drop at a time.
Stir after each drop and watch the glue curl and pull away.
When it firms, it will feel thicker and less sticky.Test the texture as you go with a clean finger.
If it still sticks badly, add one more small drop of saline.
If it becomes too firm, knead in a few drops of water.Remove the mass and begin gentle rolling.
Cup the mixture between your palms and roll slowly.
Feel the warmth and resistance as it forms a sphere.Continue kneading until the surface smooths.
Work in short bursts to keep your hands relaxed.
If glitter clings to the bowl, scrape it gently back into the ball.Let the ball rest on the cloth for five to fifteen minutes.
The rest helps the internal structure settle and firm.
You will notice a firmer bounce after a short pause.Test the bounce on a soft surface.
Start with a low drop from a few inches.
Enjoy the sound and adjust future balls by varying baking soda or saline.Store finished balls in a small jar or cloth bag.
Keep them away from extreme heat or direct sunlight.
Label the jar if you make multiple color or texture variations.
Each step lets you slow down. Pause between actions. Notice the small changes in texture and light. If something feels inexact, treat it as a gentle experiment.
Using Fairy Dust Bouncy Balls in Everyday Life


Once you finish a handful of Fairy Dust Bouncy Balls, they become tiny tokens of calm. Keep one on your desk for a brief sensory break when you need a minute. Roll a ball between your fingers while you breathe and listen to the small sound it makes on a soft surface. You can use them in a mindful hand practice: set an intention, hold the ball for one breath, then bounce it softly and notice any shift.
Children find them captivating, but always supervise play. For quiet play, place a small cloth circle on the floor and let one ball bounce gently. You can create a soft rhythm by bouncing a sequence of colors in a slow, meditative pattern. If you keep a jar on a shelf, the light catches the glitter and becomes a little moment of brightness in a calm space.
If you also make other bouncy varieties, you will feel the differences: some balls respond with a high, lively bounce, while a fairy-dusted ball often has a softer, rounder spring. Using them helps you notice texture, sound, and the tiny reward of a predictable, gentle motion.
How to Store or Reuse Fairy Dust Bouncy Balls
Store your finished balls in a cool, dry jar or cloth pouch to keep dust away. A small glass jar with a soft lining works well. Keep them away from heaters and open windows where sunlight might fade color or soften the material.
If a ball loses bounce, try gently kneading it again with clean hands. A tiny mist of saline can sometimes revive the interior links and restore spring. If a ball becomes sticky or starts to break apart, you can press the pieces together and roll until they rejoin. For very tired or crumbly balls, save the pieces in a small container for tactile play in a tray rather than bouncing.
If you prefer not to reuse broken pieces, compost the non-glitter parts if your local rules allow and dispose of glitter responsibly. Consider switching to biodegradable glitter next time to keep the craft aligned with gentle environmental choices.
Gentle Tips & Variations
- Invite color slowly: Use one soft color at a time to keep the palette calm. A pale blue or blush gives a subtle, soothing feel.
- Try mica instead of plastic glitter: Mica gives a gentle shimmer and feels lighter against the skin.
- Make tiny gift sets: Pair a group of small bouncy balls with a hand-pressed note for a thoughtful, tactile present.
- Adjust the bounce: Add a touch more baking soda for a firmer texture, or a drop of extra saline for a springier feel. Tweak in tiny amounts to avoid overcorrecting.
- Make a sensory tray: Combine a few fairy-dusted balls with smooth stones and a soft cloth. Use the tray for short mindfulness breaks.
These variations invite curiosity without pressure. Treat each change as a quiet experiment. I like to try one small tweak at a time and keep notes on what changed. That gentle record helps me repeat a favorite texture later.
FAQs About Fairy Dust Bouncy Balls:
Q: Are these bouncy balls safe for kids?
A: They work well for older children with supervision.
Keep the materials out of mouths and eyes.
Always supervise play and store finished balls safely.
Q: What if my ball stays sticky?
A: Add the contact solution in very small amounts and knead longer.
Resting the ball can also help the material firm.
If it remains sticky, start a new batch and compare ratios.
Q: Can I make them without glitter?
A: Yes. They look lovely plain or softly colored.
Omitting glitter also makes clean-up simpler and kinder to nature.
Q: How long will they last?
A: With gentle use and cool storage, expect weeks to months.
Heavy use or warm conditions shorten lifespan.
Refresh them by mild kneading or a tiny saline mist.
Q: What should I avoid?
A: Avoid ingestion and keep contact solution away from young children.
Do not use household borax powder without proper guidance.
If your skin reacts, stop and rinse with warm water.
I answer these questions from many quiet afternoons spent testing ratios, cleaning sticky counters, and noticing how small changes shift texture. I keep a little notebook with notes about what worked and what I will do differently next time.
A Gentle Note Before You Go
Making Fairy Dust Bouncy Balls invites small rituals into ordinary minutes. Take your time with each step. Let the mixing and rolling become a series of little attentions that ground you. When you hold a finished ball, notice the temperature of the surface, the way the light settles in glitter, and the sound when it meets a soft tabletop. These tiny sensations give you a simple anchor back to the present.
If you want to explore more tactile projects, our collection offers other peaceful bouncy ball ideas and gentle variations. Each project teaches a small lesson about patience and texture. Allow yourself to make, to experiment, and to keep the work small and joyful.
Conclusion
I hope these small instructions help you find calm in the act of making and keep a little sparkle in your hands. For playful options you can buy today, consider delightful cat toys that echo the same round, bouncy charm from this curated collection at Cat toy balls to lose under the couch. If you prefer ready-made kits and store-bought mixes, you can also explore craft kits for making your own bouncy ball at make your own bouncy ball – Target. Thank you for making with care.
PrintFairy Dust Bouncy Balls

A simple DIY recipe to create springy, colorful bouncy balls using glue, baking soda, and saline solution, perfect for calming sensory breaks.
- Prep Time: 10 minutes
- Cook Time: 0 minutes
- Total Time: 10 minutes
- Yield: 4 bouncy balls
- Category: Craft
- Method: DIY
- Cuisine: N/A
- Diet: N/A
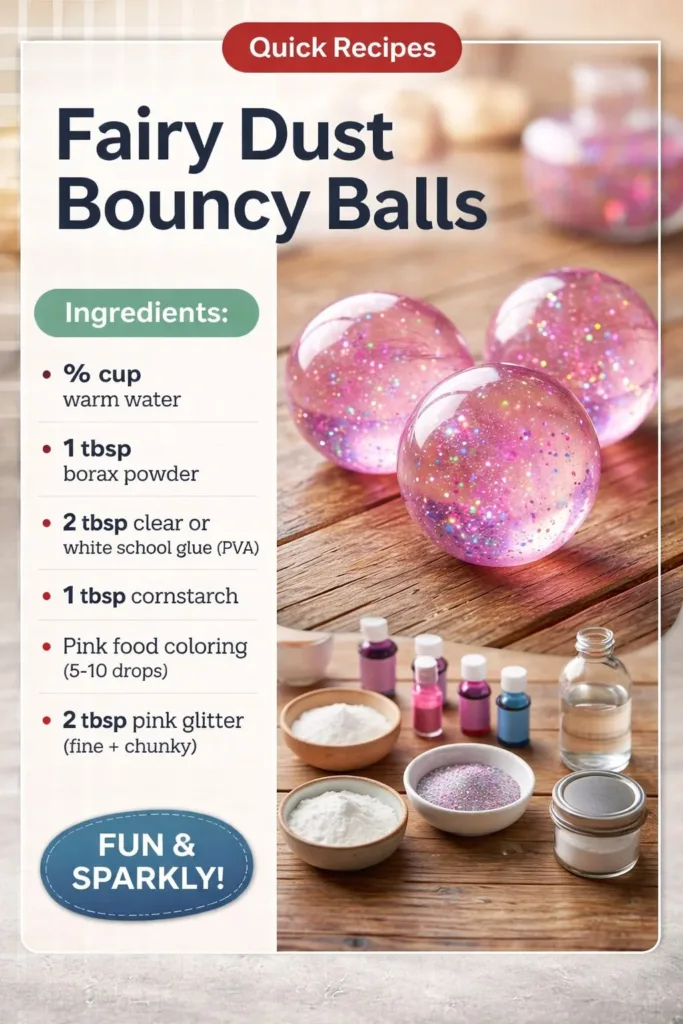
Ingredients
- 2 tablespoons White PVA glue
- 1/4 teaspoon Baking soda
- Contact lens saline solution
- Fine glitter or mica powder (optional)
- Food coloring or liquid watercolors (optional)
- Small mixing bowl
- Spoon or small spatula
- Measuring spoons or small scale (optional)
- A shallow tray or cloth
- Gloves (optional)
- A towel and soap for clean-up
Instructions
- Gather your materials and create a calm workspace.
- Lay a soft cloth or tray on the table.
- Keep a small cup of warm water and a towel nearby.
- Pour 2 tablespoons of glue into the mixing bowl.
- Add a pinch (about 1/4 teaspoon) of baking soda.
- Stir slowly until the mixture feels smooth.
- Add color and fairy dust if desired.
- Sprinkle glitter or mica and fold it in.
- Add contact solution slowly, one drop at a time.
- Stir after each drop and watch the glue curl away.
- Test the texture with a clean finger; adjust with saline or water as needed.
- Remove the mass and begin gentle rolling in your palms.
- Continue kneading until the surface smooths.
- Let the ball rest on the cloth for 5-15 minutes.
- Test the bounce on a soft surface.
- Store finished balls in a small jar or cloth bag.
Notes
These balls provide tactile sensory relief and are safe for older children with supervision. Store them in a cool, dry place.