

A light rain taps the window and I tuck a small pressed violet between two warm palms, smoothing its edges into a soft, matte sheet of Cornstarch Bioplastic for Pressed Flowers. The material feels gently cool and slightly flexible under my fingertips. I breathe in the faint, sweet scent of dried petals and the clean, comforting smell of kitchen starch, and the quiet of the table slows my thoughts. This project invites slow hands, careful eyes, and a calm space where making becomes a little ritual.
Why Cornstarch Bioplastic for Pressed Flowers Feels Comforting to Create

Making Cornstarch Bioplastic for Pressed Flowers brings a particular kind of stillness. You work with simple pantry ingredients and delicate blooms, and the process rewards slow gestures. As the mixture thickens on the stove, you listen to the soft bubbling, watch the color deepen, and feel the shift from liquid to pliable sheet. The texture stands out. It gives a gentle tactile feedback when you press petals in, like a quiet conversation between your fingers and the material.
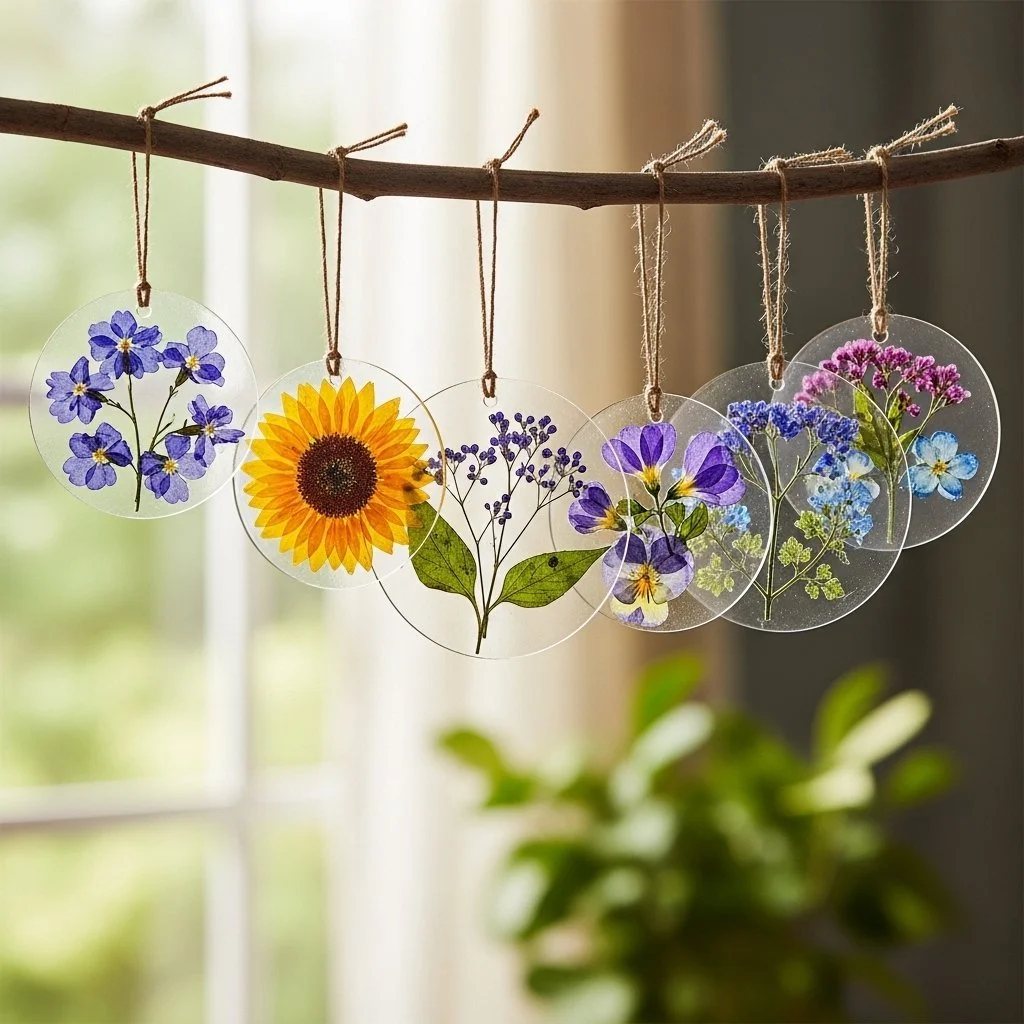
This DIY fits into mindful routines because it asks you to notice small things. You watch the way light filters through a thin petal trapped in the bioplastic. You feel the warmth of the cooling sheet under your hands. You practice patience as each slab cures. That calm rhythm stays with you after the project finishes. If you want a similar, sunny craft to pair with this one, you might enjoy the step-by-step approach in our bioplastic suncatchers flowers recipe, which uses comparable materials and a slow, sensory making flow.
A Gentle Look at the Process
Take a moment to picture the process before you begin. You boil, stir, and watch, then pour a warm, glossy mixture onto parchment. You arrange petals on the glossy surface and press gently with a soft cloth. Over hours the sheet changes from glossy to velvety, and the petals settle like memories preserved in a soft, translucent page.
The movement of the project feels calming. You stir with a wooden spoon and feel the rhythm of your arm matching the simmer. You slide a spatula along the pan and enjoy the smooth motion. You place weighted books on a cooling sheet and feel the reassuring weight as the piece flattens and dries. The sounds remain minimal, the lights remain soft, and the work invites presence rather than speed.
If you like the idea of turning these sheets into small sun-catching pieces, our guide to bioplastic suncatchers with flowers offers ideas for using similar slabs in bright, window-facing projects.
Materials You’ll Need
- Cornstarch: the base ingredient, easy to find in most kitchens.
- Water: clean, lukewarm for mixing and hot for cooking.
- White vinegar: a small amount helps the chemistry and acts as a mild preservative.
- Coconut oil or a light vegetable oil: adds flexibility so the bioplastic does not become brittle.
- Glycerin: optional, but it softens the final sheet and increases pliability.
- A nonstick skillet or small saucepan: for gentle, even heating.
- Wooden spoon or silicone spatula: for stirring without scratching.
- Parchment paper or silicone baking mat: for pouring and resting your sheets.
- Smooth rolling pin or a flat-topped cup: to flatten the warm sheet softly.
- Clean, dry pressed flowers or petals: well-pressed blooms keep moisture low and reduce buckling.
- Weights or books: to help flatten during the cooling stage.
- Fine sandpaper (optional): for smoothing edges later.
- Small craft scissors: to trim finished pieces.
- Measuring spoons and cups: for careful ratios.
Notes on materials: glycerin and coconut oil remain optional and work as tuning tools. If you avoid glycerin you can still make a pleasant sheet; it will feel a touch stiffer. I choose coconut oil for its gentle scent and skin-friendly nature. If you prefer neutral smell, use a light vegetable oil instead. For techniques that use small molds or frames, the ingredients and ratio remain the same.
Step-by-Step Directions
- Gather your ingredients and tools on a quiet surface. Lay out pressed flowers and measure everything slowly, allowing your hands to get used to the textures.
- Mix 2 tablespoons cornstarch with 1 cup water in the saucepan, stirring until mostly smooth. The cold mixture looks milky and soft in the pan.
- Add 1 teaspoon vinegar and 1 teaspoon oil to the mixture. If you use glycerin, add 1 teaspoon now. Stir the pale mixture gently so it feels even.
- Heat the pan over medium-low heat. Stir continuously in smooth, circular motions. Listen to the gradual increase in gentle bubbling; this signaling sound keeps you present to the moment.
- Watch the mixture thicken slowly into a translucent paste. It should gather on the spoon and move slowly, not liquidly. This stage usually takes 5 to 8 minutes. If it thickens too quickly, lower the heat.
- Remove the pan from heat when the paste forms a thick, stretchable mass. Let it rest one minute to cool slightly so it does not scorch or overcook the flowers later.
- Prepare your work surface with parchment paper or a silicone mat. Pour the warm paste into a small mound and use the spatula to spread it into an even layer, about 1.5 to 2 millimeters thick. Keep movements slow and calming.
- Arrange your pressed flowers gently on the warm sheet. Position them slightly spaced so each bloom breathes. Press each petal down with a soft cloth or the flat back of a spoon, feeling the subtle give under your hand.
- Cover the arranged sheet with another layer of parchment and place a smooth weight or book on top to keep it flat. Leave to cool and set for at least 2 to 4 hours, or overnight for a firmer finish.
- Once mostly dry, peel the sheet from the parchment slowly. If edges feel rough, trim with small scissors. If the piece remains tacky, return it to a dry area for a few more hours.
- If you prefer a smoother surface, sand the edges lightly with fine sandpaper, then wipe with a soft cloth. Store finished pieces flat until use.
During my first time making this, I misread the heat level and rushed. I learned that patience at the stove creates a silkier sheet, and that pressing petals when the sheet feels warm but not hot preserves their shape. I now trust the rhythm of stirring and timing more than a strict minute count.
Using Cornstarch Bioplastic for Pressed Flowers in Everyday Life


The finished sheets feel quiet and elegant in a small way. I keep a few thin squares on my work table to slip into a journal, and I place other pieces in a shallow dish so light can peek through. The material works well in small jewelry pendants when you cut a window and seal the edges with a thin glue or varnish. You may also string tiny rectangles into a delicate mobile that moves with soft air, casting floral shadows.
One of my favorite uses involves simple gift tags. Cut modest rectangles, punch a hole, and thread a piece of ribbon through. The recipient holds something tactile that carries a pressed memory. You can layer two thin sheets together and seal the seam with a little oil warmed on the surface. This doubles strength and offers a subtle translucence.
If you want to cross-pollinate ideas across crafts, try pairing a few bioplastic bits with the soft, crystalline textures from a different project, like our baking soda crystal instructions, for a mixed-material display that plays with matte and shiny surfaces across seasons. For inspiration on those playful textures, see our baking soda rainbow crystal forest recipe.
How to Store or Reuse Cornstarch Bioplastic for Pressed Flowers
Store your finished pieces flat in a cool, dry place. Keep them away from direct sunlight if you want to preserve color. Slight warmth may soften the sheets, but they regain firmness as they cool. If humidity becomes a worry, slip a small packet of dry rice or silica gel into the storage container to reduce moisture.
If a piece starts to feel too brittle, you can soften it slightly with a tiny dab of glycerin warmed on a spoon, then press and let it absorb. If the bioplastic shows tiny surface scuffs, buff gently with soft cloth and a touch of oil to restore a gentle sheen. When you wish to reuse a slab for another project, warm it very gently on low heat and press again into a new shape. The material responds well to gentle reworking but avoid high heat as it will degrade the sheet.
I keep small labeled envelopes of similar-sized finished pieces so I can choose one for a card or frame without searching. The ritual of selecting a piece becomes part of the calm practice.
What I’ve Learned While Making This
- Respect low heat: Gentle cooking yields the nicest texture. I learned that medium-low prevents graininess and helps the paste turn truly translucent.
- Press petals when warm but not hot: If the sheet feels hot, the petals can darken or shift. I now wait until the sheet cools to a warm touch.
- Use dry, well-pressed flowers: Damp petals change shape and invite mold. A few extra days in a heavy book make a big difference.
- Keep measurements as a guide, not a rule: Small adjustments to oil and glycerin let you tune firmness. I treat the recipe like a language where I change one word at a time.
- Practice gentle preservation: Store flat and keep humidity in mind. A soft cloth between layers prevents sticking and keeps surfaces clean.
Each of these notes comes from hands-on trials and small mistakes. I share them so your first experience feels easier. I also remind you to enjoy the experiments. Slightly different amounts create unique textures that feel personal.
Gentle Tips & Variations
- Invite color: Add a drop of natural pigment or powdered mica for soft color. Use a small amount, and mix thoroughly so the color remains subtle.
- Layer thin petals: Place petals in layers to create depth, and press gently between parchment for a soft, shadowed look.
- Make tiny frames: Use a small cookie cutter to cut shapes, then edge with a thin bead of varnish for a sturdier outline.
- Add texture: Press lace or thin fabric into the sheet before it sets for a whisper of pattern embedded beneath the petals.
- Try botanical stamping: Lightly press freshly cut leaves into a nearly dry sheet to leave a faint impression and then remove the leaf, leaving a silhouette.
Each tip invites play. Treat them as invitations rather than rules. Small, patient experiments often yield the most pleasurable surprises.
FAQs About Cornstarch Bioplastic for Pressed Flowers
Q: Will this material biodegrade if I compost it?
A: Yes, cornstarch-based bioplastic will break down more readily than many synthetic plastics, especially in a home compost or commercial composting environment. However, I recommend removing any non-biodegradable embellishments, such as metal loops or synthetic varnish, before composting.
Q: Can I use fresh flowers instead of pressed ones?
A: Fresh flowers carry moisture that changes the drying process and can lead to curling or discoloration. If you prefer fresh blooms, use very thin petals and press them gently as soon as they make contact with the warm sheet. Expect more experimentation and watch for longer drying times.
Q: Is this safe for small children or gentle pets?
A: The primary ingredients are food-safe, but the final product can pose a choking hazard to small children or pets if they chew on pieces. Keep finished items out of reach of children and pets, and supervise any shared making time. If you plan to make wearable pieces, double-check that any added findings or fasteners meet safety standards.
Q: How long will the colors of my pressed flowers last inside the bioplastic?
A: Colors will fade gradually over time, especially when exposed to direct sunlight. Storing pieces in shaded areas and choosing naturally color-stable blooms helps. If you want bright, lasting color, consider adding a thin layer of UV-blocking varnish designed for crafts.
Q: Can I sew or stitch through these sheets?
A: You can poke small holes and stitch with fine thread, but the material has limited tensile strength. Reinforce stitch points with a small patch of fabric or use them as framed elements instead of load-bearing pieces.
A Gentle Note Before You Go
Hold the finished piece to the light and notice the petal veins glow. Keep the making slow enough that each choice feels deliberate. The material rewards attention and returns a simple, tactile memento of a quiet hour.
Conclusion
If you want a deeper look at the science behind starch-based bioplastics and how they form and change with ingredients, this paper on Synthesis and characterization of starch based bioplastics offers detailed analysis and helpful context. For broader material experiments and resources related to sustainable materials, the Materiom search provides a practical, searchable collection of community-tested formulations and notes.
Thank you for taking this gentle making time. May the soft glow of your pressed blooms remind you to move slowly and return to small, grounding acts of creation.
PrintCornstarch Bioplastic for Pressed Flowers

A calming and mindful project to create biodegradable sheets for preserving pressed flowers, using simple pantry ingredients.
- Prep Time: 15 minutes
- Cook Time: 10 minutes
- Total Time: 4 hours
- Yield: 1 sheet
- Category: Craft
- Method: Crafting
- Cuisine: N/A
- Diet: N/A
Ingredients
- 2 tablespoons cornstarch
- 1 cup lukewarm water
- 1 teaspoon white vinegar
- 1 teaspoon coconut oil or light vegetable oil
- 1 teaspoon glycerin (optional)
- Parchment paper or silicone baking mat
- Wooden spoon or silicone spatula
- Weights or books for flattening
- Clean, dry pressed flowers or petals
- Small craft scissors
Instructions
- Gather your ingredients and tools on a quiet surface.
- Mix 2 tablespoons cornstarch with 1 cup water in the saucepan, stirring until mostly smooth.
- Add 1 teaspoon vinegar and 1 teaspoon oil to the mixture. Stir gently.
- Heat the pan over medium-low heat, stirring continuously.
- Watch the mixture thicken into a translucent paste (5 to 8 minutes).
- Remove the pan from heat when the paste is thick and stretchable.
- Prepare your work surface with parchment paper or silicone mat.
- Pour the warm paste into a small mound and spread it into an even layer.
- Arrange your pressed flowers gently on the warm sheet.
- Cover with another layer of parchment and place a weight on top.
- Leave to cool and set for at least 2 to 4 hours, or overnight.
- Peel the sheet from the parchment and trim if necessary.
- Smooth edges with fine sandpaper if desired.
Notes
Glycerin and coconut oil are optional; use as needed for desired texture. Ensure petals are dry and well-pressed to avoid mold.