

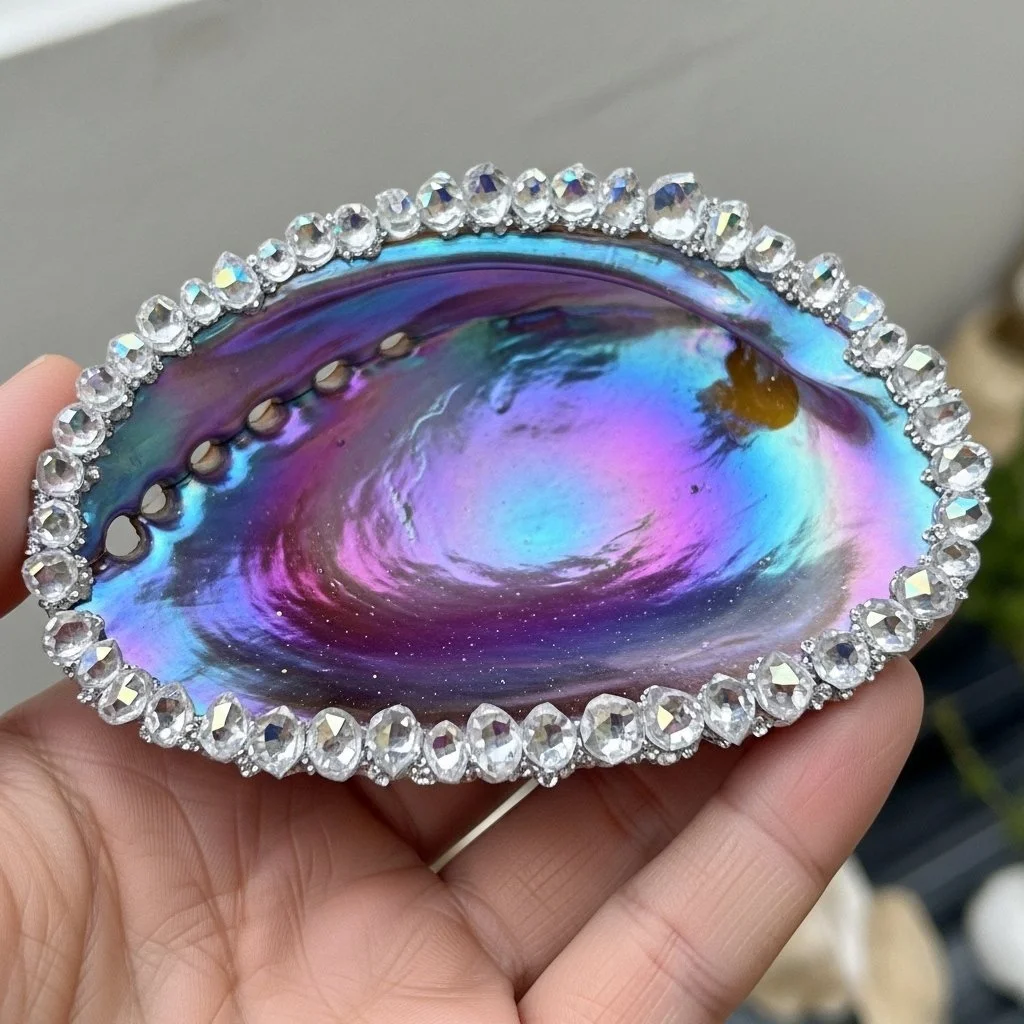
A slow afternoon light spills across a small tray of shells and jars, and I trace the ridges with a thumb until each curve feels familiar. Galaxy Crystal Seashells with Sparkling Colors sit between my palms like tiny planets, their glitter catching the sun and turning my breath into a gentle rhythm. Making them asks me to move slowly, to listen to the soft clink of glass and the hush of drying resin, and that quiet becomes its own kind of comfort. If you want a closer look before we start, this Galaxy Crystal Seashells project page offers a gentle overview I return to sometimes.
The Quiet Joy of Making Galaxy Crystal Seashells with Sparkling Colors

There is something small and certain in working with shells and crystals. You hold a rough edge, smooth it, choose a shimmer that reminds you of night sky, and the world slows. I return to this craft when I need to steady my hands and focus on simple, satisfying tasks.
This project invites quiet attention. The tactile feel of shells, the weight of tiny crystals, and the way resin moves and levels all give sensory cues that keep the mind present. You watch colors bloom, listen to the soft scrape of a toothpick, and that ongoing noticing feels soothing.
Making Galaxy Crystal Seashells with Sparkling Colors fits gently into slow routines. You can work for twenty focused minutes, or sit with it across an evening. The pace stays yours. The result delivers soft light and a small, sparkling object you can hold when you want to remember calm.
A Gentle Look at the Process
Before you gather materials, imagine the flow of this small project. You clean a shell until it feels dry and clean under your fingertips. You mix a tiny amount of resin and watch air bubbles rise and pop. You sprinkle iridescent glitters and tiny crystal chips and tilt the shell to let colors pool.
Movement stays minimal and mindful. You stir slowly and deliberately so the resin blends and sings beneath the spoon. You set a shell down and feel the table’s cool surface, then breathe and return to another shell. The process gives a soft visual rhythm: raw shell to glossy surface, white to dark swirls, small crystals to bright flecks.
Sound matters here in small ways. The tap of a glass jar lid, the whisper of glitter sliding, the muted clack of crystal chips. I find I listen to those sounds and let them guide my timing. If you want a longer read about the heart of this craft, this quiet joy post shares more personal moments and photos I used to plan my color palettes.
Materials You’ll Need
- Small clean seashells (easy to find at craft stores or from walks)
- Clear casting resin and hardener (one-part resin may work; follow label directions)
- Disposable mixing cups (single use keeps things simple)
- Stir sticks (wooden, smooth)
- Fine glitter in pearlescent or iridescent tones (optional)
- Tiny crystal chips or crushed glass (look for small, smooth pieces)
- Alcohol for cleaning (rubbing alcohol, easy to find)
- Nitrile gloves (safety and clean hands)
- Small funnel or pipette (for careful drops)
- Toothpicks and a small soft brush (for moving resin and clearing edges)
- Sanding paper in fine grits (optional, for smoothing edges after cure)
- Parchment or silicone mat to protect your work surface (reusable)
- Small sealant spray (optional, for added protection after curing)
A few gentle notes: I like crystal chips that catch light without sharp edges. You can substitute crushed glass with tiny beads or mica flakes. Choose resins labeled for small casting or jewelry work for a slower cure and fewer bubbles. If you prefer, this DIY crystal seashells tutorial gives variations on materials I tested.
Step-by-Step Directions
-
Prepare your space and shells.
Lay a parchment mat on the table and arrange shells on a soft towel. Wipe each shell with alcohol until it feels cool and clean. -
Set safety and pace.
Put on nitrile gloves and open a window or work near a small fan. Read the resin directions and plan the time you need to mix and pour. -
Measure resin and hardener.
Follow the manufacturer ratio exactly. Pour each part into a disposable cup slowly so you feel the weight of the mixture. -
Stir with calm, steady motion.
Use a stir stick and rotate gently for the time indicated. Watch air bubbles rise; scrape the sides and stir again to fold everything together. -
Add color and sparkle.
Drop a quarter of a teaspoon of fine glitter or mica into the mix and stir slowly. Add a tiny pinch of crystal chips and fold them in with the stick. -
Test a drop in a practice shell.
Let a drop level for a minute to see how the mixture behaves. This tiny trial helps you feel the cure time and shine before committing to all shells. -
Use a pipette or small funnel to pour.
Aim for the center of each shell and let the resin flow. If it pools high, tilt the shell gently so the resin settles along the ribs and fills small pockets. -
Nudge crystals into place.
Use a toothpick to move chips or glitter into patterns. Work slowly, making small adjustments until the design reads like a quiet galaxy. -
Pop visible bubbles with a warm breath or torch.
Hold a small butane or heat tool a few inches above the resin and wave it in short bursts. The warm air lifts bubbles without rushing the surface. -
Let the shells cure in a dust-free place.
Cover with a shallow box or container to keep dust away. Check them after the time the bottle suggests; resin often firms to a tacky feel first, then fully hardens later. -
Finish edges if needed.
When fully cured, sand any sharp spots gently with fine-grit paper. Wipe with alcohol to remove dust and reveal the glossy surface below. -
Add a final seal if you wish.
A clear sealant spray or thin resin topcoat gives extra protection. Spray or brush in light, even strokes and let everything dry slowly. -
Sit and savor the process afterward.
Place your finished shells in a favorite bowl or on a windowsill. Hold one and notice how the light moves through crystals and glitter.
Enjoying the Finished Piece


Small objects like Galaxy Crystal Seashells with Sparkling Colors invite pockets of quiet joy. I keep a few on my desk where I can reach for them between tasks. Their weight and texture draw attention away from screens and toward something tactile.
You can float them in a shallow dish of sand, nest them in a cluster on a bedside tray, or place one beside a candle where the flicker catches the crystals. I sometimes tuck a shell into a palm during a brief pause and breathe in the cool salt-scent memory it evokes.
These shells also make gentle gifts. I wrap them in soft tissue and a small box, then write a few words on a scrap of paper. The first time I gave one away, the receiver held it quietly and smiled; that small exchange felt like a shared moment of calm.
If you enjoy making matching sets or want to learn a related technique, try the ideas in this another DIY guide that explores alternate finishes and display ideas.
Keeping It for Later
Store finished shells in a cool, dry place away from direct sunlight. Sunlight can fade certain pigments and soften resin over long periods, so a shaded shelf preserves color longer.
Place shells on soft fabric in a shallow box for transport or storage. Wrap fragile edges in tissue to prevent chips. If a shell picks up dust, wipe it gently with a microfiber cloth and a small amount of rubbing alcohol to restore shine.
If you plan to reuse the shells in another craft, avoid aggressive sanding that removes the original details. Instead, apply a light coat of fresh resin and add new crystals on top for a layered effect. This keeps the shell’s shape and allows you to refresh its look without heavy alteration.
Gentle Tips & Variations
- Invite a color story. Choose three harmonious pigments and a single accent sparkle for calm cohesion.
- Use natural pigments with mica for a soft, metallic sheen. They spread well and layer beautifully.
- Work in batches. Mix only as much resin as you can comfortably pour in a short span. This reduces waste and helps maintain a relaxed pace.
- Try translucent shells under a spotlight for a jewel-like glow. Experiment with small LED lights in display boxes to see how crystals react.
Treat these tips as small invitations. I often change a single element and let the shell tell me what it wants next.
What I’ve Learned While Making This
I learned to trust slow mixing and a careful pour. Early attempts rushed those moments and trapped bubbles or left thick edges. When I slowed down, the materials behaved, the resin settled, and the shells looked like tiny skies.
I also learned to listen to the materials. Shells accept resin differently depending on texture and thickness. Rough interiors hold small crystals better. Smooth shells show a clearer reflection. That understanding helps me pick the right embellishments.
Safety and patience matter most. Wearing gloves and working in a ventilated area protect my hands and lungs. Waiting the full cure time prevents fingerprints and keeps edges clean. I tell myself these small rules kindly, and they keep the making calming and safe.
FAQs About Galaxy Crystal Seashells with Sparkling Colors
Q: Can I use any resin for this project?
A: Use a resin labeled for small casting or jewelry work. These formulas often cure slower and show fewer bubbles. Read the product directions and follow the mixing ratio exactly.
Q: Are crystal chips safe to use inside resin?
A: Yes, but choose chips without sharp edges if you want to hold the finished piece. Rinse chips to remove dust and dry them before embedding so they do not introduce moisture.
Q: How do I prevent yellowing over time?
A: Keep finished shells out of direct sunlight and use UV-resistant resin or a UV-blocking topcoat. That preserves color longer and keeps resin clear.
Q: Can children help with this project?
A: Children can participate in safe parts like choosing colors or sprinkling glitter, but adults should handle resin mixing and heat tools. Supervise closely and keep resin and small chips out of reach.
Q: What if bubbles form after pouring?
A: Small bubbles often rise and pop during the initial cure. For visible bubbles, a short pass with a warm tool or gentle exhale from a distance usually clears them. Work slowly to avoid introducing more air.
A Gentle Note Before You Go
Sit with the feeling of having made something that holds light. These shells ask for attention in small acts: a measured stir, a patient pour, a tiny adjustment with a toothpick. The making moves like a quiet conversation between your hands and the materials, and the finished shells return that calm whenever you pick them up.
I hope you find comfort in the slow parts and delight in the tiny bright moments. Keep the process flexible and kind to yourself. Creativity wants to be gentle sometimes, and these little galaxies respond well to a soft touch.
Conclusion
If you enjoy seeing how others decorate shells and want more ideas for embellishment, the marketplace roundup at Crystal Embellished Seashells on Etsy can inspire new palettes and styles. For a different, playful crystal craft that uses similar techniques, the Magical Crystal Ball Craft (with Video) offers a friendly tutorial and a gentle video to watch while you work.
PrintGalaxy Crystal Seashells with Sparkling Colors

A serene and tactile craft project to create beautiful seashells embellished with resin and sparkling colors, inviting moments of quiet joy.
- Prep Time: 20 minutes
- Cook Time: 0 minutes
- Total Time: 20 minutes
- Yield: Multiple shells
- Category: Craft
- Method: Crafting
- Cuisine: N/A
- Diet: N/A
Ingredients
- Small clean seashells
- Clear casting resin and hardener
- Disposable mixing cups
- Stir sticks
- Fine glitter in pearlescent or iridescent tones (optional)
- Tiny crystal chips or crushed glass
- Alcohol for cleaning
- Nitrile gloves
- Small funnel or pipette
- Toothpicks and a small soft brush
- Sanding paper in fine grits (optional)
- Parchment or silicone mat
- Small sealant spray (optional)
Instructions
- Prepare your space and shells.
- Set safety and pace.
- Measure resin and hardener.
- Stir with calm, steady motion.
- Add color and sparkle.
- Test a drop in a practice shell.
- Use a pipette or small funnel to pour.
- Nudge crystals into place.
- Pop visible bubbles with a warm breath or torch.
- Let the shells cure in a dust-free place.
- Finish edges if needed.
- Add a final seal if you wish.
- Sit and savor the process afterward.
Notes
Use resins labeled for small casting or jewelry work for a slower cure and fewer bubbles. Ensure all materials used are safe and clean.