

The grainy sound of sugar pouring into warm water settles the room into a gentle rhythm. Steam lifts in a soft veil and the spoon traces lazy circles as crystals begin to whisper on the glass jar. I breathe with each small click and watch the first white points form, simple and steady. This is the calm of a Sugar Crystal Experiment, a moment that invites slow focus and quiet joy.
The Quiet Joy of Making Sugar Crystal Experiment

This project holds a quiet pleasure. Watching sugar become structure feels like listening to a tiny, patient story unfold. The tactile drag of sugar between your fingers, the glossy shine of a saturated syrup, and the slow, visible growth of crystals bring a kind of noticing that settles the mind.
When I set aside a slow hour to care for a jar, the world feels kinder. The project helps me pause, feel texture under my fingertips, and listen to small sounds. It suits mornings with soft light and evenings with a warm lamp. If you want a deeper look at a classic method, I sometimes return to the classic sugar crystal guide for extra notes and gentle variations.
A Gentle Look at the Process
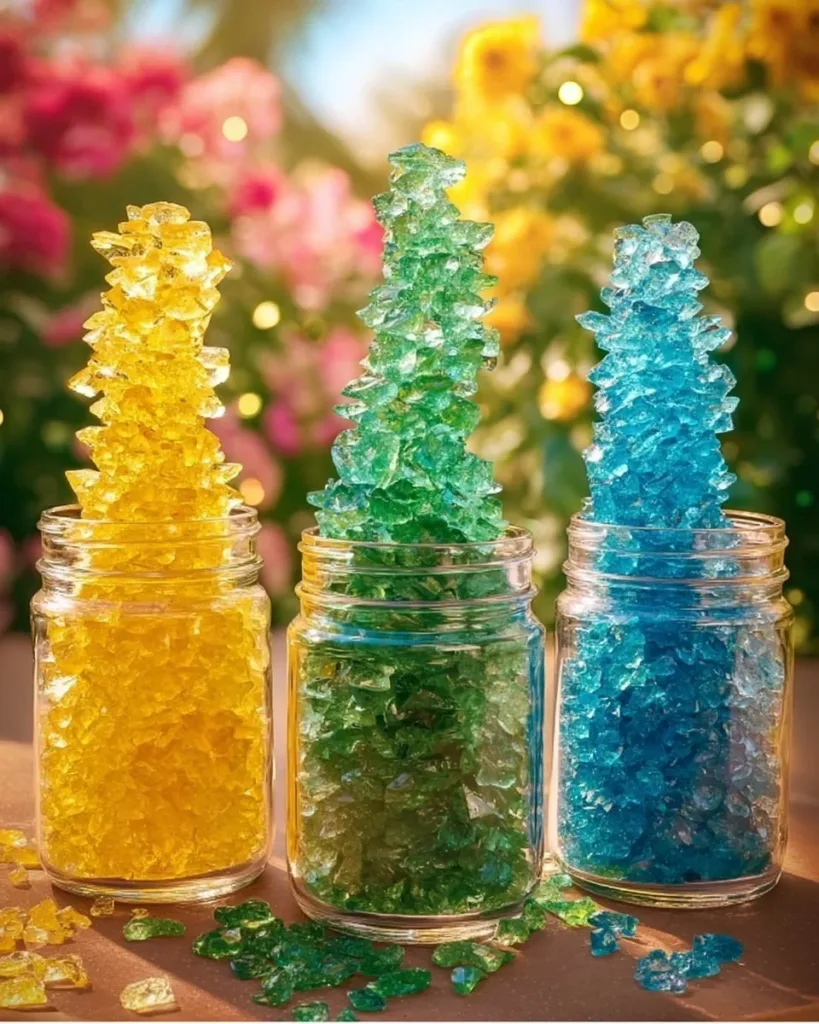
This experiment moves like a quiet ritual. You dissolve sugar into hot water until the syrup shines and slips like glass. You pour it into a jar, anchor a string or stick, and then wait while tiny structures take shape one grain at a time.
The rhythm feels slow and kind. Stirring brings a soft, steady sound. The syrup glows under light and the first specks catch and hold it. Over days the specks become faceted, and the jar turns into a small, private landscape. If you enjoy exploring different crystal patterns, you may also like a slightly different approach in the crystal growing experiment guide I keep on hand. The two methods share the same patient, hands-on attention.
Materials You’ll Need
- Granulated sugar, regular white sugar (easy to find)
- Clean glass jar or heatproof glass (clear works best to watch growth)
- Water, filtered or tap is fine
- Saucepan for heating water gently
- Wooden skewer or clean pencil to hang the string
- Cotton string or a light fishing line (tie knots easily)
- Clothespin or clip to hold string in place
- Food coloring, optional (use a few drops for subtle color)
- Jar lid or paper to loosely cover the jar, optional
- Thermometer, optional but helpful to keep heat steady
I choose simple, familiar supplies because this experiment benefits from quiet materials. The glass shows the crystals. The string gives them a place to grow. Little changes will affect the pace and look, and that is part of the joy.
STEP-BY-STEP DIRECTIONS:
- Warm a cup of water gently on low heat until it feels warm and slightly steamy.
Stir slowly with a spoon to invite calm and make space for the next step. - Add sugar a little at a time and stir until it dissolves.
Keep going until the mixture looks glossy and just starts to cling to the spoon. - Remove the pan from heat and let the syrup sit for a moment.
Watch steam rise and notice the smooth, syrupy shine in the pan. - If you want color, add a drop or two of food coloring and stir softly.
A tiny bit goes a long way. Choose gentle hues for a softer look. - Pour the syrup into a clean glass jar, leaving space at the top.
Move slowly so the surface stays calm and clear. - Tie a short length of string to a skewer or pencil and clip it.
Adjust the string so it hangs without touching the jar sides or the bottom. - Lower the string into the jar and balance the skewer across the rim.
Rest the clip or clothespin so everything sits steady and quiet. - Cover the jar loosely with a paper or lid to keep dust out.
Keep the jar in a calm spot at room temperature away from drafts. - Check the jar every 12 to 24 hours and notice small changes.
Touch nothing inside. Observe color, sheen, and the tiny points of growth. - After two to seven days, you will see crystals form along the string.
The pace depends on temperature, sugar concentration, and patience. - When crystals reach a size you like, lift the skewer gently out of the jar.
Let excess syrup drip back slowly, then rest the crystals on a paper towel. - Allow the crystals to dry for a day to firm up and become clear.
Store them in a dry place and enjoy their facets and texture.
These steps move slowly on purpose. Each pause gives the syrup and the crystals space to do their own work. I often hum a soft tune while stirring or breathe in time with the steam.
Using Sugar Crystal Experiment in Everyday Life

You may also enjoy giving one as a mindful token in a gift box. Wrap it in tissue and include a card that invites the recipient to pause and notice. The crystals add a small, handmade charm to cozy moments.
How to Store or Reuse Sugar Crystal Experiment
Store finished crystals in a glass jar with a tight lid to keep them dry.
Avoid humid places like near a bathroom or a kettle. Moisture softens sugar.
If a crystal absorbs moisture and becomes sticky, you can gently dry it in a low oven for a few minutes.
Place it on a baking sheet and watch closely. The heat firms the structure again.
For reuse, dissolve smaller pieces back into warm water and begin a fresh batch.
This recycles sugar and adds a soft, circular quality to your making.
If you plan to keep crystals long term, place them on a cushioned cloth inside a cool cupboard.
Over many months the facets can dull with dust, so I often keep a few ready and rotate them into use.
Gentle Tips & Variations

Crystals make sweet little gifts and quiet table accents. I set one on a saucer beside a herbal tea and watch sunlight dance through its tiny planes. Children love to hold the rough, glittery surface while telling a story. You can use them as edible decorations for desserts, or simply tuck one into a small jar as a calming object to handle.
- Invite color slowly. A tiny drop of food coloring gives a soft tint that deepens as crystals grow.
- Try different string materials. Cotton gives rough anchoring texture, while fishing line makes crystals float more freely.
- Seed the jar with a small pre-grown crystal. This helps growth start in a chosen spot and gives a focal point.
- Change the environment gently. Cooler rooms slow growth and produce clearer facets. Warmer rooms speed growth and make more clustered forms.
- Use natural light for display. A low, slanted light reveals facets and creates small, moving patterns on the table.
Each of these options feels like a small invitation. None of them break the method. They just invite your own taste and attention.
What I have learned while making these is that tiny differences matter. A slightly colder jar nudges crystals toward clarity. Stirring too hard invites bubbles and uneven growth. I approach the process as a set of choices, not rules. That mindset keeps the work peaceful.
FAQs About Sugar Crystal Experiment:
Q: How long does it take for crystals to grow?
A: Most jars show visible growth in two to three days.
Some take up to a week. Temperature and sugar concentration make the biggest difference.
Q: Can I use brown sugar or honey instead?
A: Brown sugar and honey change the chemistry slightly.
They can create interesting colors and textures but often yield softer, less clear crystals.
Q: Are the crystals safe to eat?
A: Yes, when you use clean supplies and food-safe coloring, the crystals are edible.
They are mainly sugar so handle them with clean hands and store them dry.
Q: My crystals are cloudy. Why?
A: Cloudiness can come from impurities, air bubbles, or too-rapid cooling.
Try filtering the sugar water before pouring and pour slowly to keep the surface calm.
Q: How do I keep the experiment clean and safe?
A: Use clean jars, wash hands before handling, and keep curious pets and small children away from hot pans and glass.
When the crystals start to form, observe without touching until they dry.
A Gentle Note Before You Go
Sit with your finished jar for a quiet moment. Notice how the light catches the tiny facets. Let the slow growth remind you that small, steady actions add up. If a batch does not turn out as you hoped, treat it as a soft lesson and try again with a small change.
When I make sugar crystals, I often brew tea and set the jar near the window. The process becomes a gentle companion to reading and quiet conversation. I invite you to make space for this kind of slow craft and let it steady your hands and thoughts.
Conclusion
If you want a detailed science-based take on growing rock candy crystals for a classroom or a long-form project, the Science Buddies rock candy guide offers clear, stepwise explanations. For a friendly, illustrated how-to with variations and ideas for kids, you might enjoy the approachable steps at Science Sparks sugar crystals tutorial.
Thank you for letting this simple project share a slow space with you. I hope it brings quiet delight, gentle focus, and the soft pleasure of making with your hands.
PrintSugar Crystal Experiment

A calming and creative project that allows you to grow sugar crystals, providing both a visual delight and a hands-on experience.
- Prep Time: 15 minutes
- Cook Time: 0 minutes
- Total Time: 7 days
- Yield: Varies
- Category: Dessert
- Method: Crafting
- Cuisine: World
- Diet: Vegetarian
Ingredients
- 1 cup granulated sugar
- 1 cup warm water
- Optional: food coloring (a few drops)
- Cotton string or light fishing line
- Wooden skewer or clean pencil
- Clothespin or clip
- Clean glass jar
- Thermometer (optional)
Instructions
- Warm a cup of water gently on low heat until it feels warm and slightly steamy.
- Stir slowly with a spoon to invite calm and make space for the next step.
- Add sugar a little at a time and stir until it dissolves, creating a glossy mixture.
- Remove the pan from heat and let the syrup sit to cool.
- If desired, add a drop or two of food coloring and stir softly.
- Pour the syrup into a clean glass jar, leaving space at the top.
- Tie a short length of string to a skewer or pencil and clip it to the jar.
- Lower the string into the jar while balancing the skewer across the rim.
- Cover the jar loosely with a paper or lid to keep dust out.
- Check the jar every 12 to 24 hours and observe the changes without touching.
- After 2 to 7 days, remove the skewer when crystals reach the desired size and let them dry.
Notes
Store finished crystals in a sealed jar to keep them dry. Avoid humid environments to prevent them from becoming sticky.