

A quiet cup of tea, a small tray warmed by the sun, and the gentle clack of shells as I sort them by size. I breathe in the faint salt of the shells and feel the weight of time in their curves. Making DIY Crystal Seashells asks me to slow down, to move with care, and to notice how light settles into tiny crevices. I learned a few small tricks on a recent afternoon project and shared extra photos in a longer post for those who like more step photos about working with shell shapes.
Why DIY Crystal Seashells Feels Comforting to Create

This craft brings together simple textures that calm the hands. When you hold a shell, you feel its smooth belly and rough ridges. When crystals grow, they add a cold, faceted surprise that catches light and quiets the eyes.
The work asks for a slow rhythm. You stir a warm solution, you wait as crystals form, you check the tray and shift a pipe cleaner. Those small, repeated acts give the nervous system a gentle focus. They turn an ordinary hour into something patient and restorative.
I find the scent of warm water and mild minerals soothing. The soft clink of glass jars in a quiet room becomes a small soundtrack. For me these moments connect hand, eye, and breath. You might notice the same softness if you try this craft on a rainy afternoon or while music plays low.
This project also invites simple curiosity. You watch a clear solution change and learn how tiny changes in temperature or salt make the crystal pattern shift. That quiet learning feels steady and kind. If you want to see a different approach with more color or a slightly different method, I have a companion post that explores avenues for decorative finishes that show color and pattern options.
A Gentle Look at the Process
Before we list supplies, imagine the process as three soft phases. First you prepare a warm, clear solution. The warmth loosens and carries the mineral that will become crystal. Next you arrange shells, wires, or tiny nests of pipe cleaner so crystals can find footholds. Finally you wait and watch as the solution cools and crystals grow, a slow, natural bloom.
The steps involve calm, steady movements. You stir until the solution looks silky. You lift shells and place them on the string or glass. You lay jars on a towel so drops do not scatter. Each small action gives you a moment to slow the breath and enjoy the present.
Sound plays a small role. The stirring makes a whisper. When you place a finished shell to dry, it makes a soft clack on fabric. Those small sounds mark progress without hurry. As you try this, you may find that pausing between steps and taking a moment to notice texture and light makes the craft feel more like a gentle ritual.
If you enjoy scent as you make, you can pair this project with calm aromatics. For a related idea that mixes scent with crystal making, I often return to a project that blends small fragrance touches safely into crystals for gentle aromatic variations.
Materials You’ll Need
- Clean seashells, small to medium size (easy to find at craft stores or collected with care)
- Borax powder or alum (both work; borax grows larger crystals, alum creates finer crystals)
- Hot water (from a kettle; use caution when handling)
- Clear glass jars or heat-safe containers (to hold your crystals as they grow)
- String or thin twine (to suspend shells)
- Pipe cleaners or small wire hooks (optional; help crystals form in decorative places)
- Food coloring or fabric dye (optional for soft tinting)
- Measuring cup and spoon (precise amounts help consistent results)
- Wooden stirring stick or spoon (heat-safe)
- Protective gloves and an old towel (safety and cleanup)
- Small tray or plate (to hold shells while they dry)
- Fine mesh strainer or coffee filter (helpful if you want extra clear solution)
Note on materials: I list borax and alum because they both form crystals in warm, saturated solutions. Borax often makes larger, chunkier crystals when cooled slowly. Alum tends to produce delicate, sparkly growth. You can choose based on the look you want and the supplies you can find.
If you like a more cosmic look, try exploring shapes and finishes in a project that plays with darker hues and sparkly glazes for galaxy-inspired seashells.
STEP-BY-STEP DIRECTIONS
- Prepare your workspace on a towel or tray.
Keep all materials within reach to avoid sudden movement.
Make sure jars sit on a stable, heat-safe surface. - Clean the shells gently with soap and warm water.
Remove sand and oils so crystals adhere well.
Pat shells dry with a soft cloth; do not scrub rough edges. - Heat water to near boiling and measure it.
Pour water into a heat-safe container carefully.
Wear gloves if you prefer not to touch hot surfaces. - Stir in borax or alum slowly until no more dissolves.
You want a saturated solution; crystals need a lot of mineral.
The water should look clear but heavy, like thin syrup. - Add a drop of food coloring if you want a tint.
Stir slowly and watch the color spread like a soft veil.
Avoid too much dye; subtlety keeps the look calm. - Shape pipe cleaners into small nests or hooks.
Thread string through the shells and tie a small knot.
Make sure the shell hangs freely without touching the jar sides. - Suspend the shell into the jar so it sits in the solution.
Hang it from the lid or prop the string across the top.
The shell should sit fully submerged without touching glass. - Cover the jar with a towel and place in a quiet spot.
Let the jar sit undisturbed for several hours or overnight.
Crystals form as the solution cools and the mineral bonds. - Check the growth after a few hours and again the next day.
Lift the shells slowly to avoid breaking delicate crystals.
If growth looks thin, return them to the solution for more time. - Remove shells and let them dry on a soft towel.
Pat gently with a cotton cloth if excess solution clings.
Leave them in a dry place until the crystals feel hard. - If needed, brush off loose granules with a soft brush.
Seal if you like with a light clear spray to protect fragile points.
Display on a tray or in a shadow box to keep dust away.
These steps work because crystal growth depends on temperature and saturation. When a warm solution holds more mineral than it can at room temperature, cooling allows those minerals to join and form lattices. The shell offers a textured base where crystals can attach, and the patience of undisturbed time lets them grow into pretty, natural shapes.
Safety note: I always handle hot water with care. I keep pets and small children away while I pour and arrange jars. Wearing gloves protects against heat and the drying effects of borax or alum. Keep powders out of reach of little hands.
Enjoying the Finished Piece


A finished crystal seashell feels like a small discovery. It holds the memory of gentle making and the light of the room where it grew. You can place it on a small dish where the sun catches crystal points and throws tiny rainbows across the table.
Use a shallow tray lined with soft fabric to display a collection. The shells look lovely beside candles, dried flowers, or vintage glass. You can tuck one into a bowl with sand and pebbles for a table centerpiece that feels quiet and coastal.
These shells also make thoughtful, calm gifts. Wrap one in tissue and place it in a small box. Add a handwritten note about the slow time you spent making it. People who receive handmade things often savor the gentle care behind them.
For a playful twist, try arranging several differently tinted shells in a small shadow box. They create depth and invite close viewing. If you enjoy mixing techniques, pair a crystal shell with a painted shell to contrast smooth color and faceted shine.
How to Store or Reuse DIY Crystal Seashells
Store finished shells in a dry box or closed display case to protect fragile points.
Keep them out of direct sunlight if dyes might fade over time.
If crystals dust or flake, store shells in a padded container with soft cloth.
You can reuse shells that lose their crystals. Gently soak the shell in warm water to dissolve old mineral.
Wipe with a soft cloth and air dry before starting a new growth cycle.
If you want to try a different crystal type, clean the shell and use alum instead of borax for a different texture.
For long-term keeping, a light coat of clear acrylic spray can help stabilize delicate tips.
Test the spray on a small crystal first to make sure you like the look.
Label older shells if you plan to experiment so you remember which materials you used.
Gentle Tips & Variations
Invite color in small amounts.
Add one drop of food coloring to the solution for soft, translucent hues.
Start with pale tones; they feel restful and let the crystal structure show.
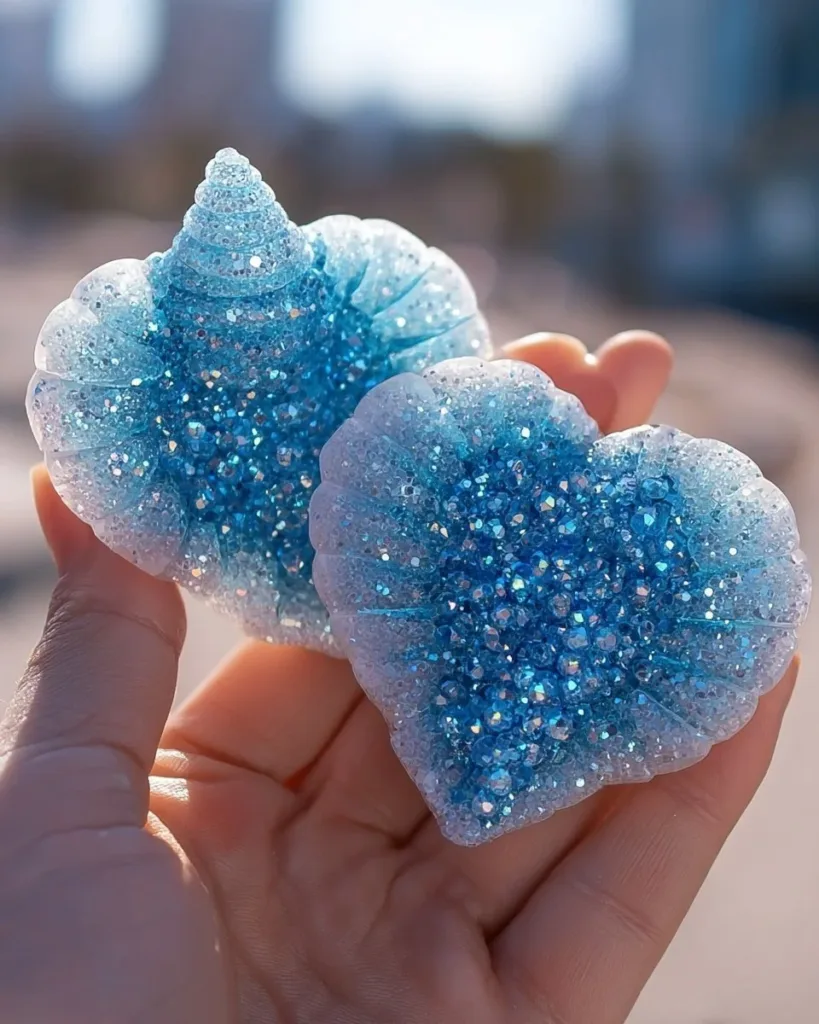
Try pipe cleaner shapes for playful growth.
Twist them into hearts, spirals, or tiny nests for crystals to cling to.
The pipe cleaner texture gives crystals little ledges to form on.
Mix methods to vary crystal texture.
Use alum for fine sparkles and borax for chunkier crystal clusters.
You can re-grow on the same shell after cleaning for layered effects.
Work with different shell types.
Smooth shells give clean crystal layers, while ridged shells create a more organic look.
Small scallops and conches often offer charming places for cluster growth.
Treat the process as a slow practice.
Notice the warmth of the jar, the tiny steam while stirring, and the way light meets crystal edges.
Make one shell at a time if you want a quiet, mindful afternoon.
What I’ve Learned While Making This
I learned to wait more than I thought I would. The first time I tried this, I grew impatient and disturbed the jar; crystals formed timidly. When I let the jar sit, they returned bolder and more confident.
I also learned that small changes make a big difference. Slightly warmer water or a touch more borax changes how crystals stack. I now measure gently but consistently so results feel familiar and comforting.
Handling the shells taught me to move with tenderness. Some crystal points form thin and fragile. I lay them on fabric and breathe between each step. Making this project on quiet afternoons roots me to the present.
Finally, I learned to share the calm. A friend joined me on a rainy day, and we traded simple observations: a particular shell made a tiny star of crystals; another looked like a shell covered in sugar. Those small stories made the finished shells feel richer.
FAQs About DIY Crystal Seashells
Can I do this with children?
Yes, with close supervision. Children enjoy watching crystals form. Keep hot water and powders handled by an adult. Let kids decorate pipe cleaners or choose shells while you manage the solution.
Which grows better, borax or alum?
Both create lovely crystals. Borax tends to make larger, chunkier clusters while alum gives finer, sparkly growth. Try both to see which you prefer. Each behaves a bit differently because of how the minerals bond as the water cools.
How long should I leave the shells in the solution?
I usually leave shells overnight for a steady growth. Some pieces show good crystals after four to six hours, but I recommend at least overnight for fuller coverage.
Can I add scent or essential oils?
Avoid adding oils directly to the crystal solution. Oils can interfere with crystal formation and may leave residue. If you want scent, pair the craft with a nearby sachet or use scented display elements after the crystals dry.
What if my crystals flake off easily?
Flaking often occurs when the solution does not fully saturate or the shell had oils. Clean shells well and ensure the solution holds plenty of mineral. Let shells dry slowly. A light clear sealant can help stabilize fragile points.
A Quiet Closing Thought
When you sit with this project, notice how small acts ask for patience. The act of measuring, the slow pouring, the quiet waiting these invite a kind of stillness that belongs to making. The shells you create will carry that calm with them, as if each point captured a small pause.
If you feel unsure, remember that each shell looks different and each attempt teaches something small and useful. That gentle trial and gentle learn becomes part of the comfort. Enjoy how the shells catch light and how the process slows your pace.
Conclusion
If you seek another step-by-step tutorial with a simple roots-in-nature style, the KiwiCo guide offers a clear beginner-friendly version in their project titled Crystal Seashells | DIY for Beginners – KiwiCo, which I have used for reference in the past. For a variation that frames this activity as both a craft and a science experiment, the Little Bins for Little Hands post explains an approachable method and child-friendly tips called Shell Crystal Craft – Little Bins for Little Hands.
PrintDIY Crystal Seashells

A calming craft project where you create beautiful crystal-coated seashells using simple materials and patience.
- Prep Time: 15 minutes
- Cook Time: 0 minutes
- Total Time: 60 minutes
- Yield: 6-10 seashells
- Category: Craft
- Method: DIY Crafting
- Cuisine: N/A
- Diet: N/A
Ingredients
- Clean seashells, small to medium size
- Borax powder or alum
- Hot water
- Clear glass jars or heat-safe containers
- String or thin twine
- Pipe cleaners or small wire hooks (optional)
- Food coloring or fabric dye (optional)
- Measuring cup and spoon
- Wooden stirring stick or spoon
- Protective gloves and an old towel
- Small tray or plate
- Fine mesh strainer or coffee filter (optional)
Instructions
- Prepare your workspace on a towel or tray.
- Clean the shells gently with soap and warm water.
- Heat water to near boiling and measure it.
- Stir in borax or alum slowly until dissolved.
- Add a drop of food coloring if desired.
- Shape pipe cleaners into nests or hooks.
- Suspend the shell in the solution and cover the jar.
- Let the jar sit undisturbed for several hours or overnight.
- Check the growth, remove shells, and let them dry.
- If needed, brush off loose granules and seal if desired.
Notes
Handle hot water with care and supervise children if doing this craft together.