

A warm afternoon light pools on the table as I press pressed leaves into semi-translucent sheets. The smell of warm vinegar and a soft honeyed plasticky note remind me of childhood experiments. My fingers move slowly, patting edges, smoothing trapped petals, listening to the faint crackle as the bioplastic cools. This quiet making feels like holding a little sun in the palm of my hand. If you have tried other iterations, you might like the brighter palette in this colorful DIY bioplastic suncatchers recipe that plays with dye and light.
The Quiet Joy of Making DIY Bioplastic Suncatchers

This project asks you to slow down and notice small things: the translucence of starch dissolved in warm water, the soft press of a leaf vein, the way tiny seeds catch the light. Making DIY Bioplastic Suncatchers invites calm through gentle, repetitive movements. You mix, stir, pour, and press. Each motion offers a small rhythm that quiets the mind.
I make these on soft afternoons when the house feels slow. I notice the contrast between the warm bowl and the cool tabletop. The tactile feedback from the mixture tells me when it is right. The finished suncatchers feel light and quiet. They do not shout. They let light through in a way that asks you to pause and look closely.
There is an easy, honest pleasure in using simple, often kitchen-sourced ingredients to make something that glows when held to a window. If you would like a different approach to botanicals and layout, see this more botanical inspiration for ideas that lean into texture and pattern.
A Gentle Look at the Process
Before you begin, picture the flow. You will measure, warm, stir, and watch the mixture thicken. You will press plants, glitter, or small paper shapes into the warm sheet. You will let each piece cool and flatten until it learns to hold light.
When I make these, I move slowly between steps. I heat on low and stir in short, calm strokes. The softly bubbling mix gives me a small, reassuring sound. When I pour, I do so in one steady motion so the surface lies smooth. When I press the objects into the warm film, I feel the yielding give under a fingertip. These small textures keep me present.
The final drying asks for patience. I often leave pieces overnight on parchment and return the next morning to find the edges curled into gentle forms. That wait deepens the satisfaction when I finally hold one up to the sunlight and watch colors bloom.
Materials You’ll Need
- Potato starch or cornstarch, 1 tablespoon per small suncatcher (easy to find)
- White vinegar, 1 teaspoon per batch (helps plasticize)
- Glycerin, 1 teaspoon per batch (optional, keeps flexibility)
- Water, about 3 tablespoons per batch (warm)
- Small saucepan or microwave-safe bowl (use what feels safe)
- Wooden spoon or silicone spatula (smooth stirring)
- Parchment paper or silicone mat (keeps pieces from sticking)
- Cookie cutters or household shapes to trace (optional)
- Leaves, petals, small feathers, thin paper, or pressed botanicals (dry, light)
- Small beads or fine glitter, optional for sparkle (use sparingly)
- Hole punch or needle for hanging once dry (if desired)
- String, twine, or thin ribbon for hanging
- Scissors and tweezers for careful placement
I keep an extra bowl of warm water nearby to rinse hands. If you want a slightly different tutorial for shaping and color, this homemade craft guide shows small variations that work well with a child-friendly approach.
Step-by-Step Directions
- Measure the starch and water into a small saucepan or microwave-safe bowl.
Warm the water slightly so the starch dissolves easily and feels smooth on your spoon. - Add the vinegar and glycerin.
Stir slowly until the mixture looks milky and the texture thickens gently. - Heat the mixture on low, stirring constantly.
You will feel the texture change from watery to lightly gloopy; stop heating when it holds a ribbon when you lift the spatula. - Remove from heat and let it cool for a minute until it is warm, not hot.
Warm mixture allows you to press delicate items without burning them and prevents tearing. - Lay a sheet of parchment on the table and pour a small puddle where you want your suncatcher.
Spread gently with a spatula to a thickness like a coin. Keep edges smooth for even drying. - Arrange your botanicals or small items on the warm film.
Use tweezers for precise placement. Press each piece gently so it sinks slightly and bonds with the film. - If you want a hole for hanging, use a skewer or needle to make one near the edge now.
It will hold shape better while the material is still warm and flexible. - Let the piece cool until it becomes leathery and safe to touch.
Place on a flat, cool surface away from drafts. A short, patient touch tells you it is ready to move. - If the piece warps, press it gently between two sheets of parchment under a light book overnight.
This flattens while preserving the translucent effect. - Once fully dry, trim edges or cut shapes with scissors.
Work slowly and notice the way light catches the trimmed edge. Thread a string and hang where morning light can find it.
Each step gives you a small sensory check. The sound of stirring, the warmth on the fingers, the visual of color through a thin sheet. Trust these tiny moments as your guides.
Using DIY Bioplastic Suncatchers in Everyday Life

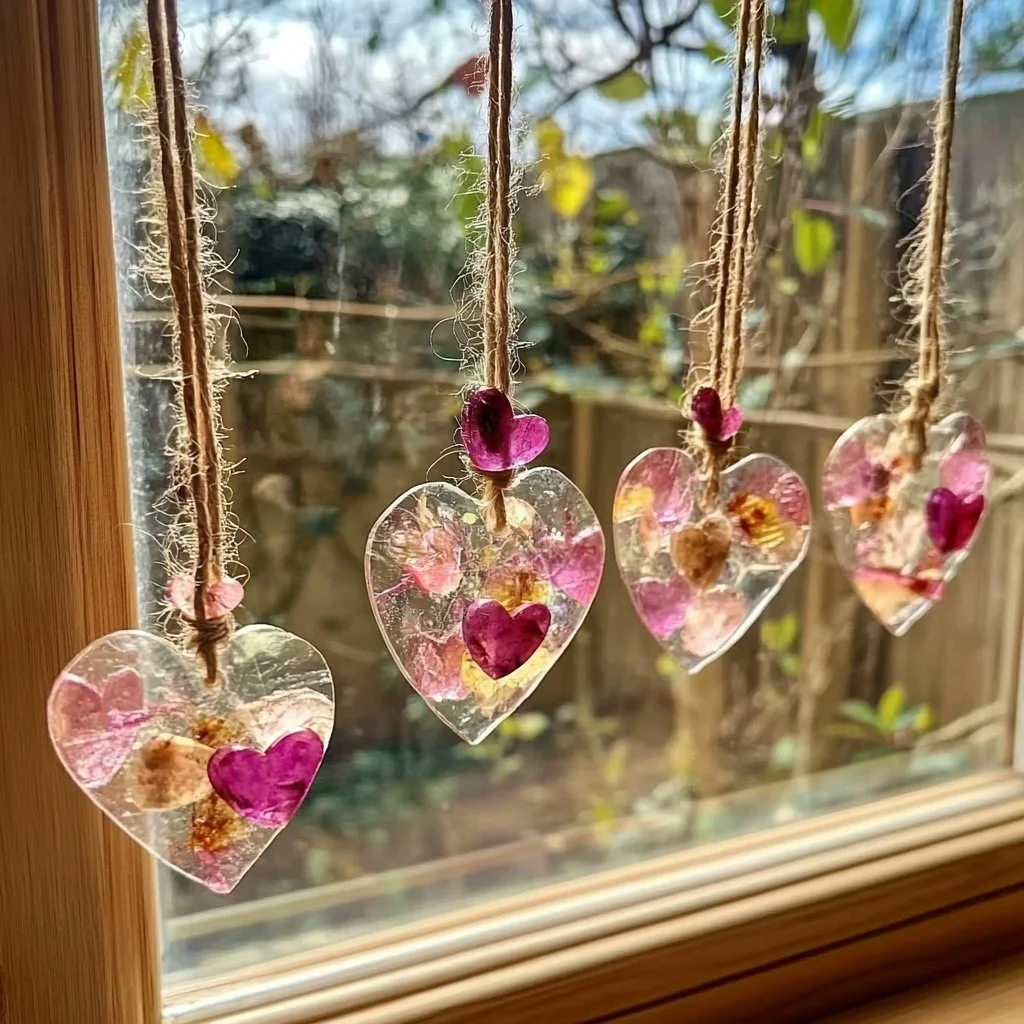
These suncatchers live gently in many places. I hang a thin one in a small kitchen window where it picks up morning gold and sends soft color into the sink area. I tie a little loop onto a lamp pull and enjoy the way late light glances across a tiny petal. Some I place in a cell with a gentle shadow box and rotate them with the seasons.
You can use them as simple window jewelry or soft ornaments hung from a shelf or a dry branch. Children like to hold them near a flashlight and watch patterns change. If you make a set, strung together they form a translucent garland that moves when you walk past. The bioplastic surface responds to touch; it feels slightly cool and satiny against the fingertips.
I keep a few flat in a shallow dish as small mood tokens. When I need to slow down, I bring them to my workspace and hold one up to the light. That small ritual helps me reset and return to the day with a calmer pace.
How to Store or Reuse DIY Bioplastic Suncatchers
Store them flat when possible to avoid unwanted curls. Lay pieces between sheets of parchment in a shallow box. Keep them in a cool, dry place away from direct heat to preserve flexibility.
If a piece bends or curls over time, you can gently steam it over a pot of hot water for a moment and then press it flat between parchment under weight. Work slowly and use caution with steam to avoid burns.
Smaller pieces make good gift tags. Punch a fresh hole if needed and tie them to a wrapped book or a jar of preserves. If a suncatcher shows wear, gently cut it into a new shape and repurpose it. The material lends itself to a second life as layered collage bits in a larger art piece.
If you want ideas for seasonal storage and rotation, this nature window art collection explains how I organize and rotate pieces through the year.
Gentle Tips & Variations

- Invite slow color: Add a drop of food coloring to the warm solution for soft tints.
- Press light: Use very dry, flattened botanicals to prevent moisture pockets and ensure crisp silhouettes.
- Try layering: Pour a thin base, let it set slightly, then add a second thin layer with different inclusions for depth.
- Use recycled molds: Old lids or shallow tins make predictable rounds and simplify edges.
- Keep it simple: Resist adding too much glitter or thick objects that block light. The quiet charm comes from translucence, not opacity.
A small note from my making experience: I once overloaded a sheet with heavy petals and the piece ripped as it cooled. I learned to spread items more evenly and to keep the overall thickness steady. These are invitations to play, not rules to follow exactly. If you like botanical silhouettes with more texture, try pressing already completely dry leaves or using thin onion skin paper to add delicate veils.
If you would like a step-by-step seasonal variation, this homemade craft guide has gentle ideas for holidays and nature walks.
FAQs About DIY Bioplastic Suncatchers
Is bioplastic safe to make at home?
Yes, when you use simple ingredients like starch, vinegar, and glycerin it stays safe for crafting. I always use low heat and keep a bowl of cool water nearby. Never leave heating mixtures unattended and keep children supervised when hot materials are present.
How long do these suncatchers last?
With gentle care they last for many months or longer. They withstand light handling and hanging. Keep them away from direct heat sources and store flat for longer life. Small repairs or trims refresh them easily.
Can I make larger pieces?
You can scale up slowly. Larger sheets need more even spreading and slower drying to avoid warping. Work on a level surface and consider drying between sheets of parchment under a light weight for the first few hours.
What if my piece becomes brittle?
Brittleness often means too little glycerin or overcooking. You can rehydrate a fragile piece briefly with a light brush of diluted glycerin or steam and then press it flat. Test carefully and work slowly.
Can children help?
Absolutely. Children love arranging bits and watching the mix change. Keep them away from hot surfaces and handle the heating steps yourself. Invite them to do the calm parts like pressing dry items onto a cooled sheet or cutting shapes after full drying.
A Gentle Note Before You Go
Sit for a moment with the finished pieces you made. Bring one to the light and notice the small variations between them. None will match exactly and each will hold its own little story of a pressed leaf, a misplaced bead, or an imperfect edge. This gentle imperfection makes them feel alive.
If you feel rushed, set only a single small batch. Let the process be your slow friend. Remember that the making itself matters as much as the object. Keep your hands soft and your movements deliberate. Every small pause helps you return to a calmer rhythm.
Conclusion
If you want a clear, step-by-step reference with classroom-safe notes, this guide from How To Make A Bioplastic Suncatcher – Chemistry for Kids gives a concise breakdown that complements the gentle approach here.
For creative botanical layouts and photography inspiration, this lovely tutorial from Botanical Bioplastic Sun Catchers – Wineberry Woods offers thoughtful ideas you can adapt into your own quiet practice.
PrintDIY Bioplastic Suncatchers

A creative and calming project to make beautiful bioplastic suncatchers using simple kitchen ingredients.
- Prep Time: 15 minutes
- Cook Time: 10 minutes
- Total Time: 25 minutes
- Yield: Multiple suncatchers
- Category: Craft
- Method: Crafting
- Cuisine: N/A
- Diet: N/A
Ingredients
- 1 tablespoon potato starch or cornstarch per small suncatcher
- 1 teaspoon white vinegar per batch
- 1 teaspoon glycerin per batch (optional)
- About 3 tablespoons warm water per batch
- Parchment paper or silicone mat
- Leaves, petals, small feathers, thin paper, or pressed botanicals
- Small beads or fine glitter (optional)
- String, twine, or thin ribbon for hanging
- Scissors and tweezers
Instructions
- Measure the starch and water into a small saucepan or microwave-safe bowl.
- Warm the water slightly so the starch dissolves easily.
- Add the vinegar and glycerin, and stir until the mixture looks milky and thickens.
- Heat the mixture on low while stirring constantly until it holds a ribbon when lifted.
- Let it cool for a minute, then pour a small puddle onto parchment paper.
- Spread gently to a coin-like thickness and arrange your botanicals on top.
- If desired, use a skewer to make a hole for hanging.
- Let the piece cool and dry, then flatten if necessary.
- Once dry, trim edges and thread a string for hanging.
Notes
Store flat to avoid curls and keep in a cool, dry place. Gently steam curled pieces to reshape.