

A single warm sliver of sunlight rests on my worktable, sliding across a sheet of glossy bioplastic and catching tiny leaves I pressed earlier. The surface feels cool under my fingertips, then slowly warms as I smooth it; the translucent color deepens, and I listen to the quiet scrape of the spoon and the soft pop as air bubbles release. If you want gentle variations or extra color ideas while you gather supplies, this resource on similar homemade suncatchers offers comforting inspiration.
The Quiet Joy of Making DIY Bioplastic Suncatchers

Making DIY Bioplastic Suncatchers invites a small, mindful ritual into a busy day. The work calls for simple attention: stirring slowly, watching bubbles rise, arranging tiny leaves just so. Each step offers a textured sensation to focus on the grain of a spoon, the sheen of a viscous mix, the gentle tapping of a drying tray.
This project helps you slow down because it asks for patience rather than speed. The material asks to settle, cool, and dry. You watch change happen over hours rather than minutes. That pace feels soothing. The light that later filters through your finished pieces brings that calm back into the room. Small panes of color and botanical shapes slide across a windowsill and remind you of the careful movements that made them.
Creating bioplastic suncatchers also connects hands and materials in an honest, tactile way. You learn by sensing what the mix should feel like and how thin to spread it. Those quiet discoveries deepen confidence. They teach you that gentle, repeated action yields steady beauty.
A Gentle Look at the Process
Before you begin, imagine the flow. You will heat a simple, plant-friendly mix until it thickens. You will stir and smooth, then pour or press that glossy mixture into shapes. You will nestle tiny flowers or scraps of color on the wet surface, and then wait.
The noises stay small. A low simmer hums. A wooden spoon rubs the lip of a pan. Air settles. The waiting is part of the craft; you check on the drying piece like you might check a simmering tea. If you want ideas for arranging botanicals or adding texture, this page with homemade craft variations shows different compositions I like to try on slow afternoons.
Throughout the process, move evenly and gently. Keep a steady cadence while stirring. Let your hands take the rhythm. That repetition feels calming and familiar. The final moment is always small and quiet: a finished suncatcher tucked on a ribbon, catching light and offering a soft, suspended warmth.
Materials You’ll Need
- Gelatin powder or agar-agar (depending on whether you prefer animal-based or plant-based options)
- Glycerin (acts as a plasticizer; optional but highly recommended for flexibility)
- Water
- Clear, food-safe glue or cornstarch (if you prefer a starch-based bioplastic variation)
- Natural pigments, watercolors, or diluted food coloring (optional; use sparingly)
- Small pressed flowers, leaves, or thin paper cutouts (dry and flat)
- A nonstick tray, silicone mat, or parchment paper
- Cookie cutters, small round molds, or templates for shapes
- A shallow spoon or silicone spatula for spreading
- A heatproof saucepan and a wooden or silicone spoon
- A fine brush for placement and smoothing of delicate botanicals
- A small hole punch or needle for making a hanging hole after drying
- Scissors and ribbon or twine for hanging
- Oven or sunny windowsill for drying (optional; air drying is gentlest)
Notes: Many of these items are easy to find. Some ingredients allow substitutes, such as agar for gelatin if you want a vegan option. Glycerin helps the final piece stay flexible; without it, your suncatcher might become brittle over time.
Step-by-Step Directions
- Measure one tablespoon of gelatin or agar-agar and two tablespoons of warm water.
Stir slowly until the powder dissolves and the mix feels smooth and slightly thick to the touch. - Add a teaspoon of glycerin and one tablespoon of water.
Stir until the glycerin blends and the mixture takes on a glossy sheen. - Warm the mix gently over the lowest heat, stirring often.
Watch the surface change from cloudy to clear; small bubbles should begin to form. - If you choose color, add a drop or two of diluted watercolor or food coloring.
Stir softly; the pigment will spread thinly and will become more subtle as it dries. - Prepare your tray with parchment or a silicone mat and set your cookie cutters or templates.
Work quietly, placing tools and botanicals near the work area so you do not rush. - Pour a thin layer of the warm bioplastic into each shape.
Use the back of a spoon or a spatula to spread it evenly and to release any bubbles. - Gently press small pressed leaves, petals, or paper cutouts onto the surface.
Use a fine brush to smooth them so they lie flat; notice the texture change under your fingertips. - Make a small hole at the top of each piece with a needle or skewer while the material still feels soft.
This step saves time later and keeps the hole neat and centered. - Let the pieces dry in a warm, ventilated place for several hours or overnight.
If you prefer, place them in a low oven (around 150 F) for faster drying, checking often. - Once dry, test flexibility gently by holding the edge and bending slightly.
If the piece cracks, store it flat and handle it more gently next time; small adjustments help. - Trim any uneven edges with scissors and thread ribbon or twine through the hole.
Tie with a small, neat knot and hang where light invites a soft glow.
Enjoying the Finished Piece

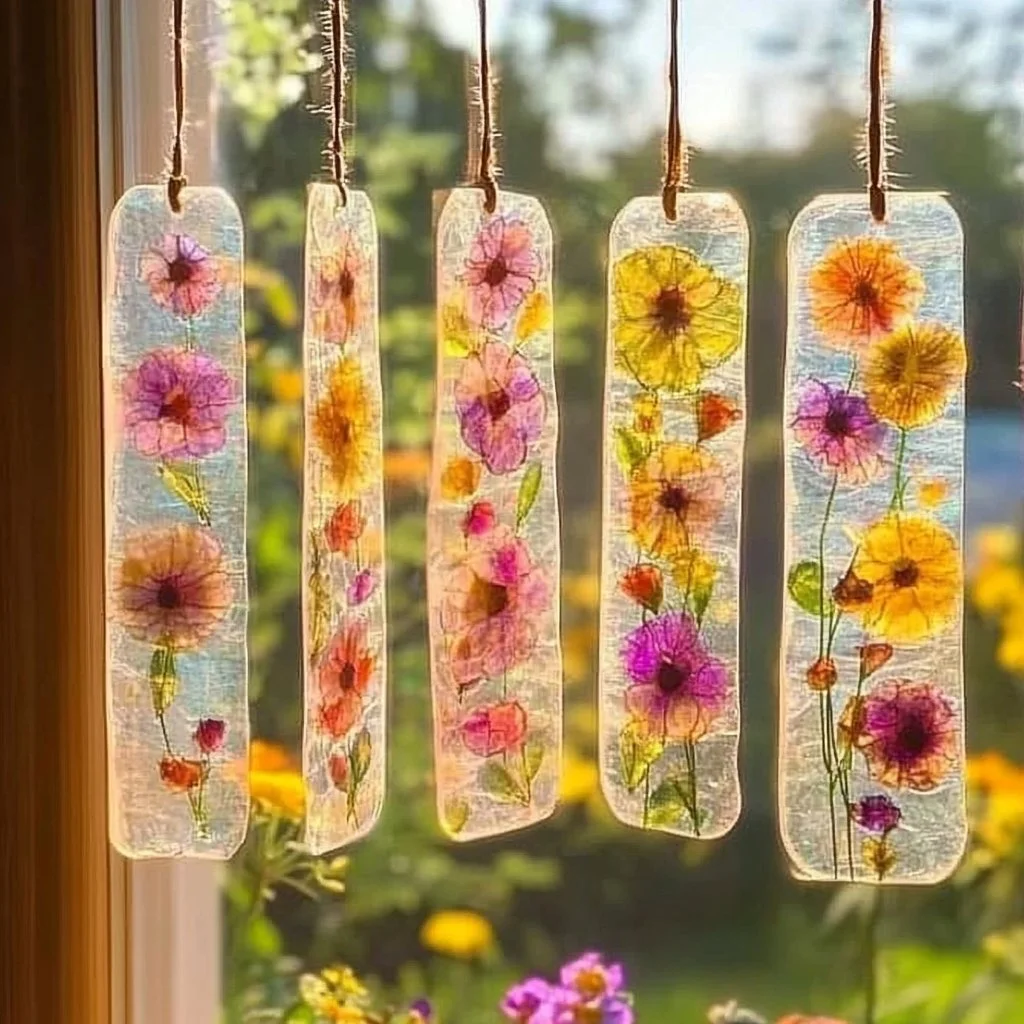
When the suncatcher finds its home, it changes the room in a quiet way. Hang one in a kitchen window to catch early light and warm the space with color. Tie a small set of three over a reading nook; the movement and shadow will be slow and subtle. I like to hang a tiny one above my sink where it catches the last light and throws soft color across plates and hands drying them.
Touch is part of the enjoyment. The finished pieces often feel slightly supple, like thin leather or soft cellophane. Pressing a fingertip along the surface reveals the botanical imprint and the faint sound of plastic settling as it finds its shape. That sound is small but rewarding a tactile punctuation to a gentle act of making.
If you want a brighter palette, I mix milder pigments and layer them in thin washes for subtle gradation. For a more natural look, I rely on leaves and flower petals, pressing them flat before embedding. For ideas that lean into richer color, I sometimes refer to a colorful recipe and ideas that show more saturated techniques and playful compositions.
Making This DIY Last
Bioplastic suncatchers can remain beautiful for months or even years when cared for gently. Store finished pieces flat in a drawer or a shallow box lined with tissue paper if you need to keep them away from direct sun or heavy wear. Prolonged intense sunlight can change color pigments over time; a windowsill with soft morning or late afternoon light works best.
Avoid placing them near heat sources or where they can bend repeatedly. If a piece becomes dusty, wipe it with a soft, dry cloth. Do not soak in water. If a small stain appears, a barely damp cloth with a touch of mild soap can help, but test on a corner first.
You can reuse elements. If a piece cracks or fades, remove any loose pieces and consider using fragments as pendants or bookmarks. Small repairs work well with a dab of clear glue along a hairline crack, pressed smooth and allowed to set. Treat your finished suncatchers like fragile treasures; they respond well to calm handling and thoughtful storage.
Gentle Tips & Variations
- Invite texture by layering thin paper shapes between very thin layers of the bioplastic.
The paper adds a soft opacity and a tactile edge that feels homey and warm. - Use powdered plant pigments or finely ground spices for a subtle, natural hue.
Turmeric gives a soft yellow, while beet powder offers gentle pink tones; use small amounts. - Try negative space: pour sparse dots of the mix and allow them to merge slightly.
That airy scattering creates a delicate, hand-placed rhythm in light. - Make tiny collections of three or five that share a color story.
Grouping small suncatchers feels intentional and displays like a little mobile. - If you need a vegan option, substitute agar-agar for gelatin and reduce the water slightly.
Agar behaves differently when cooled; expect a firmer, less elastic feel and allow extra time to adjust.
These suggestions are invitations. Each variation teaches you something about how the material behaves. Let your hands experiment slowly and celebrate little surprises.
FAQs About DIY Bioplastic Suncatchers
Are these suncatchers safe for kids to help make?
Yes, with supervision. Children can press leaves, choose colors, and help smooth edges. Keep them away from the hot pan and any steps that require heating. Set up a calm station where they can work at the cool finishing steps like arranging botanicals and threading ribbon.
Will the colors fade over time?
Natural pigments can lighten with prolonged, strong sunlight. Using small amounts of color and hanging suncatchers in gentler light helps them keep their tones longer. For bolder, more fade-resistant color, choose lightfast pigments and avoid direct, midday sun.
Can I wash these suncatchers?
Avoid full immersion. Wiping with a soft, dry cloth removes most dust. If necessary, use a barely damp cloth and dry immediately. Water can soften the bioplastic and alter its texture.
How flexible are they and can I make them more durable?
Glycerin helps keep the suncatchers flexible. Increasing glycerin slightly yields a softer result, while too much can slow drying. For added durability, keep layers thin and allow full drying time. Store flat to prevent bending.
What should I do if a piece cracks while drying?
Gently lay it flat and let it finish drying undisturbed. If the crack opens, you can press the edges back together with a small drop of clear glue and smooth carefully. Learn from the experience by slightly altering thickness or drying location next time.
A Quiet Closing Thought
The act of making a bioplastic suncatcher asks for small, deliberate choices. It rewards slow hands, a soft gaze, and an acceptance that each piece will possess its own gentle irregularities. Those tiny imperfections become part of the charm. As you sit with a finished suncatcher swinging in a shaft of light, let the quiet measure of your time with it be the real keepsake.
Take a moment to notice how the light moves across the material when you pass by. Let the sensation of a cool edge under your thumb remind you of the warm range of making. Keep the process simple and personal. Invite someone you love to help, or keep the practice as a peaceful, private ritual. Whatever you choose, let the making be as comforting as the seeing.
Conclusion
For a clear, kid-friendly tutorial that walks through a classic bioplastic suncatcher recipe step by step, How To Make A Bioplastic Suncatcher – Chemistry for Kids offers helpful photos and a gentle approach. If you want more botanical-focused inspiration and variations that highlight pressed flowers and textures, this guide from Wineberry Woods, Botanical Bioplastic Sun Catchers – Wineberry Woods, provides thoughtful examples and natural color ideas.
PrintDIY Bioplastic Suncatchers

Create beautiful and colorful bioplastic suncatchers using simple, natural ingredients for a soothing crafting experience.
- Prep Time: 15 minutes
- Cook Time: 60 minutes
- Total Time: 75 minutes
- Yield: Multiple suncatchers
- Category: Craft
- Method: Crafting
- Cuisine: N/A
- Diet: N/A
Ingredients
- 1 tablespoon gelatin powder or agar-agar
- 2 tablespoons warm water
- 1 teaspoon glycerin (optional)
- 1 tablespoon water (for mixing)
- Natural pigments, watercolors, or diluted food coloring (optional)
- Small pressed flowers, leaves, or thin paper cutouts
- A nonstick tray, silicone mat, or parchment paper
- Cookie cutters or small molds
- A shallow spoon or silicone spatula
- A heatproof saucepan
- A wooden or silicone spoon
- A fine brush for placement and smoothing
- A small hole punch or needle
- Scissors and ribbon or twine for hanging
- Oven or sunny windowsill for drying (optional)
Instructions
- Measure one tablespoon of gelatin or agar-agar and two tablespoons of warm water. Stir slowly until the powder dissolves and the mix feels smooth and slightly thick.
- Add a teaspoon of glycerin and one tablespoon of water. Stir until blended and the mixture takes on a glossy sheen.
- Warm the mix gently over low heat, stirring often, until it changes from cloudy to clear and small bubbles form.
- Add color if desired and stir softly.
- Prepare your tray with parchment and set cookie cutters or templates.
- Pour a thin layer of warm bioplastic into each shape, spreading it evenly.
- Press small leaves, petals, or cutouts onto the surface, smoothing them with a fine brush.
- Make a small hole at the top of each piece while the material is soft.
- Let the pieces dry in a warm place for several hours or overnight, or use a low oven for faster drying.
- Test flexibility and trim any uneven edges with scissors.
- Thread ribbon or twine through the hole and hang where it can catch light.
Notes
These suncatchers can last for months if cared for correctly. Store flat and avoid direct sunlight to prevent fading. Glycerin helps keep them flexible.