

A slow cup of tea warms my palms while a spoon stirs tiny grains of sugar into a steaming pot. The room smells faintly sweet. The first clear crystal forms on the edge of a glass rod and catches the light like a quiet star. This simple Sugar Crystal Experiment feels like a small ceremony for the senses, a way to sit with gentle patterns and slow change, and I often pair it with other explorations like rapid growing sugar crystals when I want a different rhythm.
Why Sugar Crystal Experiment Feels Comforting to Create

This project invites soft focus and patient watching. The act of dissolving sugar in warm water produces a smooth, slick surface that feels almost like oil under a spoon. When the first crystals form, they do so in a quiet, deliberate way that rewards calm attention.
I find the experiment so comforting because it moves slowly enough to notice small changes. You watch a cloudy solution clear, then cloud again. You hear a gentle fizz when sugar meets hot water. Your hands stay busy with small, tidy actions: stirring, pouring, tying a string. Each motion has a purpose, but none hurry the process.
The sensory details ground you. Warm glass against your palms, the gloss of saturated syrup, the quiet clink of a wooden spoon these moments slow the mind. That is the heart of this Sugar Crystal Experiment: an easy, mindful craft that asks for presence and offers steady, beautiful results.
A Gentle Look at the Process
Before you gather jars, you will move through warm water, bubbling sugar, and a patient wait. The work feels like a soft ritual.
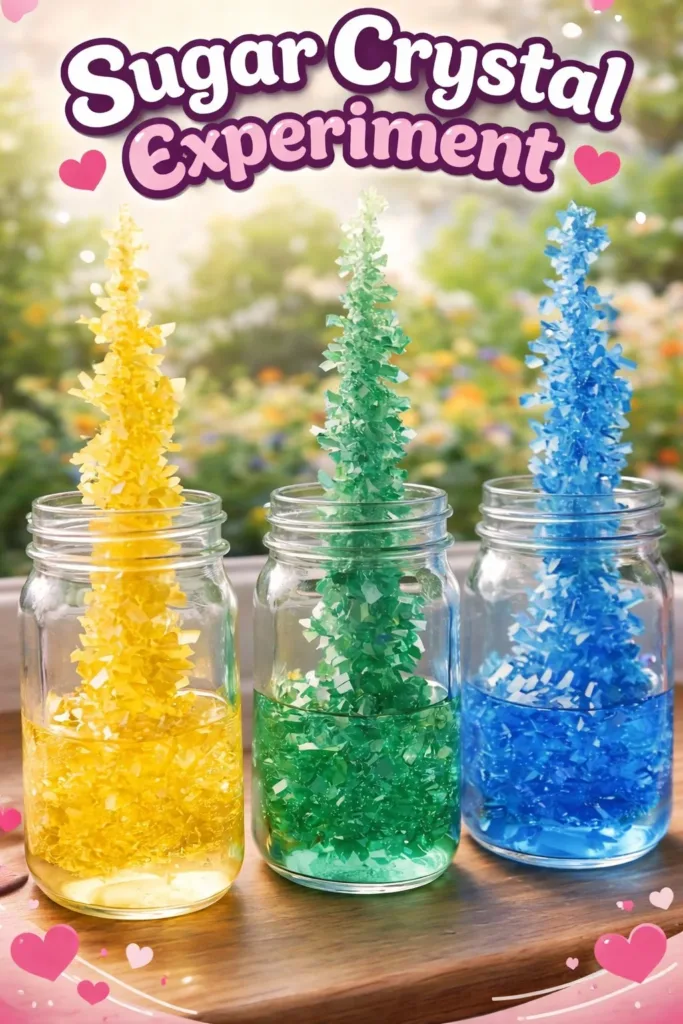
You start by making a supersaturated sugar solution. The liquid looks thick and glossy as you add sugar, and it smells faintly of caramel when it warms. You then introduce a seed point for crystals, often a string or a stick, and suspend it in the syrupy solution. Over days, microscopic sugar molecules find one another and arrange into a lattice. The growth feels gradual and patient, like watching frost spread on a window.
If you enjoy comparing methods, I sometimes test sugar crystals alongside other simple experiments such as the baking soda crystal tree, which uses a different chemistry and grows in its own sculptural way. See a cozy comparison in my post about the baking soda crystal growing tree for a feel of different textures and speeds.
Materials You’ll Need
- Granulated white sugar, easy to find and pure tasting
- Clean glass jars or heatproof glasses, clear so you can watch growth
- Wooden craft sticks or a clean pencil, to balance and suspend strings
- Cotton string or fishing line, for seed crystal surfaces (fishing line grows clearer crystals)
- A small clothespin or tape, to secure the string
- A pot for heating water, medium-sized
- Measuring cup and spoon, simple and steady
- Food coloring, optional and soft for gentle tints
- Flavor extracts like vanilla or lemon, optional and adds a faint scent
A quick note on substitutes: you can use skewers instead of craft sticks. If you prefer no added scent, skip extracts. I choose plain white sugar because impurities in brown sugar alter the way crystals form.
Step-by-Step Directions
- Warm the water slowly until it feels comfortably hot.
Stir in sugar a little at a time so the solution stays glossy and clear. - Keep adding sugar until no more dissolves and the liquid looks syrupy.
This creates a supersaturated solution that encourages crystals to form. - Let the mixture cool slightly, then pour it into a clean glass jar.
Pour slowly to avoid introducing too many air bubbles that can disturb growth. - Tie a short length of string to a pencil or stick and dip the string in the solution.
If you want seed crystals, roll a bit of damp sugar onto the string first and let it dry. - Suspend the string so it hangs in the middle of the jar without touching the sides.
Secure the stick across the jar mouth with a clothespin or tape for a steady hold. - Place the jar somewhere undisturbed and at a gentle room temperature.
A calm shelf or a corner of a kitchen counter away from drafts works well. - Watch the surface each day and notice tiny crystal points forming.
They will grow slowly and layer onto one another like delicate glass petals. - If you want colored crystals, add a drop of food coloring once the solution cools.
Avoid adding color while hot because it can separate or change tone. - After several days to a week, lift the string and admire your crystals.
If they feel fragile, let them dry on a clean paper towel for an hour or two. - Store your finished crystal in a dry place if you plan to keep it.
Handle it with gentle fingers; it will feel cool and slightly grainy where crystals meet.
Enjoying the Finished Piece

Crystals feel like tiny sculptures you can hold or display. The finished piece catches light in a warm, soft way. Place it in a window where morning sun can touch it, and you will see translucent patterns and tiny rainbows on bright days.
I like to sit near my work with the crystal within reach, turning it slowly to feel the textured surface under my fingertips. The crystals remind me of quiet winters and slow afternoons. They also make sweet, humble gifts: nest one on a small dish and wrap it in tissue paper to give a friend a little token of calm.
Crystals also work well as a sensory prop during quiet reading time. Place one on your lap as you read aloud, or use it as a pause object during a breathing break. The weight, coolness, and tiny facets invite slow touch and present attention.
While we enjoy these pieces, we can also explore other crystal shapes and textures. I sometimes pair this sugar crystal display with experiments that form different shapes, like the baking soda crystal hearts I wrote about in this cozy tutorial for baking soda crystal heart growth. The contrast between sugar’s glassy planes and baking soda’s feathery clusters offers a calm variety.
How to Store or Reuse Sugar Crystal Experiment
If you plan to keep a crystal for a while, store it in a dry box or a glass dome.
Moist air can soften crystals over time, so a sealed container helps them last.
You can reuse larger crystals in simple displays. Mount a crystal on a small base and tuck it into a shadow box with dried flowers.
This preserves the delicate surface and turns the crystal into a gentle art object.
If the crystal starts to dissolve or attract moisture, you can gently dry it and let children or guests touch it briefly.
If it must be recycled, dissolve it in warm water and compost any organic residue when possible.
For teaching or repeating the experiment, reheat the dissolved sugar and make a fresh solution.
I often reuse jars and sticks after a careful wash. Reusing means less waste and a familiar, comforting routine.
Gentle Tips & Variations

- Try different seed surfaces: cotton string gives more textured growth, while a clean piece of fishing line yields clearer, more glass-like crystals.
This small change alters both look and feel. - Add gentle color with one drop of food coloring once the solution cools.
Soft pastels feel calm and avoid harsh tones that distract from the slow growth. - Make small clusters in shallow dishes for faster observation.
These are tender, quick studies that give the same quiet satisfaction in less time. - Test scent additions like a few drops of vanilla for a subtle aroma.
Scent can deepen the sensory moment but avoid strong essential oils that can alter growth. - Create shared experiments: place jars side by side with small differences and watch how conditions change results.
This turns the making into a slow conversation with subtle discoveries.
These suggestions come from many afternoons at my table, arranging small experiments and noting what delights or frustrates me. I learned that simple changes yield gentle surprises, and that the process often matters more than perfection.
FAQs About Sugar Crystal Experiment
Will the crystals grow faster if I put the jar in the sun?
Sunlight can warm the jar and sometimes speed growth a little. But warmth also creates air currents that disturb the surface. I recommend a steady, room-temperature spot for the most even crystals.
Why did my crystals become cloudy or misshapen?
Tiny impurities, too much movement, or disturbances from opening the jar can create cloudiness. Use clean tools, avoid stirring after you set up, and choose a calm spot to help crystals keep clear faces.
Are these crystals safe to taste?
They are made from sugar and are non-toxic. I avoid eating them after adding food coloring or flavor extracts. If children are involved, supervise tasting gently to avoid too much sugar.
How long will it take for large crystals to form?
Growth varies with temperature and saturation. Small crystals appear in a day or two. Larger, clear specimens may take one to two weeks. Patience rewards you with better-formed crystals.
Can I make shapes instead of straight strings?
Yes. Use a mold or a shaped support, such as a paperclip or a small twig frame, and allow crystals to form around it. They will take on the shape of the support and create more sculptural pieces.
A Gentle Note Before You Go
Sit with the finished crystal for a moment and breathe slowly. Notice how the light plays on a facet and how your fingers feel on the textured surface. This project offers small reminders that slow things become beautiful when we give them time.
If you want to read more about the science behind sugar crystals, I recommend a few friendly guides that explain why sugar molecules join into lattices and how temperature and concentration shape growth. They helped me understand the gentle chemistry that guides each making moment.
Conclusion
Thank you for taking this calm, sensory journey with the Sugar Crystal Experiment. If you would like a clear, step-by-step science project guide that explains the growing process for kids and classrooms, the Growing Rock Candy Crystals | Science Project page offers a friendly, educational overview. For a deeper look at making large, transparent sugar crystals at home and seeing thoughtful variations, I found the How to Make Giant Transparent Sugar Crystals at Home – Crystalverse article to be a clear and inspiring resource.
May your making be slow and simple, and may each crystal you grow bring a small, steady calm to your day.
PrintSugar Crystal Experiment

A gentle and mindful craft to grow beautiful sugar crystals.
- Prep Time: 10 minutes
- Cook Time: 60 minutes
- Total Time: 70 minutes
- Yield: Varies
- Category: Craft
- Method: Experimentation
- Cuisine: N/A
- Diet: N/A
Ingredients
- Granulated white sugar
- Clean glass jars or heatproof glasses
- Wooden craft sticks or clean pencil
- Cotton string or fishing line
- A small clothespin or tape
- A pot for heating water
- Measuring cup and spoon
- Food coloring (optional)
- Flavor extracts like vanilla or lemon (optional)
Instructions
- Warm the water slowly until it feels comfortably hot.
- Stir in sugar a little at a time until the solution stays glossy and clear.
- Keep adding sugar until no more dissolves and the liquid looks syrupy.
- Let the mixture cool slightly, then pour it into a clean glass jar, avoiding air bubbles.
- Tie a short length of string to a pencil or stick and dip the string in the solution, optionally rolling it in damp sugar for seed crystals.
- Suspend the string in the middle of the jar without touching the sides and secure it.
- Place the jar somewhere undisturbed at room temperature.
- Watch for tiny crystal points forming each day, adding color with food coloring if desired.
- After several days to a week, lift the string and admire your crystals.
- Store in a dry place if keeping.
Notes
Store crystals in a dry box to prevent moisture; they can be reused for displays.