

A warm cup sits beside a small bowl of shells. Steam lifts soft and slow, and a quiet light catches tiny facets of newly formed crystals. My fingers rest on smooth edges, and the memory of pouring warm water and watching sparks of glasslike growth keeps me calm. This is the hush of making DIY Crystal Seashells, the gentle kind of craft that asks only for patience, attention, and the comfort of slow hands. I often pair this project with another gentle table activity like my aromatic gems project, so the room smells like citrus or lavender while the crystals grow.
Why DIY Crystal Seashells Feels Comforting to Create

Making crystal seashells brings a deep, sensory calm. You work with warm water, the faint mineral scent of the solution, and the steady motion of stirring. Those small, repeated actions slow the breath and steady the hands. The moment when crystals first appear feels like a soft surprise, tiny gardens emerging on familiar shapes. That quiet wonder helps you settle into the present.
This craft also invites gentle focus instead of perfection. Shells already hold texture and story. Adding crystals highlights those ridges and hollows. The process rewards patience: a slow cooling solution, a few hours of stillness, and then the light plays differently across a shell. Over time, placing a finished piece on a windowsill or beside a candle becomes a daily, tactile reminder to breathe and to notice simple beauty.
The project fits easily into a calm routine. You can start it in the morning and check back later in the day, or set it up in the evening and let the crystals grow overnight. Either way, the pace remains unhurried. The sensory notes warmth, slight fizz of dissolving powder, the soft clink when shells settle create a small meditation of making.
A Gentle Look at the Process
Before listing materials, here is a soft overview of how the project comes together. You dissolve a mineral agent in hot water until it forms a saturated solution. The warm solution carries more dissolved mineral than cool water can hold. As it cools, those dissolved particles reconnect and form visible crystals on the shell surfaces.
You will prepare shells, nestle them securely, and allow the solution to touch their textured edges. That contact gives crystals a place to begin. Over hours, tiny facets grow and gather, catching light. The rhythm of this project moves from active preparation to patient watching. If you have tried crystal trees or other slow-growing crafts, the motion will feel familiar; if not, it invites a new, quiet satisfaction. For a different but related experiment, you might like the mindful steps in this baking soda crystal growing tree tutorial, which highlights similar sensory moments.
Materials You’ll Need
- Clean seashells, rinsed and dried (easy to find or collected)
- Borax powder or alum (borax is common; alum works as a substitute)
- Hot water, just off the boil
- Small glass jars or heatproof containers (one per shell or cluster)
- Clear string or thin wire for suspending shells (optional)
- A spoon or stir stick (wooden or metal)
- Food coloring or liquid dye, optional for color
- A tray or towel to protect your work surface
- Gloves and goggles for safety if you prefer (recommended for careful handling)
- A fine brush or soft cloth for gentle cleaning after crystals set
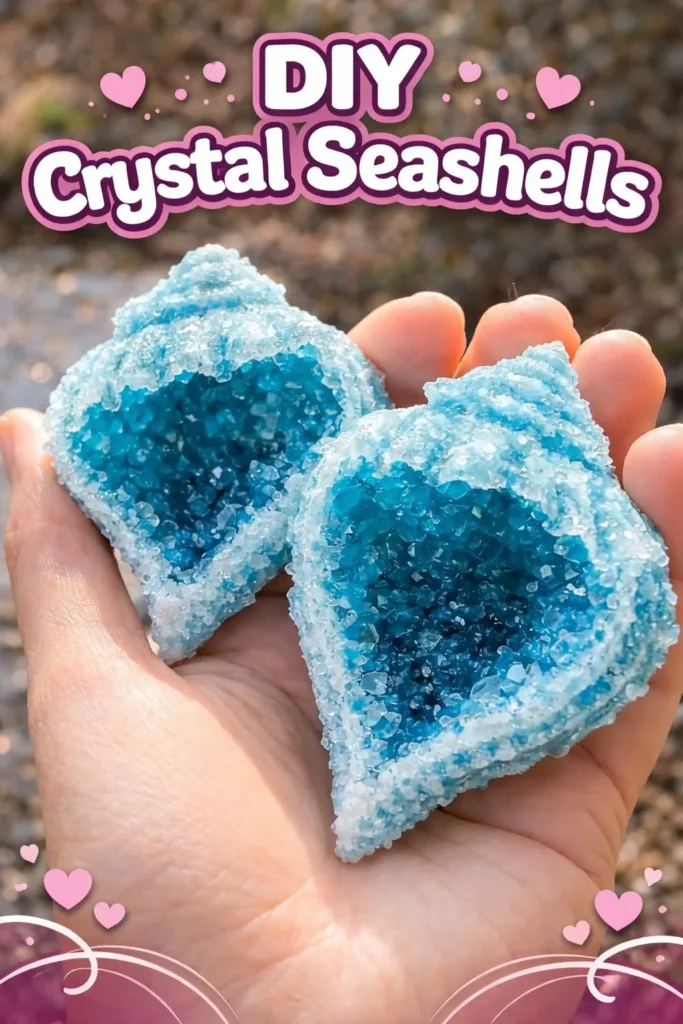
- Inspiration shell photos like the calming tones in this turquoise crystal seashells post
Notes: Borax dissolves well in hot water and creates clear, glasslike crystals. Alum gives bright, sparkly growth too but can yield slightly different textures. If you choose color, a drop of food coloring in the solution will tint the crystals gently. Safety note: never ingest borax and keep the solution away from children and pets.
Step-by-Step Directions
- Gather a calm workspace. Lay down a towel to catch spills and place jars on a steady surface.
Let your hands warm with the cup of tea you keep nearby. - Measure hot water into a jar. Use enough to fully cover the shell you plan to crystalize.
The water should be very warm but not boiling by the time you mix. - Add borax or alum slowly, stirring until the water looks full and a bit cloudy.
You want a saturated solution; a small amount may remain undissolved at the bottom. - Prepare the shell by rinsing and letting it dry. If it has a waxy feeling, wipe with a soft cloth.
A clean surface invites even crystal growth along ridges. - If you plan to suspend the shell, tie clear string and hang it in the jar so it does not touch the sides.
Or nestle the shell in the solution with a support so it sits comfortably. - Gently lower the shell into the solution and leave it undisturbed. Cover lightly if you worry about dust.
The silence of waiting is part of the practice; check only occasionally. - Watch for the first tiny crystals to appear usually within a few hours, clearer by morning.
When they look full and sparkly, remove the shell slowly by lifting the string or support. - Rinse the shell very gently in cool water to remove loose crystals. Use a soft brush if needed.
The rinse should be delicate; too much force can knock crystals free. - Let the shell dry on a paper towel or soft cloth until completely set. Turn it slowly as it dries.
The drying process helps crystal faces sharpen and catch more light. - If you want deeper growth, return the shell to a fresh saturated solution and repeat.
Each soak can produce larger, more confident crystals.
Using DIY Crystal Seashells in Everyday Life

Use a small group of shells in a shallow dish of sand for a coastal vignette. The contrast of rough sand and smooth, crystalline shells feels pleasing to the touch and to the eye. You can also tie a tiny string and hang a single shell as a peaceful ornament or tuck one into a plant pot as a quiet surprise.
If you enjoy rituals, add a crystal seashell to a bedtime tray with a small candle and a lavender sachet. The shell becomes a small, intentional object that marks a moment of winding down. For gifting, place a single crystal shell in a recycled glass jar with a soft ribbon and a handwritten note. The object carries time and care, not just a pretty shape. For another way to reuse crystals and small handmade ornaments, the ideas in baking soda crystal growing trees may spark gentle inspiration.
How to Store or Reuse DIY Crystal Seashells
Crystals can be surprisingly fragile. Store finished shells in a dry, low-humidity place away from direct sunlight if you want to preserve color. Wrap each shell in acid-free tissue or a soft cloth and place them in a shallow box with dividers to keep pieces from knocking together.
You can reuse a shell by soaking it in warm water to slowly dissolve loose crystals, then gently scrub with a soft brush and re-grow in a fresh solution. This lets you experiment with new colors or deeper growth without collecting new shells. If a shell’s crystals chip over time, set the piece aside as a tactile object for mindful handling rather than display.
For long-term keepsakes, place the shell in a glass dome or small cloche. The dome reduces dust and accidental knocks while allowing light to highlight the textures. If you live in a humid climate, slip a small silica packet into the container to help preserve the clarity of the crystals.
Gentle Tips & Variations
- Invite color with restraint. A single drop of food coloring produces subtle tints. Start small and add more in later trials if you want richer hues.
- Use small clusters of shells in one jar for a miniature geode scene. Arrange shells so their ridges face the solution where crystals can catch them.
- Try mixing a little glitter or mica powder into a thin coat of glue on the shell first for a soft metallic shimmer under the crystals.
- Grow crystals at night for a quiet reveal in the morning. Overnight growth often yields well-formed facets and a calm sense of surprise.
- Experiment with different minerals. Alum gives a different crystal structure than borax and can result in more delicate, sparkly formations.
Consider these ideas as invitations. Each variation teaches you something about how texture, temperature, and time shape the little crystalline landscapes you create.
What I’ve Learned While Making This

Place finished crystal seashells where light can dance across their facets. A sunny windowsill, the rim of a glass bowl, or a shelf near soft lamp light all highlight the delicate geometry of the crystals. The way light catches the edges gives a gentle sparkle without being showy.
I learned that patience changes the craft. The first time I tried to speed the process, I disturbed the jar and ended up with uneven growth. Now I set the shell, cover the jar with a thin cloth, and let household sounds happen around the work without touching it. That small act of restraint produces more even, confident crystals.
I also noticed how the same shells behave differently depending on their shapes. Smooth, rounded shells form thin, reflective coats. Deeply ridged shells grow clusters that collect light like tiny facets on a necklace. This taught me to choose shells intentionally when I want a certain look.
Finally, the small rituals around the project mattered most. Making a warm drink, putting on a soft playlist, and sitting for a few minutes with the work before leaving it to set made the whole thing feel more like a calm ritual than a task.
FAQs About DIY Crystal Seashells
Is borax safe to use for crafts?
Borax works well for clear, sturdy crystals, but it is a mineral with safety considerations. Keep it out of reach of children and pets, do not ingest, and wash hands after handling solutions. Consider wearing gloves if you have sensitive skin.
How long do crystals take to grow?
You will often see tiny crystals within a few hours, with more defined growth by morning. For fuller coverage, allow the shell to sit in the solution overnight or for 24 hours. Growth continues slower after the first day.
Can I color the crystals without changing their texture?
Yes. Adding a few drops of food coloring to the solution tints crystals without significantly altering their texture. Start small; color becomes stronger with repeated soaks.
What happens if crystals flake off when I move the shell?
Flaking can occur if growth is thin or if you rinse too forcefully. Rinse gently and let the shell dry fully before handling. If many crystals fall away, consider re-soaking in a fresh solution to strengthen attachment.
Can children participate?
Children can join parts of the project with close adult supervision. Let kids rinse shells and watch crystals form, but keep them away from the hot solution and borax powder. Use protective measures and clear boundaries for safety and calm participation.
A Quiet Closing Thought
Sit with one finished shell for a moment. Notice the way light and shadow move across the crystals. Feel the contrast between smooth shell and jagged growth, and let that small intimacy quiet the mind. Making these pieces teaches slow attention. The shells carry both the sea’s memory and the time you gave them.
Conclusion
If you want a teacher-led simple guide or an alternative approach to growing crystals on shells, this Crystal Seashells | DIY for Beginners – KiwiCo resource offers a clear, stepwise example that many beginners find reassuring. For a child-friendly, explorative version with science notes and charming photos, the Shell Crystal Craft – Little Bins for Little Hands page pairs craft delight with simple explanations and gentle safety tips.
Thank you for sitting with this quiet process. May your next batch of crystal seashells bring you small, steady moments of wonder.
PrintDIY Crystal Seashells

Create beautiful crystal formations on seashells using a simple process that combines warm water and borax or alum.
- Prep Time: 5 minutes
- Cook Time: 240 minutes
- Total Time: 245 minutes
- Yield: Varies – depends on number of shells used
- Category: Craft
- Method: Growing Crystals
- Cuisine: N/A
- Diet: N/A
Ingredients
- Clean seashells, rinsed and dried
- Borax powder or alum
- Hot water, just off the boil
- Small glass jars or heatproof containers (one per shell or cluster)
- Clear string or thin wire for suspending shells (optional)
- A spoon or stir stick
- Food coloring or liquid dye (optional)
- A tray or towel to protect your work surface
- Gloves and goggles (recommended for safety)
- A fine brush or soft cloth for gentle cleaning
Instructions
- Gather a calm workspace and lay down a towel.
- Measure hot water into a jar, enough to fully cover the shell.
- Add borax or alum slowly, stirring until the solution is saturated.
- Prepare the shell by rinsing and letting it dry completely.
- If suspending, tie the shell with string or hang it in the jar.
- Lower the shell into the solution gently and leave undisturbed.
- Wait for the first tiny crystals to appear, usually within a few hours.
- When crystals look full, gently remove the shell and rinse with cool water.
- Let the shell dry completely on a paper towel.
- If desired, return the shell to a fresh saturated solution for deeper growth.
Notes
Borax is recommended for clearer crystals, while alum can create different textures. Always handle borax carefully – it’s not safe for ingestion.