

The sun filters through a kitchen window and warms a small saucer of quiet work. I hold a scallop shell in one hand and a wooden spoon in the other. Steam lifts from a pot of softly bubbling water, and the spoon moves through the liquid with a gentle, rhythmic sound. Tiny crystals begin to catch the light along the shell’s ridges and I breathe a little easier. This project, making DIY Crystal Seashells, asks for slow hands, simple attention, and the small, steady joy of watching something sparkle into being. In another post I explored colorways for seashore crafts with the turquoise crystal seashells idea, and I return to that calm curiosity here.
Why DIY Crystal Seashells Feels Comforting to Create

Working with shells and crystals feels like meeting two quiet, old friends. The shells bring texture and weight. The crystals bring light and pattern. Together they make a small, focused ritual. When I make crystal seashells, I welcome a rhythm that slows me down. I stir, I wait, and I watch. The waiting carries its own quiet pleasure. It gives the hands something calm to do and the eyes something to follow.
This craft asks for simple repetition. You mix, pour, and suspend. The motion calms your breath. The sound of a spoon in warm water soothes. The sight of tiny crystals forming along a ridge offers a steady, optimistic surprise. That gentle surprise helps you feel present.
This project also works well as a mindful pause. You can plan it for a half hour in the evening and leave the soaking shells overnight. In the morning, the work welcomes you back. You return to a surface transformed by delicate, glassy shapes. That small return feels grounding.
The Flow of Making DIY Crystal Seashells
Before the materials, let me sketch the movement. You will heat, dissolve, color if you like, and then suspend shells so crystals can form. The process moves from warm motion to stillness. It asks for a careful balance of temperature and patience.
First you feel the warmth of boiled water. Then you watch the clarity change when you stir in your crystal-forming ingredient. You will notice steam, the soft clink of glass, and the slow sparkle that begins at the shell’s edges. These sensory markers guide your pace.
I sometimes set a quiet timer and move through the steps with a single song playing softly. That helps me keep the pace calm and steady. If you have younger makers nearby, the process makes a gentle science moment. If you prefer solitary making, it becomes a quiet ritual of attention and sensation. For more experiments with crystals on different armatures, try our simple approach to baking soda crystal trees in this companion project: baking soda crystal growing trees.
Materials You’ll Need
- Clean seashells, medium to large, washed and dried (easy to find at craft stores or beach collections)
- Borax powder or substitute crystal-former such as alum (borax works reliably; alum gives clearer crystals)
- Hot water from the kettle (careful: use oven mitts)
- Clear glass jars or heatproof cups (see-through jars help you watch the crystal growth)
- String or thin wire to suspend the shells (cotton string for natural feel; wire for firm support)
- Pencils or chopsticks to rest across jar rims for suspension
- Food coloring or liquid watercolor, optional for subtle color
- Tweezers and gloves, optional for handling rough edges (safety-friendly)
- A spoon for stirring
- A small tray or towel to catch drips
- Glitter or mica powder, optional for extra sheen (optional and decorative)
A note on borax and safety: borax works beautifully because it dissolves a lot in hot water and then forms crystals as it cools. It can irritate skin or eyes if you handle it without care. I keep gloves on and avoid inhaling powders. If you prefer a gentler chemical, alum or salt-based solutions make crystals too, though the size and clarity differ. For a child-friendly alternative, you can explore our earlier baking soda crystal guide for safe variations: baking soda crystal growing tree.
Step-by-Step Directions
- Wash and dry your shells slowly.
Run them under warm water, rubbing gently with a soft brush. Let them air dry. Hold them to notice their cool, rough texture. - Prepare a calm workspace.
Lay a towel or tray on your table. Place jars, a spoon, and your kettle within easy reach. Keep the area tidy to help your mind stay quiet. - Heat water and measure borax.
Boil enough water for your jars. For each cup of hot water, stir in about three tablespoons of borax until the solution looks clear. You will notice small clouds as the powder dissolves. - Add color gently, if you like.
A drop or two of food coloring creates soft hues. Stir once to blend. Watch the color spread in warm water like a watercolor bloom. - Suspend shells in jars.
Tie each shell with a short length of string or wire. Rest a pencil or chopstick across the jar and let the shell dangle without touching the sides. The shell’s concave side faces up to collect crystals. - Pour the solution with slow hands.
Hold the jar with one hand and pour the warmed borax solution from the kettle with the other. Pour steadily until the shell sits just immersed. The motion should feel smooth and controlled. - Let the jars sit undisturbed.
Move the jars to a still, room-temperature spot. Cover them loosely with a paper towel to keep dust out. Listen for the quiet. Crystals start forming in a few hours. Overnight yields deeper growth. - Check and remove gently.
When you lift a shell, do it slowly. Use tweezers or gloves if the crystals feel sharp. Let excess solution drip over the jar and set the shell on a towel to dry. - Rinse and let dry fully.
If you want a cleaner look, rinse the shells lightly with cool water. Pat them dry. As they dry, the crystals harden and sparkle more clearly. - Display and enjoy.
Arrange your crystal seashells on a small dish or nestle them in a bowl of sand. Touch them gently and take a quiet moment to notice the light moving across the facets.
Enjoying the Finished Piece

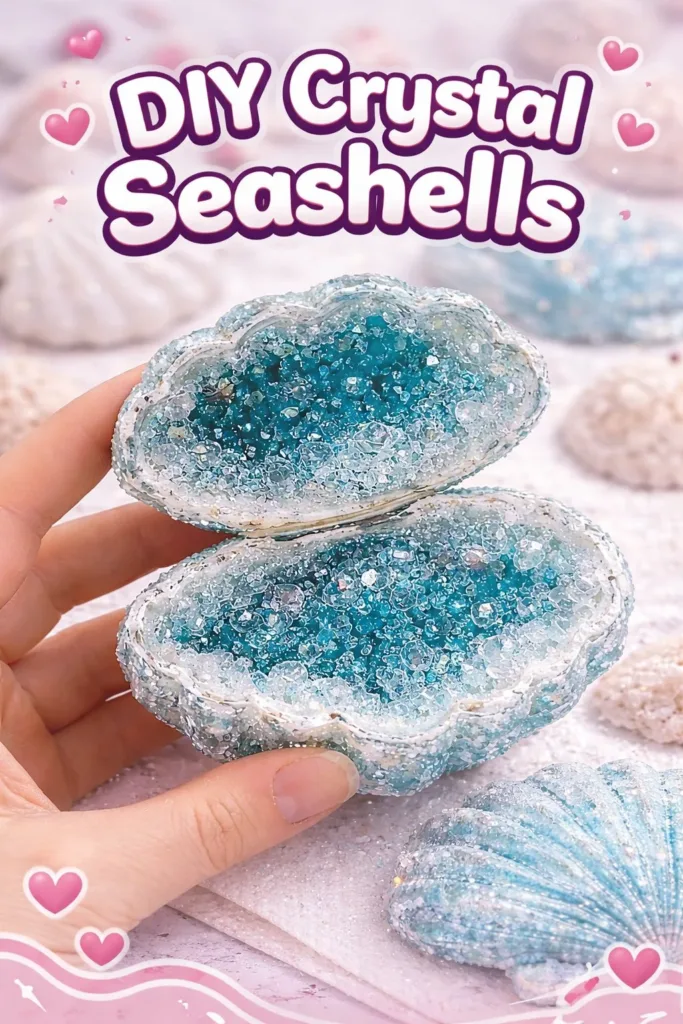
The finished shells feel like tiny, crystalline keepsakes. You will notice how the crystals catch light and how each ridge becomes a miniature landscape. The weight of a shell in your palm can calm you. The way a crystal edge glitters when you tilt it gives you a small, satisfying reward for your patient work.
Place a single shell on a bedside table for a soft morning smile. Group a few shells in a glass bowl with sand and a candle nearby for a slow, mindful centerpiece. If you like, tuck a shell into a small shadow box and use it as a tiny scene to revisit during a busy day.
Crystals can feel delicate. Handle your pieces with care. I often keep a small saucer next to the display so I can lift a shell and feel its texture. The shells make good conversation pieces. They offer a gentle story about patience and transformation.
How to Store or Reuse DIY Crystal Seashells
If you plan to store shells, pick a small box lined with tissue or fabric. Keep each shell separated so crystals do not rub against each other. Store in a cool, dry place to avoid humidity softening the crystals.
You can reuse shells as frames for new crystals. Gently dissolve old crystals with warm water and a soft brush, then repeat the process with a fresh solution for a different look. Some people like to repaint shells before re-crystallizing to create deeper colors under the crystal layer.
If a crystal edge breaks, accept the imperfection. You can smooth rough spots with a soft brush and embrace the new texture. For long-term keepsakes, display shells away from direct sunlight. Prolonged sun can fade any added pigments.
Gentle Tips & Variations
- Invite scent gently. Add a drop of essential oil to a cotton ball near the display area. Do not add oils to the solution. For a more immersive aromatic craft, explore our scented crystal gems for ideas: DIY aromatic gems and natural scented crystals.
- Try alum for clearer crystals. Alum often forms clearer, glass-like crystals with a slightly different texture. It dissolves readily in hot water, similar to borax.
- Use colored thread or metallic wire to suspend shells. The tiny line you choose can add a hint of color or shine when the shell hangs for display.
- Grow crystals on smaller shell fragments for delicate, lacy patterns. Smaller pieces form smaller crystals more quickly. They make lovely accents on cards or in resin art.
- Pair crystals with other natural elements. A small cluster of pebbles, a sprig of dried seaweed, or a strip of linen can make a quiet vignette that supports the shell’s tactile story.

What I learned while making these helps me stay gentle with the process. Let the solution cool gradually for larger, clearer crystals. If the room is very drafty, move jars to a more stable spot so crystal growth stays even. I also learned to trust the in-between time. The waiting becomes part of the craft.
FAQs About DIY Crystal Seashells
Are borax crystals safe for children?
Borax can irritate skin and eyes. I recommend adult supervision, gloves, and keeping borax away from mouths and small hands. For a child-friendly approach, try a baking soda method or use alum with careful adult handling. See our family-friendly crystal experiments for ideas.
Why did my crystals look cloudy or small?
Cloudy or small crystals often mean the solution did not reach full saturation or cooled too quickly. Try dissolving a little more borax while the water is hot, and let jars sit undisturbed at room temperature.
Can I color crystals with food coloring?
Yes, food coloring gives delicate hues. Add it sparingly when the solution is hot. Small amounts yield soft, watercolor-like tones. Heavier color can change the clarity.
How long will growth take?
You will see tiny crystals within a few hours. For substantial growth, leave shells overnight or for 24 hours. The longer you wait, the larger the crystals can become, up to a point.
Can I use plastic containers instead of glass?
You can, but glass helps you observe growth clearly and handles heat better. If you use plastic, let the hot solution cool slightly before pouring to avoid warping.
A Quiet Closing Thought
This craft rewards the hands and the mind with a slow, visible transformation. The mix of warm, stirring motion and the patient stillness that follows helps you practice a gentle attention. Each finished piece carries the memory of the making the slight steam on your cheeks, the soft scrape of a spoon, the first moment a crystal caught the light. Keep the shells close to places where you want to feel steadier. Return to them when you need a small, quiet reminder of how something beautiful comes from waiting and care.
Conclusion
If you would like a step-by-step guide from another perspective, I found the clear instructions in KiwiCo’s Crystal Seashells guide helpful for beginners. For a science-focused variation and additional photos, consider the detailed approach in Little Bins’ shell crystal craft.
PrintDIY Crystal Seashells

An enchanting craft project to create beautiful crystal seashells using simple materials and techniques.
- Prep Time: 30 minutes
- Cook Time: 0 minutes
- Total Time: 30 minutes
- Yield: Multiple seashells
- Category: Craft
- Method: Crafting
Ingredients
- Clean seashells, medium to large
- Borax powder or alum
- Hot water
- Clear glass jars or heatproof cups
- String or thin wire
- Pencils or chopsticks
- Food coloring or liquid watercolor (optional)
- Tweezers and gloves (optional)
- A spoon for stirring
- A small tray or towel
- Glitter or mica powder (optional)
Instructions
- Wash and dry your shells slowly under warm water, rubbing gently with a soft brush.
- Prepare a calm workspace by laying a towel or tray on your table with your necessary materials within reach.
- Boil water and for each cup of hot water, stir in about three tablespoons of borax until dissolved.
- If desired, add a drop or two of food coloring and stir gently to blend.
- Tie each shell with string or wire, then suspend it in a jar using a pencil or chopstick.
- Pour the borax solution into the jar, immersing the shell without letting it touch the sides.
- Let the jars sit undisturbed at room temperature, loosely covered with a paper towel.
- After several hours or overnight, gently check and remove the shells using tweezers or gloves.
- Rinse and let the seashells dry fully to enhance the clarity of the crystals.
- Display and enjoy your finished crystal seashells in a bowl or as part of a decorative centerpiece.
Notes
Use gloves when handling borax and avoid inhaling powders. For a child-friendly approach, consider using alum or baking soda instead.