

A warm pool of afternoon light settles on the table as I press the tip of a glue bottle to paper, watching the clear line wobble like a slow river. Swirled Glue Sun Catchers catch that gentle motion and hold it — a soft ribbon of color, a tiny world of light you can tilt and turn. The glue cools under my fingers, slightly tacky, then firm and smooth, and the quiet makes the making feel like a small meditation. If you have tried other sun catcher ideas, you might enjoy how this one gathers slow movement and gentle textures; I also like to pair it with patterns from our DIY glue suncatchers guide when I want a familiar rhythm.
Why Swirled Glue Sun Catchers Feels Comforting to Create

There is a calmness in watching glue become translucence. The process asks for patience, and that invitation to slow down feels comforting on a busy day. You trace lines, you swirl color, and the work returns a soft glow when it catches the sun. The tactile part matters: the squeeze of the bottle, the smooth drag of a toothpick, the quiet pop as a bead of pigment spreads. All of this grounds the hands and gently steadies the breath.
Making these sun catchers gives you small moments of control and wonder. You shape color and light without pressure. The glue makes forgiving shapes; it holds tiny imperfections like memories, and those marks look like texture when the sun slips through. For me, this project has become a way to mark quiet hours. I sit with a cup of tea, a low playlist or no sound at all, and I let the motion guide my pace.
The cozy value shows up in how the finished pieces live with you. Hung in a window, they change with the day. They remind you to pause. They cast soft specks of color across a table, and those flecks feel like tiny, intentional gifts. This is why many people return to glue-based sun catchers again and again: the making and the light both soothe.
A Gentle Look at the Process
Before you begin, imagine a rhythm: slow squeezes of glue, tiny dots of pigment, the quiet swirl of a toothpick. The main movement feels like breathing. You place glue, you add color, you nudge it, and then you wait. The glue looks wet and glossy at first. It breathes into translucence as it dries and thins.
You will repeat small, careful gestures. Each repetition brings a soft satisfaction: a line laid down, a swirl finished, a bead of color resting in place. If you have tried other clear glue techniques, you will notice the similarity in patience and feel; it calls to mind seasonal variations like the delicate textures I explore in my sparkling clear glue Christmas suncatchers guide, where the same quiet steps shape frosty designs. This felt rhythm helps you stay present, and the process asks you to listen to what your hands prefer.
Materials You’ll Need
- Clear school glue or clear craft glue, easy to find
- Heavyweight wax paper or a silicone mat, to prevent sticking
- Toothpicks or thin wooden skewers, for swirling
- Liquid watercolor or diluted acrylic ink, for small drops of color
- Fine-tip glue bottles or disposable piping bags, optional, for controlled lines
- Pencil and a simple cardboard template (circle, heart, or star), optional
- Small beads or glitter, optional for texture
- Thin fishing line or ribbon, for hanging
- A tray or shallow box to protect a drying surface
- A hair dryer on low heat, optional, to speed gentle drying
Note: You can substitute liquid pigment with watered-down food coloring, though color permanence may vary. Use items you find soothing to touch and work with; a soft tablecloth or a tray with a felt base keeps movement gentle.
Step-by-Step Directions
-
Prepare your surface and template.
Spread a sheet of wax paper on a flat table. Place a cardboard template under the wax paper if you want a neat shape. The waxy surface will release the dried glue gently. -
Load your glue bottle or piping bag.
If you feel steady with a steady squeeze, use the glue bottle. For finer control, cut a small tip from a piping bag. The glue should flow slowly and smoothly, not gush. -
Draw the outline.
Squeeze a continuous line of glue around your template to form a border. Feel the smooth, cool line build as you go. Keep your hand relaxed and steady. -
Fill with concentric lines or dots.
Work inward with more glue lines, circles, or tiny spaced dots. Each pause lets you see how the glue settles. The glue will sit glossy and clear at first. -
Add color drops.
Use a toothpick to dip into a tiny pool of liquid watercolor and touch it into the glue. Start with one or two colors. The pigment will bead and spread slowly. -
Swirl gently.
With a clean toothpick, nudge the color in small circular motions. Watch the colors pull into soft marbled veins. Move slowly; the swirl becomes smoother the gentler you are. -
Add texture if you like.
Place a bead, a speck of glitter, or a tiny pressed flower petal into the glue for a small accent. Tuck it lightly and avoid disturbing the surrounding color too much. -
Smooth thick areas.
If a part looks too tall, press gently with the back of a spoon wrapped in cloth. This helps create even thinness, which dries clearer. Work with a calm, steady touch. -
Let it dry.
Leave the piece in a warm, still spot. Drying takes time. You can use a hair dryer on low and at a distance to encourage even drying, but avoid hot, fast air that makes the glue bubble. -
Peel off carefully.
Lift the edge of the wax paper after the glue feels firm. Pull slowly and evenly. If it resists, wait a little longer. The piece should feel smooth and slightly flexible. -
Trim and finish.
If the edge looks uneven, use sharp scissors to tidy the shape. Punch a small hole for hanging and thread fishing line or ribbon through it. -
Hang and enjoy.
Place your sun catcher where light can pass through. Tilt it to find small, cheerful patterns of color on nearby surfaces.
Enjoying the Finished Piece

{image_template}
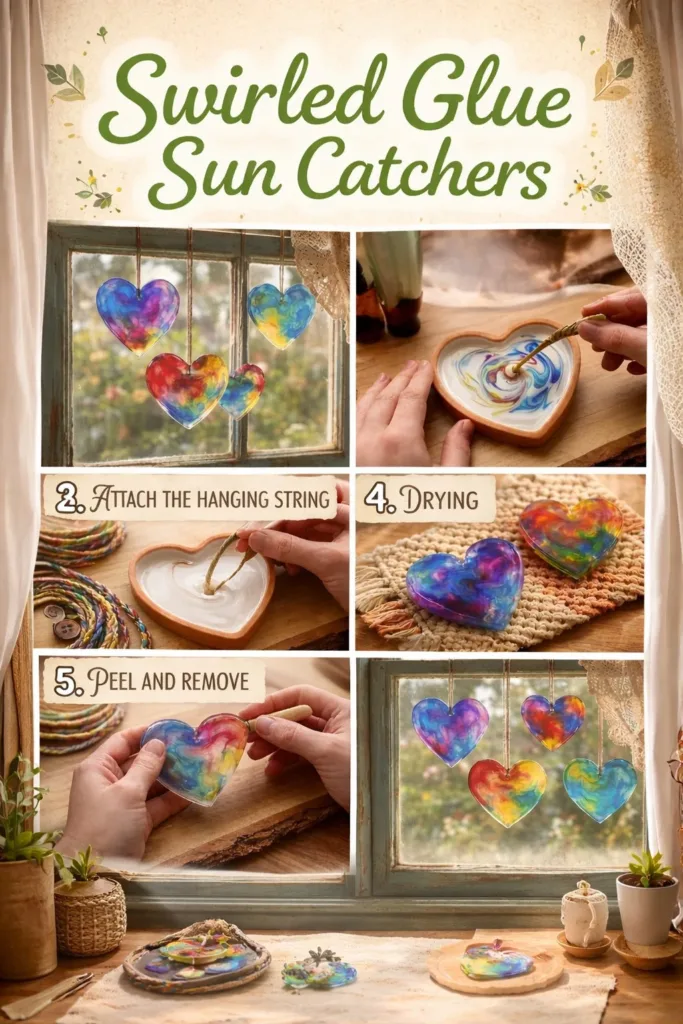
Place a Swirled Glue Sun Catcher in a window that catches the morning or late afternoon light. The thin layers of color move with the sun, and small details become visible only at certain angles. I like to hang a few at different heights; they sing quietly with each breeze, casting tone and shadow across a wooden table.
You can also let a sun catcher rest on a plain shelf so the light creates tiny pools of color on the wall. Tucking one near a reading chair makes the corner feel intentional and calm. These pieces make thoughtful, handmade gifts too: wrapped in tissue paper, they become an offering of slow time.
If you enjoy mixing clear glue techniques, you may find ideas for shapes and seasonal textures in the beautiful bioplastic suncatchers with natural flowers post, which shares similar gentle rhythms and ways to celebrate small materials.
Caring for Your Finished DIY
Keep your sun catchers away from direct heat sources and avoid very humid spaces, as prolonged moisture can soften the glue over time. Wipe them gently with a damp cloth if dust collects; use light strokes to protect any added embellishments.
Store extras flat between sheets of wax paper in a shallow box. Avoid stacking heavy objects on top. If a piece bends slightly, place it between two flat boards and leave it under a small weight overnight to regain a smoother shape.
If an edge chips, you can reapply a thin bead of clear glue to the damaged area, smooth it with a cloth-wrapped spoon, and let it dry. Treat the repair like a small repair to pottery: gentle, patient, and exact enough to preserve the piece’s calm lines.
Gentle Tips & Variations
- Invite slow color changes: start with one color and add a second after a few minutes. Watch them meet at a soft border rather than forcing rapid mixing. This creates layered depth without muddiness.
- Try translucent patterns: make tiny islands of clear glue and let color sit at their edges. The contrast between empty space and color reads like breath in a painting.
- Add pressed plant bits: a tiny petal or leaf looks lovely trapped in glue. Use very dry, thin plant pieces to avoid introducing moisture.
- Make a set in a single palette: choose three harmonious pigments and repeat them across several sun catchers for a calm, cohesive look in a window.
- Change scale: use a larger template for a bold statement or small ones for delicate clusters. The same slow movements translate to different sizes.
See these suggestions as invitations. There is no right or wrong here. The beauty often lives in small surprises.
What I’ve Learned While Making This
I learned to slow my hands first, then my thoughts. When my hands hurry, the glue beads unevenly, and the colors lose their softness. When I slow down, the glue behaves. I also learned to trust the drying time. Rushing with heat or prodding while it is still soft tends to leave fingerprints or dents. A patient wait rewards you with glassy clarity.
I noticed that thin, even layers dry clearer. So I took to smoothing the tall beads early in the process with a cloth-wrapped tool. That small habit made the pieces look more delicate and consistent. Another lesson: color looks different when layered against clear glue. A pale blue can glow like a pond when behind a thicker area, and the same color spread thin reads almost like a whisper.
Sometimes I started without a plan and let the glue tell me where to place the next color. Those pieces feel freer and more human. Other times I planned concentric shapes and followed a pattern, which felt restful in its predictability. Both ways feel valid and calming.
FAQs About Swirled Glue Sun Catchers
Q: Will the glue yellow with time?
A: Clear craft glue can yellow slowly in strong, direct sunlight. To extend clarity, place sun catchers where light filters rather than where it blazes all day. Use archival-quality clear glue when you want long-term clarity.
Q: Can children help with this project?
A: Yes, with supervision and simple roles. Young children can place color dots or add glitter, while an adult handles the glue outlines and final smoothing. Keep small parts like beads out of reach and work on a protected surface.
Q: How long does drying take?
A: Drying depends on thickness and humidity. Thin pieces dry within a day; thicker pieces may take two to three days. Give them time. If you are in a hurry, use low, distant airflow but avoid direct heat.
Q: What pigments work best?
A: Liquid watercolor and diluted inks give bright, translucent color. Food coloring works in a pinch, but color may fade faster. Avoid heavy, opaque paints unless you want stained, less light-transmitting patches.
Q: Can I make a sun catcher flexible?
A: The glue itself becomes slightly flexible but mostly firm. If you want more bend, keep layers thin and avoid rigid embellishments. For more flexible pieces, explore silicone-based materials in separate projects.
A Gentle Note Before You Go
Sit with the finished piece for a quiet moment. Tilt it to and fro and notice how the light changes the color’s mood. Let the small motions and tiny patterns remind you that making can be a place to breathe. You do not need perfection. The warmth you tucked into the process shows in subtle curves, gentle swirls, and the calm regularity of your own hands.
Return to the tray of materials on another day. Try a different palette or a new shape. Each attempt teaches you something about patience, texture, and how light tells stories through small things. These sun catchers ask only for your time and your quiet attention, and they repay you in soft color and slow, steady joy.
Conclusion
If you want a variation that uses painted glue for bolder, more opaque effects, you might enjoy this painted glue suncatchers tutorial from Capturing Parenthood for more inspiration. For another colorful approach with slightly different materials and technique ideas, explore this colorful glue suncatcher variation from Mombrite that shows playful patterns and color combos.
PrintSwirled Glue Sun Catchers

Create beautiful swirled glue sun catchers that catch and play with light, making your space feel calm and vibrant.
- Prep Time: 15 minutes
- Cook Time: 0 minutes
- Total Time: 60 minutes
- Yield: 1 sun catcher
- Category: Craft
- Method: Crafting
- Cuisine: DIY
- Diet: N/A
Ingredients
- Clear school glue or clear craft glue
- Heavyweight wax paper or a silicone mat
- Toothpicks or thin wooden skewers
- Liquid watercolor or diluted acrylic ink
- Fine-tip glue bottles or disposable piping bags (optional)
- Pencil and a cardboard template (optional)
- Small beads or glitter (optional)
- Thin fishing line or ribbon
- A tray or shallow box
- Hair dryer on low heat (optional)
Instructions
- Prepare your surface and template.
- Load your glue bottle or piping bag.
- Draw the outline.
- Fill with concentric lines or dots.
- Add color drops.
- Swirl gently.
- Add texture if you like.
- Smooth thick areas.
- Let it dry.
- Peel off carefully.
- Trim and finish.
- Hang and enjoy.
Notes
Keep your sun catchers away from direct heat sources and avoid very humid spaces. Store extras flat between sheets of wax paper.