

A soft square of sunlight falls across my lap as I thread thin wire through a tiny glass bead. The bead catches the light and sends a warm, quiet sparkle across the table. Making a Spider Suncatcher invites this slow attention, the gentle click of beads, the smoothness of glass under fingertips, and a small surprise when color spills across a windowsill.
Why Spider Suncatcher Feels Comforting to Create

This small project asks for just enough focus to quiet the mind without taking over the day. The pattern of wrapping wire, the repeat of beads, and the final moment when the suncatcher hangs free all offer a rhythm that soothes.
You might notice the sound of beads sliding, the slight resistance when wire meets loop, or the cool weight of the finished piece. Those sensations help anchor you to the present. The result adds a calm, playful touch of light to a room and gives you something tangible made by your own hands.
I often reach for projects like this when I want a peaceful, hands-on break. If you enjoy projects that catch light, you may like some of my other suncatcher adventures, such as blue crayon suncatchers, which explore color, translucence, and slow melting in a different way.
A Gentle Look at the Process
Before you begin, imagine moving slowly and enjoying one small action at a time. You will cut and shape wire, string beads, and form a little spider body and legs. The whole process takes time, but nothing here needs to be perfect.
You will feel the firm snap of wire when you trim it, the soft bend when you shape legs, and the satisfying click as the last bead nests into place. The steps repeat in a friendly rhythm. When you think of them as a sequence of simple, sensory moments, the making becomes calm and steady.
If you like projects that let you experiment with color and translucence, try reading the colorful recipe notes in my colorful bioplastic suncatchers recipe for ideas about palettes and layering.
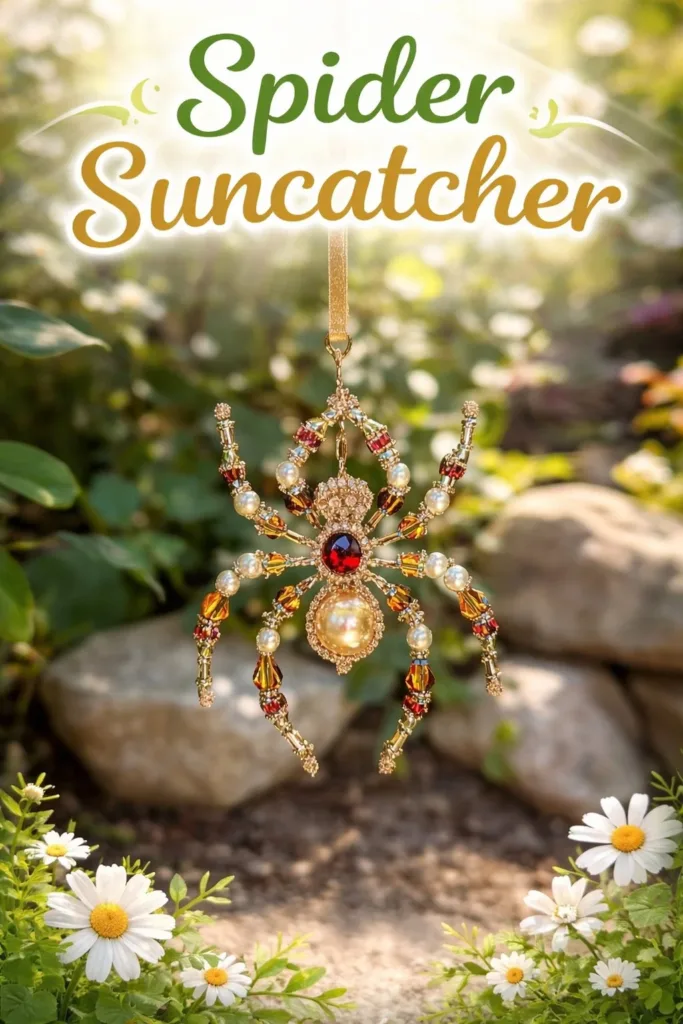
What You’ll Use to Make Spider Suncatcher
- Thin craft wire, 20 to 26 gauge, in a soft color (easy to bend)
- Glass or acrylic beads in assorted colors and sizes (translucent ones catch light best)
- A small round bead for the spider body (smooth and slightly larger)
- A tiny bead for the spider head (optional)
- Round-nose pliers (for gentle loops and curves)
- Wire cutters (sharp and precise)
- Flat-nose pliers (for pressing and shaping)
- A jump ring or small metal loop for hanging (optional)
- Fishing line, thin cord, or thread for hanging the finished piece (substitute-friendly)
- A small piece of felt or cloth to rest your hands on while you work (for comfort)
- A soft towel or shallow dish to keep beads from rolling away
A note about materials. Glass beads give the clearest, most jewel-like light, while acrylic beads are lighter and less fragile. I choose wire that bends without too much effort but still holds shape. If you prefer a recycled option, small bits of stained glass or polished sea glass work beautifully with a slightly thicker wire. For safety, keep small beads away from very young children and pets.
You may find additional guidance on using bioplastic or alternative suncatcher materials in the detailed instructions of my bioplastic suncatchers guide.
Step-by-Step Directions
-
Gather a small tray of beads and your tools.
Place the beads where you can see their colors under light. Breathe once and let your hands settle onto the table. -
Cut a length of wire about 8 to 12 inches long.
This gives you room to form the spider and legs. Keep the cut end away from fingers until you tuck it in. -
Thread the larger bead for the spider body onto the middle of the wire.
Slide it gently until it sits at the wire center. Feel its cool roundness against your finger. -
If using a head bead, thread it next to the body bead on one side.
Keep both beads snug but not tight so the wire can still wrap smoothly. -
Bend the wire under the beads and form a tight loop beneath the body using round-nose pliers.
This secures the body in place and creates a base to attach the legs. The loop should feel secure but not crushed. -
Divide the remaining wire into four segments for the legs, two on each side.
Visualize the spider’s balance as you shape each leg. Small, even lengths keep the spider symmetric. -
Shape each leg by bending the wire at gentle angles with your fingers or flat-nose pliers.
Make small joints, two or three per leg, to suggest knees. Pause to enjoy the subtle curves. -
Add beads to the ends of some legs for weight and decoration if you like.
Beads at leg tips catch light and give a woven look. Slide them on and tuck the wire ends with pliers. -
Wrap excess wire around the base beneath the body to secure the legs.
A few neat wraps keep everything firm. Press the ends down so nothing snags. -
Create a small hanging loop above the spider by bringing the top wire ends together.
Use round-nose pliers to form a circle. This loop will be where you attach fishing line or a jump ring. -
Trim any sharp ends and press them flat.
Use flat-nose pliers to tuck ends into the wrapped base. Feel the surface with your fingertip; it should be smooth. -
Attach a jump ring or tie fishing line to the hanging loop.
Measure the length you want for hanging and knot securely. The line should feel thin and almost invisible once suspended. -
Hang the suncatcher in a sunny window and watch the light dance.
Notice the way colors shift as the day moves. Let the small, steady movement be a quiet moment.
Enjoying the Finished Piece


A finished Spider Suncatcher invites slow observation. Hang it where morning light moves across a table or where afternoon sun warms a chair. The spider itself moves slightly on a breeze, and its beads scatter flecks of color around the room.
You might place it near other small glass pieces or use it as a gentle mobile above a plant. I like to hang mine where I can see it from two rooms, so I get a small bright surprise as I move through the house. If you enjoy mixing techniques, try combining this piece with a flat suncatcher panel or textured glass.
If you have a collection of handmade suncatchers, think about spacing them so each one gets its own patch of light. Small changes in angle can change how the colors hit your walls.
For ideas that blend different suncatching methods and materials, my post on making suncatchers shows playful pairings and ways to layer pieces for more complex light effects.
How to Store or Reuse Spider Suncatcher
Treat the suncatcher gently when you are not displaying it. Wrap it in soft tissue or a cloth and place it in a shallow box so beads and wire do not bend or tangle.
If you want to change its look later, you can carefully unwrap the wire and reuse the beads and body bead for a new piece. Glass beads keep their beauty over time, so they make excellent reusable supplies.
For long-term storage, keep pieces away from direct sunlight that can fade some acrylic beads. Store in a dry place to prevent any metal components from tarnishing. Label the box with small notes so you remember which pieces are fragile or especially meaningful.
If the loop loosens or a wire begins to bend, use your pliers to gently reshape and tighten. Small adjustments can restore the original balance without starting from scratch.
Small Ways to Make It Your Own
- Try different bead palettes. Invite nature by choosing greens and amber, or choose cool blues to echo water. Let color guide the mood.
- Use textured or faceted beads on the body to catch more light. The way a faceted bead plays with sunshine gives a lively, jewel-like shimmer.
- Create a cluster by making several spiders on one longer loop. Hang them at varying lengths for a tiny mobile that moves in layered rhythm.
- Swap wire types for a different feel. Copper wire warms the color palette, while silver or brass gives a cool, polished look. Copper can develop a patina over time, adding quiet character.
- Add a small charm or leaf bead to the hanging loop for a personalized touch. Keep it light so the piece still spins and catches light easily.
These suggestions are gentle invitations. Choose the ones that appeal to your senses and habits. There is no right way to make something that brings you a small moment of joy.
FAQs About Spider Suncatcher
Q: Will the wire hold its shape or will the legs droop over time?
A: If you use a medium-firm wire, like 20 to 24 gauge, it will hold its shape well. Gently tighten any loose wraps and tuck ends flat with pliers to keep everything secure. If you prefer a very stiff look, choose a thicker wire and adjust leg length slightly.
Q: Can I hang this outdoors or on a porch?
A: You can hang it in a covered outdoor spot, but prolonged exposure to rain and direct sun can wear down some beads and cause metal to tarnish. Choose weather-safe materials and bring pieces indoors during bad weather.
Q: Are glass beads safe if I have pets or children?
A: Keep small parts out of reach of little hands and curious pets. If you want a child-friendly version, use larger beads and ensure wire ends are well tucked and crimped. Always supervise young children with small crafts.
Q: How do I fix a bead that slips loose?
A: Carefully open the nearest wrapped section with round-nose pliers, re-position the bead, and rewrap the wire securely. Take a moment to feel the tension as you wrap so you achieve a snug hold without crushing the bead.
Q: Can I make a larger spider for a statement piece?
A: Yes. Use thicker wire and larger beads, and increase the leg segments to keep proportions. Larger pieces need sturdier hanging loops and possibly two attachment points to hang evenly.
Final Reflections on Making Spider Suncatcher
Sit with the finished piece for a few quiet minutes. Watch how light meets glass and how the gentle motion seems to slow the room. The small actions you took—measuring, bending, threading—add up to a simple work of light that warms the day.
Making this small suncatcher gives you an intentional pause. It invites you to notice texture and tone, to slow your hands, and to find delight in a tiny, personal ornament. Keep your tools nearby so this becomes a repeating ritual you can return to in a calm hour.
Conclusion
I hope this project encourages a slow, sensory practice that feels cozy and possible. If you want to see other handmade spider suncatchers for inspiration or to pick up a finished piece, you can browse a selection of handmade options on Spider Suncatcher – Etsy. For a ready-made hanging design that blends charm with crisp color, the Hanging Spider Suncatcher – 8269 shows a commercial take that might spark ideas for your own versions.
Take a deep breath and enjoy the small streaks of light you made. If you keep a little notebook of the colors and shapes you try, you will build a quiet gallery of experiments to return to on slow afternoons.
PrintSpider Suncatcher

A soothing and creative project for making a beautiful spider-shaped suncatcher using beads and wire.
- Prep Time: 15 minutes
- Cook Time: 0 minutes
- Total Time: 15 minutes
- Yield: 1 suncatcher
- Category: Craft
- Method: Handcrafted
- Cuisine: N/A
- Diet: N/A
Ingredients
- Thin craft wire (20 to 26 gauge)
- Glass or acrylic beads (assorted colors and sizes)
- A small round bead for the spider body
- A tiny bead for the spider head (optional)
- Round-nose pliers
- Wire cutters
- Flat-nose pliers
- A jump ring or small metal loop for hanging (optional)
- Thin fishing line, cord, or thread for hanging
- A small piece of felt or cloth for comfort
- A soft towel or shallow dish to keep beads from rolling away
Instructions
- Gather a small tray of beads and your tools.
- Place the beads in view and let your hands settle.
- Cut a length of wire about 8 to 12 inches long.
- Thread the larger bead for the spider body onto the middle of the wire.
- If using a head bead, thread it next to the body bead.
- Bend the wire under the beads and form a tight loop beneath the body.
- Divide the remaining wire into four segments for the legs.
- Shape each leg by bending the wire at gentle angles.
- Add beads to the ends of some legs for weight and decoration.
- Wrap excess wire around the base beneath the body.
- Create a small hanging loop above the spider.
- Trim any sharp ends and press them flat.
- Attach a jump ring or tie fishing line to the hanging loop.
- Hang the suncatcher in a sunny window and enjoy the light.
Notes
Use glass beads for the best light capture; keep small beads away from young children and pets.