

I set a spoonful of warm, glossy syrup on the counter and watched a single sugar crystal catch the light. The kitchen felt quiet and small, like a pocket of slow time. As the syrup cooled, tiny facets appeared, catching the morning light and offering a soft, steady shimmer. Rapid-Growing Sugar Crystals can begin like that: a small, careful gesture that grows into something bright and tactile, a gentle lesson in patience and a sweet, sensory reward.
Why Rapid-Growing Sugar Crystals Feels Comforting to Create

There is a slow comfort in watching clear sugar turn into a tiny landscape of crystals. The process asks you to pay attention to small changes: the way the syrup glosses over a spoon, the way steam curls up and then stops, the quiet snap of a cooled crystal. This DIY feels designed for calm hands and quiet curiosity.
Making these crystals grounds you in simple sensations. You will feel warm glass under your palms, smell the faint caramel note as sugar dissolves, and notice the subtle click of a crystal as it detaches. Each sensory moment helps steady the mind. If you like projects that invite a little wonder, try the playful color and eruption ideas in our Rapid-Growing Sugar Crystals guide for another gentle variation.
This project fits a slow afternoon or a rainy morning. It asks for care, not speed, and rewards small attention with quick-growing, jewel-like results. That feeling of watching something form is quietly magical and deeply rooting.
A Gentle Look at the Process
Before you begin, picture a simple rhythm: heat, dissolve, cool, and then wait while the solution gives up its sugar to form shapes. You will whisk, pour, and gently suspend a seed, then let time do the quiet work.
There is a satisfying repetition to the steps. Stirring dissolves the sugar into the water, creating a syrup that looks like liquid glass. Cooling allows the dissolved sugar to find an order and build layers, forming crystals that grow outward from a seed. Each stage has a texture and a sound: the soft hiss of boiling, the lump of a cooled syrup, the faint crackle as crystals settle.
If you enjoy small science paired with slow making, this feels like a soft ritual. For related sensory experiments and different textures, lovingly explore the colorful options in the rapid-growing rainbow sugar crystal eruption article, which uses similar ideas with a joyful twist.
Materials You’ll Need
- Granulated sugar (easy to find; the main ingredient)
- Clean glass jars or heatproof containers (clear glass helps you watch growth)
- Wooden skewers or bamboo sticks (a neutral seed surface)
- Clothespins or clips (to suspend the skewer over the jar)
- Small saucepan for heating (sturdy and stable)
- Measuring cup and tablespoon (keep ratios consistent)
- Food-safe string or cotton thread (optional for different textures)
- A pencil or chopstick (to rest the clip on top of the jar)
- Optional: a few drops of food coloring or flavor extract (subtle color or scent)
- A tray or baking sheet to catch drips (easy to clean)
Notes: Most items come from the kitchen or a craft stash. Food coloring and extracts remain optional. For a less sticky experiment, try a heavier container that cools more slowly.
Also consider exploring different bases like the baking soda crystals in our baking soda rainbow crystal forest for a dryer, more matte texture and bright colors.
Step-by-Step Directions
- Clean and prepare your work area.
Place jars on a tray. Wipe the jars so they stay clear and calm to look at. Keep a kitchen towel nearby for small spills. - Warm water in a small saucepan.
Use gentle heat and steady motion. The water only needs to be hot enough to dissolve sugar; notice the faint steam and the ripple of warmth. - Add sugar gradually and stir.
Pour sugar in a little at a time. Stir smoothly and slowly until the sugar dissolves and the liquid looks glossy and thick. The syrup should look like clear glass, not cloudy. - Test saturation with a drop.
Put a drop of syrup on a cool plate. If it crystallizes quickly, you may have reached the right concentration. If it spreads thin, add more sugar slowly. - Let the solution cool slightly.
Allow the syrup to settle until it is warm but not hot. This soft pause helps keep the suspended seed in place without shocking it. - Prepare your seed stick or string.
Wet a skewer and roll a small amount of loose sugar on it, or tie a length of cotton thread and dust with sugar. The rough texture helps crystals begin to cling. - Suspend the seed in the jar.
Use a clip or clothespin to balance the skewer across the jar so it hangs without touching the sides. The seed should sit in the center, free to draw sugar from all sides. - Cover and set in a quiet spot.
Place the jar where it can rest undisturbed. A slightly cool, dry shelf works best. Avoid direct sunlight or heavy drafts. - Watch gently over the next hours.
You will see tiny crystals form within a few hours and larger structures overnight. Take slow, soft looks rather than constant checking; each glance rewards you. - Remove and dry once crystals reach the size you like.
Lift the skewer and set it on a clean tray to dry. The crystals may continue to harden for a few hours after removal. - Enjoy, display, or repeat the experiment.
Place finished crystals in a glass jar for display or use them as short-lived decorations. If you want to grow more, clean the jar and repeat with fresh syrup.
Each step invites calm attention. If a step feels rushed, pause and breathe, then continue.
Enjoying the Finished Piece

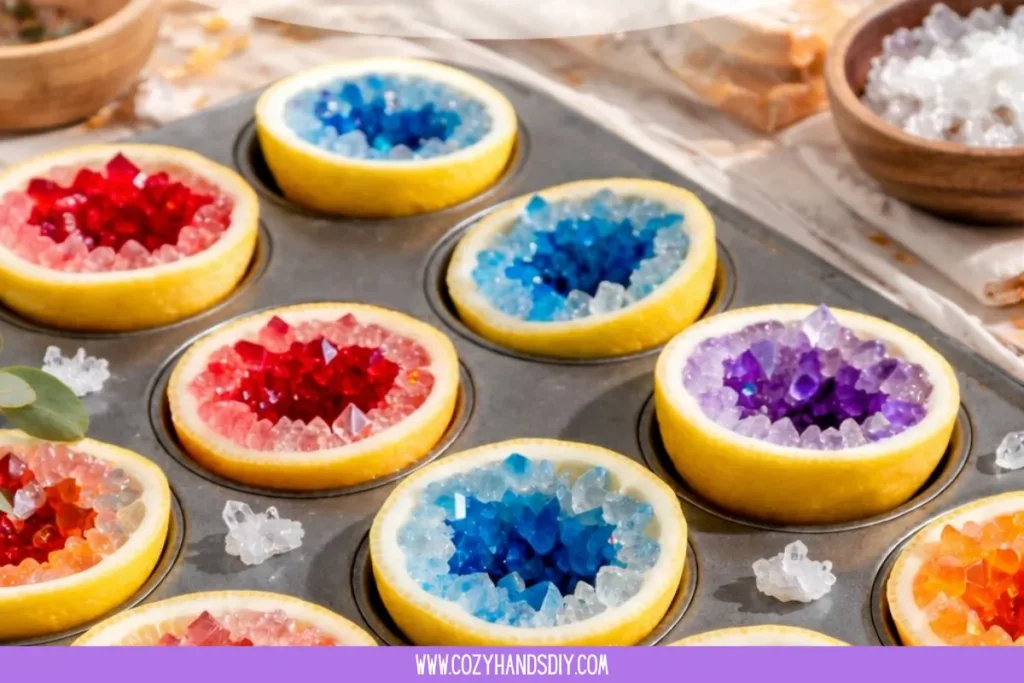
When the crystals feel dry and solid, they become little translucent jewels. They catch light and invite touch. Display them in a small glass jar or on a windowsill where they can sparkle without direct sun, which may soften them in humid conditions.
The finished pieces work as simple, ephemeral decorations for a cozy table, a sensory tray, or a mindful activity corner. If you grow them with children, place them in a low, safe jar for admiration rather than constant handling. They remain fragile and feel pleasantly brittle between your fingers.
For a scented twist, try placing a sealed sachet of dried lavender near the display, or use a few drops of vanilla in a separate jar for a comforting kitchen scent. If you prefer to keep the project edible, make sure everything that touched the syrup stayed food-safe and clean, and store the crystals away from moisture.
You can also combine crystals with other tactile objects in a small bowl: smooth stones, dried citrus slices, and a sprig of rosemary make a quiet, sensory vignette. For ideas that pair scent and texture, see our DIY aromatic gems for inspiration that blends smell and shine.
How to Store or Reuse Rapid-Growing Sugar Crystals
Sugar crystals attract moisture. Store them in a dry, airtight container to keep their sharp facets. A small glass jar with a tight lid works well. Keep the jar in a cool, dry place away from the stove or a sunny window.
If humidity softens the crystals, you can try a gentle rescue: leave them in a warm, dry oven at the lowest setting for a few minutes, watching carefully until they dry out. Do not leave them unattended. This can help re-harden slightly sticky crystals.
You can reuse unchanged crystals as decorative elements or dissolve them back into water to make a new batch. Gently warm a small amount of water and stir in the crystals until they dissolve, then strain and use as your base syrup. This makes the process feel economical and sustainable.
If crystals become too soft or sticky, compost them if you have a food compost option. They break down easily and return to the natural cycle. Treat this project as temporary beauty; part of its charm is its ephemerality.
Gentle Tips & Variations

- Invite color softly. Add one or two drops of food coloring to the warm solution for a whisper of hue. Use pale tones for a natural look and avoid too much color, which may cloud the shine.
- Try different seed textures. Use a pipe cleaner for bushy growth, cotton string for delicate threads, or a sugar-dusted skewer for larger, faceted crystals.
- Experiment with temperature. Faster cooling tends to create many small crystals. Slower cooling encourages fewer, larger crystals. Choose your rhythm based on what soothes you.
- Use flavor as mood. A hint of vanilla or citrus extract in the cooled syrup adds a comforting aroma without changing the structure much. Add scents sparingly and with care.
- Practice safe sugar work. Boiling sugar can burn. Use an adult hand for the heating step and teach children to observe from a safe distance. Safety keeps the project cozy.
Frame these as invitations rather than rules. Each small change produces its own calm surprise.
What I’ve Learned While Making This
I learned to trust slow moments. On my first try, I checked the jar too often and disturbed tiny clusters. When I let things be, crystals formed in quiet, radiant layers. I found that warm syrup smells like memory a soft, caramel warmth that settles in the kitchen and in the hands.
I noticed that the containers matter. Clear glass makes a small theater of light, while darker jars hide the growth. The right jar turns the project into a little window for watching change. I also learned that humidity is a quiet enemy; a damp day will give you sticky results.
Working with kids taught me the joy of single-sense focus. They loved the glossy stage where sugar dissolved and the shiny moment when a crystal first took shape. We practiced naming sensations: warm, smooth, glossy, cool. Those words shaped the calm of the activity and gave children a simple way to notice and describe the world.
Overall, the most useful lesson: keep steps simple, respect heat, and give time its part. The rest is gentle discovery.
FAQs About Rapid-Growing Sugar Crystals
How quickly will crystals grow?
You may see tiny crystals form within a few hours, with larger growth overnight. For the most dramatic change, allow 24 hours or more. Growth speed depends on temperature and how saturated your solution is.
Are these crystals edible?
Yes, when made with food-safe equipment and clean water, they are edible sugar. If you add non-food-safe colorants or craft materials, do not eat them. Always use clean tools if you plan to taste.
My crystals are sticky. What went wrong?
High humidity or insufficient drying causes stickiness. Place finished crystals in an airtight container with a dry packet if you have one, or dry gently in a low oven for a few minutes, watching carefully.
Can I reuse the solution?
You can dissolve the crystals back into warm water and start again, or filter and heat the syrup for a new batch. Reuse keeps the process gentle on resources.
Is boiling sugar dangerous?
Boiling sugar can burn skin. Always handle hot syrup with care. Use a long-handled spoon, keep children at a safe distance, and let an adult manage the heating steps.
A Gentle Note Before You Go
When you finish your tea or set the jar on a quiet shelf, take a slow look at the light through the crystals. Let the small jewel reflect a moment of calm back to you. Creating these tiny forms offers more than a pretty object; it gives you a place to practice patient attention.
If you return to this craft, you will notice subtle differences each time: a faster spark of growth on a cool night, a softer mound when you use string, a clearer facet when you work in a dry room. These small differences become part of your making memory and add gentle texture to your days.
Conclusion
If you would like a step-by-step child-friendly version that leans into playful learning, the Grow Dazzling Sugar Crystals guide offers clear, engaging ideas for small makers.
For a deeper look at slow-grown, transparent crystal techniques and variations, the Giant transparent sugar crystals tutorial provides thoughtful insights into structure and form.
Take your time with this one. Let a single crystal catching the light be enough for today.
PrintRapid-Growing Sugar Crystals

A gentle DIY project to create beautiful sugar crystals, rewarding patience and calm attention.
- Prep Time: 15 minutes
- Cook Time: 30 minutes
- Total Time: 45 minutes
- Yield: 1 batch of sugar crystals
- Category: Dessert
- Method: Cooling
- Cuisine: American
- Diet: Vegetarian
Ingredients
- Granulated sugar
- Water
- Clean glass jars or heatproof containers
- Wooden skewers or bamboo sticks
- Clothespins or clips
- Small saucepan
- Measuring cup and tablespoon
- Food-safe string or cotton thread (optional)
- Pencil or chopstick
- Few drops of food coloring or flavor extract (optional)
- A tray or baking sheet
Instructions
- Clean and prepare your work area.
- Warm water in a small saucepan.
- Add sugar gradually and stir.
- Test saturation with a drop.
- Let the solution cool slightly.
- Prepare your seed stick or string.
- Suspend the seed in the jar.
- Cover and set in a quiet spot.
- Watch gently over the next hours.
- Remove and dry once crystals reach the size you like.
- Enjoy, display, or repeat the experiment.
Notes
Most items come from the kitchen or a craft stash. For a less sticky experiment, try a heavier container that cools more slowly.