

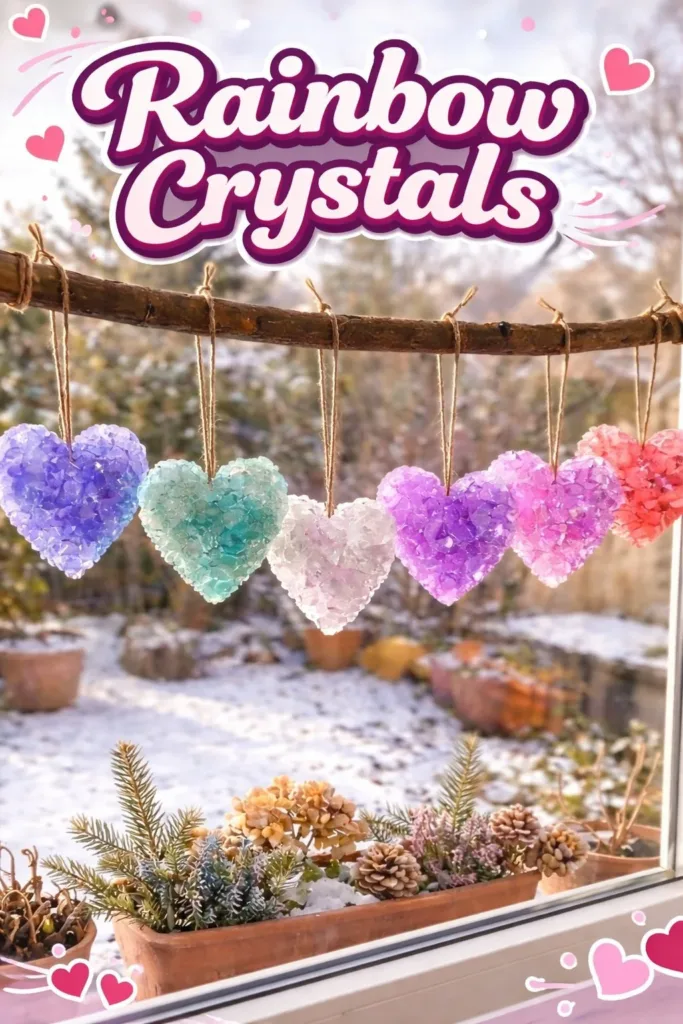
The afternoon light slips through a lace curtain and catches a small bowl of Rainbow Crystals, sending soft color like a hush across the table. The crystals make a gentle sound when I tilt the bowl, like dry leaves, and they feel pleasantly cool and slightly grainy between my fingers. I breathe slower. Making these tiny rainbows became a calm habit for me, a hand-centered pause at the end of a long day that invites quiet attention and a little wonder.
Why Rainbow Crystals Feels Comforting to Create

Making Rainbow Crystals slows my hands and sharpens my senses. The process asks for steady stirring, patient cooling, and a watchful eye as color settles and edges form. Those simple, repeated motions feel comforting. When I watch the first sparkles appear, I notice how light plays over facets and how sound drops into a whisper.
This craft encourages small, mindful acts. You soak, you stir, you wait, you notice. The textures vary from smooth liquid to grainy crystals, which keeps each moment interesting. The colors move like soft weather across a tiny landscape. If you enjoy touching, arranging, and collecting small, beautiful things, this project gives you a slow, deliberate rhythm.
Creating Rainbow Crystals also fits quietly into many parts of life. You can make them with a child beside you, or alone with a mug of tea. You can use them as decorative accents, breathable sachets, or little gifts. I return to this project when I want to ground my attention in something gentle and predictable, and that habit has helped me when I feel scattered or tired.
I often mention related projects when I teach friends who like gentle science activities, and I keep a simple guide bookmarked for quick reference. For a slightly different take on color and texture, I like the baking soda crystal forest experiment I wrote about earlier in this space Baking Soda Rainbow Crystal Forest. That project pairs nicely with these rainbows when you want a larger, layered display.
A Gentle Look at the Process
Before you gather your materials, picture the flow of making Rainbow Crystals. You will heat and dissolve, pour and color, then wait. The rhythm moves from warm and fluid to cool and fixed. You will notice the way syrupy solutions cling to a spoon, the tiny air bubbles that rise and pop, and the delicate cling of crystals as they begin to form.
You will repeat small gestures: measuring, stirring, tilting. Those gestures create a kind of slow music; the soft clink of glass, the whisper of water, the gentle scrape of a spoon. I often set a timer and let the quiet minutes hold me. If you work with children, let them feel the warm solution from a safe distance and tell them what you notice. For adults seeking calm, a single, unhurried session can be deeply satisfying.
If you like experimenting with scent and texture, you might enjoy combining these crystals with aromatic elements. I once mixed lightly scented crystals with dried lavender to create a bowl that felt like a calm, tactile garden. To see another gentle approach to scented crystal making, I keep a simple reference handy DIY Aromatic Gems and Natural Scented Crystals. That piece can help you expand what you make from these basic rainbows.
Materials You’ll Need
- Clear glass or heatproof jars, cups, or molds (easy to find)
- Boiling water, measured gently with a kettle or pot
- Borax powder, a common laundry additive that helps crystals form (handle with care)
- White sugar or table salt, optional for texture or to alter growth speed
- Food coloring in small bottles, several colors for the rainbow effect
- Wooden skewers or string, for crystal nucleation
- Small bowls or measuring cups, for mixing colors
- A stirring spoon, ideally metal or heatproof plastic
- A fine mesh strainer or funnel, optional for pouring
- Gloves and safety glasses, to protect from splashes
- A tray or towel, to catch drips and keep the area tidy
- Labels and small jars, for storing finished crystals
- Optional additions: a few drops of essential oil, or dried flower petals, used sparingly
Note on borax and alternatives: borax works well because it dissolves fully in hot water and encourages solute to recrystallize on a surface. If you prefer not to use borax, you can explore sugar-based crystal recipes, though growth and clarity will differ. I include both borax and sugar as suggestions because each gives a slightly different look and pace.
Step-by-Step Directions

- Prepare your workspace and safety items. Lay a towel down and place jars on a tray. Put on gloves and glasses to protect hands and eyes. This quiet setup helps you move slowly and confidently.
- Heat water until it reaches a gentle boil. Pour measured hot water into a heatproof bowl. The warmth softens and dissolves borax more easily, so the temperature matters to the process.
- Stir borax into the hot water until it dissolves. Use about three to four tablespoons per cup of water for a strong, saturated solution. Watch the solution go clear and glassy as crystals dissolve.
- Add a small spoon of sugar if you want a slightly slower crystal growth or a different texture. Stir slowly and feel the liquid smooth along the spoon. Notice the little ripples and steam.
- Divide the solution into small bowls. Add a few drops of food coloring to each bowl to make your rainbow. Use gentle strokes when stirring color in to avoid splashes.
- Prepare skewers or string by dipping them in the solution and wrapping them lightly with coarse thread or a pipe cleaner. The texture gives crystals a surface to cling to. Secure each skewer across the top of a jar.
- Lower skewers or strings into the colored solutions. Make sure they hang freely and do not touch the jar sides. Set the jars in a quiet place where they can cool slowly and undisturbed.
- Cover the jars loosely with a paper towel to keep dust out. As the jars cool, watch for tiny specks forming at the edges. I like to check in with a soft breath, not rushing the process.
- Leave the jars to sit for 12 to 24 hours. Check occasionally from a distance. When you see substantial growth, gently lift the skewer and let excess solution drip back into the jar.
- Rinse crystals quickly under cool running water to remove loose residue. Lay them on a soft towel to dry. Take a moment to feel the weight and texture, the way color deepens in the center of a larger crystal.
- If you want to add scent or a finish, lightly mist with a diluted essential oil or brush on a tiny amount of clear glue to seal. Allow everything to dry completely before handling or storing.
- Arrange finished crystals in bowls, jars, or gift bags. Label any jars if you plan to give them away. Sit for a few minutes and observe how the light moves through each tiny facet.
Enjoying the Finished Piece

Once you finish, the crystals invite quiet attention. Place them in a shallow bowl near a window where morning light can pass through. The colors catch and soften the room. I like to tuck a few crystals into small glass vials and display them on a shelf; they feel like little captured mornings.
You can add crystals to homemade potpourri, or nest them among dried flowers for a tactile centerpiece. If you keep a jar of crystals on your desk, touching one when you pause helps steady my breath. I also use tiny bowls of crystals when I lead slow craft circles; they give participants a focused, sensory object to hold between steps.
If you make multiple colors, arrange them into a small gradient and photograph the spread on a neutral fabric. The camera picks up the subtle textures and the way edges sparkle. For a longer display, place crystals on a tray with a tealight nearby, keeping flame at a safe distance and never unattended.
If you like combining crafts, pair crystal piles with other tactile projects like clay charms or pressed flowers. I often tuck a single crystal into the lid of a homemade jar of body scrub; the piece becomes both decorative and grounding.
How to Store or Reuse Rainbow Crystals
Store crystals in a cool, dry place. Glass jars with lids work well to keep dust away and preserve any scent. If you added essential oil, keep those crystals separate from ones you plan to handle often, because the oil may feel sticky over time.
You can reuse partially dissolved crystals by gently reheating them in a fresh solution. When crystals start to crumble, collect the fragments and make a new batch with them as a seed. I sometimes break a large crystal into pieces and place those pieces into fresh flavored solutions to encourage new growth. This practice feels economical and creative.
If you want to refresh the color, dissolve a small amount of sugar in warm water and briefly dip crystals, then dry them. This step can brighten faded hues but use it sparingly to avoid damaging delicate formations.
Avoid extended exposure to humid air if you want crystals to stay crisp. In high humidity, crystals may soften or recrystallize into duller shapes. If that happens, let them dry slowly in a lower humidity space or use silica packets in your storage jar to keep them dry.
Finally, label jars by color and scent if you plan to keep many. Clear labeling keeps the display tidy and helps you sense the collection at a glance. I keep a tiny notebook nearby where I jot the date and any scent blends I used; those notes become a small memory log of quiet afternoons.
Gentle Tips & Variations
- Invite texture: Wrap skewers with coarse thread or natural twine to give crystals a stronger surface to grow on, which often makes larger formations. Try this as an experiment and see how the crystals choose the fibers.
- Change the pace: Use a slightly cooler solution to slow growth for more delicate crystals. Small changes in temperature and saturation lead to different crystal shapes, which makes the process feel like a gentle science experiment.
- Add scent mindfully: If you want scented crystals, add a drop or two of essential oil after the crystals form. Oils can alter the look if you mix them in while the solution is hot, so apply them as a finishing touch.
- Mix media: Embed tiny dried flowers or translucent beads in a jar of crystals to create a layered scene. Add these elements sparingly and place them where the crystals have space to grow.
- Make miniature gifts: Fill tiny glass vials with a mix of rainbow crystals and a single dried petal. Tie with twine and a small tag. These little tokens feel like captured moments you can share.
These ideas come from casual experiments and calm afternoons at my table. I encourage you to treat each variation as an invitation, not a requirement. Let curiosity guide your hands, and remain open to the small surprises that arise.
FAQs About Rainbow Crystals:
Are Rainbow Crystals safe to make at home?
Yes, when you follow simple precautions. Use gloves and safety glasses, work in a well-ventilated area, and keep young children and pets at a safe distance from hot liquids and borax. If you prefer not to use borax, try a sugar-based recipe, keeping in mind that results will vary.
How long does it take for crystals to form?
You will see tiny crystals within a few hours, and larger formations will appear after a full day. Patience rewards you here. I often leave jars overnight and check them in the morning, when the shapes feel most settled.
Can I reuse the solution or crystals?
You can reuse crystal fragments as seeds for new growth. Reheating an old solution can dissolve small crystals and encourage fresh growth, though clarity may differ. I sometimes collect fragments for a “seed” jar to spark new batches.
Do food dyes stain?
Food coloring may stain porous surfaces or fabrics. Work on a tray and wipe spills promptly. If you worry about staining, wear an apron and use gloves when mixing bright dyes.
Can children help with this project?
Yes, with supervision. Children can mix colors and observe growth from a safe distance. Keep them away from boiling water and borax until those steps cool. I like to assign small, safe jobs to children, such as arranging dried petals or labeling jars, so they stay involved without handling hot or chemical elements.
A Quiet Closing Thought
When I sit with a small bowl of Rainbow Crystals, I notice how ordinary light becomes delicate and new. The making process helps me practice patience, welcome the unexpected, and hold a small, beautiful thing with care. Each step encourages me to slow my breathing and pay attention to texture, to color, and to the simple pleasure of hands at work.
Take these instructions as a gentle companion, not a strict map. Allow your own rhythm to shape what you do. If you move slowly and stay mindful of safety, you will arrive at results that feel honest and calm. The craft becomes its own reward, offering a quiet space to notice light, color, and the steady satisfaction of having made something with your hands.
Conclusion
If you would like a more formal step-by-step science approach, I recommend reading a trusted tutorial on how to grow your own Rainbow Crystals with borax, which explains the chemical basics in a friendly way. For those who prefer ready-made options or varied product choices, you can browse curated selections at Rainbow Crystals on Amazon for inspiration and supplies.