Rainbow Crystal Trees
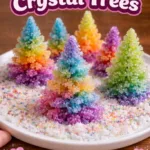
Create stunning and delicate Rainbow Crystal Trees using simple materials like baking soda and food coloring, perfect for adding a touch of whimsy to your space.
- Prep Time: 15 minutes
- Cook Time: 120 minutes
- Total Time: 135 minutes
- Yield: 1 crystal tree
- Category: Craft
- Method: Crafting
- Cuisine: N/A
- Diet: N/A
Ingredients
- Thin craft wire or copper wire (20 to 26 gauge)
- Small jar or glass container (clear)
- Baking soda (3 to 4 tablespoons)
- Hot water (about 1 cup per jar)
- Clear tape or a small cork (optional)
- Food coloring (small bottles)
- Pliers and wire cutters
- Small pebbles or a clay base
- A tray or towel to catch drips
- Gloves (optional)
Instructions
- Prepare your space by laying down a towel or tray to catch spills and arranging tools and jars for easy access.
- Make the tree skeleton by cutting lengths of wire (6 to 8 inches), twisting them to form a trunk, and fanning the ends into branches.
- Shape the branches by bending tips into small curves or loops for balance.
- Secure the trunk in clay or pebbles, ensuring it’s centered in the jar mouth.
- Heat the water, boiling it and allowing it to cool slightly.
- Dissolve baking soda in the hot water by stirring until grains dissolve.
- Tint the solution with food coloring, stirring gently to create a soft rainbow.
- Position the tree in the jar, ensuring branches do not touch the sides.
- Pour the warm solution into the jar, covering the tree trunk but avoiding splashes.
- Find a calm spot for the jar to promote crystal growth away from direct sunlight.
- Watch and wait, checking for crystal growth after 1 hour and in two hour increments.
- Add more solution if growth slows, using cautious warmth to avoid overwhelming the tree.
- Harvest the tree when desired, letting it dry upright on a tray.
- Finish by trimming stray wires and placing the tree on a small base or dish.
Notes
Crystals look best when completely dry, and care should be taken to prevent humidity and dust build-up.
Find it online: https://www.cozyhandsdiy.com/rainbow-crystal-trees/