

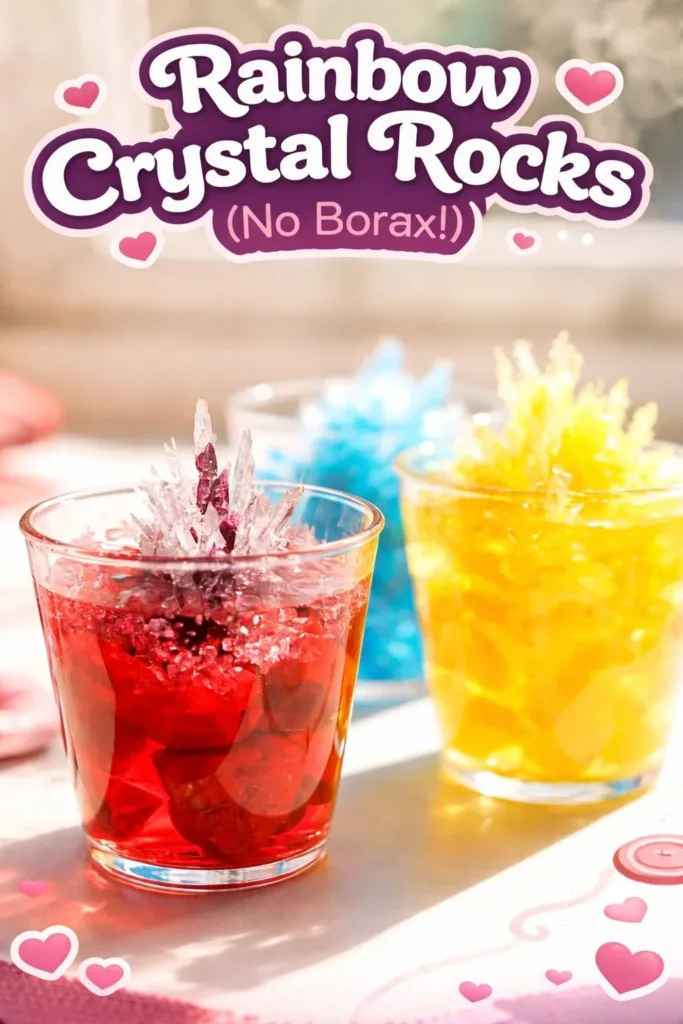
I press a spoon into the bowl and watch tiny glassy spikes catch the morning light, like rain that decided to sleep on the table. The grains shift under my fingers, cool and slightly gritty, and a quiet, small satisfaction rises. This is the hush of making Rainbow Crystal Rocks (No Borax!), a slow, colorful ritual that asks only for a few steady breaths and the soft scratch of a stirring stick.
Why Rainbow Crystal Rocks (No Borax!) Feels Comforting to Create
 1")
There is a gentle rhythm to growing crystals that soothes the mind. Each stage asks for simple, patient attention: measuring, stirring, pouring, and waiting. The textures change as you work. A smooth solution becomes cloudy, then grainy, then sharp with tiny facets. The colors bloom like watercolor on salt. I often return to this practice when I want to slow down; it feels like a small, tender ceremony.
Making these Rainbow Crystal Rocks (No Borax!) helps me notice small signals my hands give me. I feel the warmth of a jar after pouring, hear a soft fizz as ingredients meet, and watch the way color pools and edges sharpen. That sensory language touch, sound, sight anchors me. If you like experiments that lead to calm, this craft fits right into an evening of gentle making.
A Gentle Look at the Process
Before you start, imagine the flow. You heat water until it hums, then stir until sugar or salt dissolves and the liquid looks clear and steady. You add color, then pour the solution into a shallow tray. The surface settles, and the waiting begins.
Over hours or days, crystals begin to grow along the edges or on little seeded rocks. The pace is slow. You may check them once or twice and then let them rest. That slow scaling, the small changes from day to day, teaches patience. It also rewards you with surprising details: rainbows in a clear point, tiny starbursts, and edges that glint when you tilt the tray.
I keep a small notebook when I make these. I write one line about what I notice each day the way a purple cluster spaced itself, the smell of warm sugar, or how the crystals leaned toward light. These tiny observations make the process feel lived-in, not rushed.
Materials You’ll Need
- Table salt, sugar, or Epsom salts (easy to find; choice affects crystal shape)
- Warm water (tap water works; filtered if your water is very hard)
- Clear jars or shallow dishes (repurpose a jar for a cozy look)
- Small pebbles, glass beads, or stones to seed crystals (optional)
- Food coloring or liquid watercolors (few drops per color)
- A stirring stick or spoon (use a wooden spoon for a quieter stir)
- Measuring cup and teaspoon (simple kitchen tools)
- Paper towels and a tray to catch drips (keep your surface calm)
- A fine-mesh strainer (optional, for cleaner solution)
- Labels or small sticky notes (to name colors or dates)
Notes on materials: Salt crystals tend to form blocky, clear shapes, while sugar makes softer, more sparkly formations. Epsom salt often grows slender needles. I choose by how I want the texture to feel in my hands and what light I want to catch in the finished pieces.
Step-by-Step Directions
- Warm gentle water in a kettle or microwave until it feels warm to the wrist.
Stir in salt or sugar slowly, listening for the soft hiss as it dissolves.
Stop adding when a few grains remain undissolved at the bottom. - Let the solution settle until it looks clear and still.
If you see cloudiness, stir gently for another minute.
Use a strainer to remove any undissolved bits for a cleaner result. - Add a few drops of color to the warmed solution.
Stir slowly and watch the tint spread like a soft wash.
Mix colors in separate jars if you want a rainbow array. - Place stones or beads in the bottom of your jars or tray.
These act as seeds where crystals like to gather.
I choose textured pebbles for more surface to catch growth. - Pour the colored solution slowly over the stones or into the shallow dish.
Fill to a level that allows air at the top; do not overfill.
Cover loosely with a paper towel to keep dust out and let air move. - Find a quiet, steady place to leave the jars where they will not be jostled.
Avoid direct sunlight and drafts; steady temperature helps crystals form evenly.
Label each jar with color and date so you can watch the changes. - Check after 12 to 24 hours and then once each day.
Gently tilt a jar to peek at new growth without disturbing the base.
Resist the urge to rearrange stones; crystals prefer to build undisturbed. - When crystals reach a size you like, lift them carefully and let excess liquid drain.
Place them on paper towels to dry for a day or two.
If you want a glossy finish, you can mist very lightly with diluted glue and let dry. - If growth slows or stops, refresh the solution by warming and adding more salt or sugar.
You can reuse the same stones for a new batch after rinsing and drying.
Keep notes about what worked so you can repeat the calm parts you loved.
 2")
Enjoying the Finished Piece
Once the crystals dry, they transform into small objects you can hold or display. I like arranging a scatter of Rainbow Crystal Rocks (No Borax!) on a shallow dish or in a glass cloche. They look gentle against soft wood and breathe a little light into a shelf.
Placing them near a window lets morning light bounce through the facets. A single cluster beside a candle makes a quiet vignette. I keep a tiny jar of crystals by my desk as a textured fidget when I want to shift focus back to my breath. The tactile memory of stirring and waiting adds meaning when I touch them later.
If you make multiple colors, you can group them by hue to create a small rainbow landscape. Children love to line them up or nestle them into clay nests. The rocks also make sweet handmade gifts: tuck a few into a small box with a note about how they grew and what you noticed each day.
Explore More Mindfulness Crafts
If you enjoyed this calming project, you’ll love our full collection of mindfulness crafts. These hands-on DIY recipes are designed to slow things down, encourage focus, and turn simple materials into peaceful, creative moments you can enjoy anytime.
How to Store or Reuse Rainbow Crystal Rocks (No Borax!)
Crystals prefer dry air. If you store them in a humid place, they may soften or lose their edges. Keep finished pieces in a dry container or on an open shelf away from steam and direct heat.
To reuse stones or beads as seeds again, rinse them gently under water and let them dry completely. If you used glue for a glossy coat, that can be soaked away with warm water, though it might take time. Label jars with dates so you know how long each piece has been kept and whether it needs refreshing.
If a crystal breaks, treat the fragments as part of the story. Tiny shards make sparkly additions to new trays, and I often create collages of broken bits mounted on card stock. They still carry the memory of the slow-making process.
Gentle Tips & Variations
 3")
- Invite nature in: Try small shells or driftwood as seed pieces to give crystals an organic curve.
- Play with scale: Shallow trays yield many delicate crystals; jars encourage taller clusters.
- Soften edges: For a frosted look, lightly sand older crystals with very fine sandpaper and dust them clean.
- Scent the space: Place a bowl of dried lavender nearby while you work to add calm without touching the crystals directly.
- Color layers: Pour one colored solution, let a thin crust form, then add another color to create layered growth.
These ideas are invitations. Let one feel right and leave the rest for another day.
What I’ve Learned While Making This
I learned that the clearest results come from quiet, regular checks instead of frantic, constant interference. When I first tried, I moved jars to chase light and knocked a few crystals loose. That taught me to pick a place and be patient.
I also learned to trust the materials. Sugar and salt each have their own way of arranging molecules into pattern. This is chemistry that speaks gently: molecules like order. Warm water gives them the energy to move and then settle into shapes when the solution cools. Understanding this simply helps me choose which material to use when I want a particular texture.
Finally, I learned to let mistakes be part of the craft. A collapsed cluster can become an interesting fragment. The unexpected parts often teach me more than the neat successes.
Create Warm Home Decor by Hand
If you love adding handmade touches to your space, explore our warm home decor projects. These DIY recipes focus on cozy textures, soft details, and simple ways to make your home feel inviting.
FAQs About Rainbow Crystal Rocks (No Borax!)
Are these Rainbow Crystal Rocks safe to make at home?
Yes, these recipes avoid borax and use kitchen-friendly ingredients like sugar, salt, or Epsom salt. Keep them away from small children or pets who might eat them. Always wash hands after handling and avoid inhaling any fine powder.
How long does it take to see crystals?
You may see the first tiny growths within 12 to 24 hours. Meaningful clusters often take several days. The pace depends on temperature, concentration, and the material you use.
Can I reuse the solution or stones?
You can rinse and reuse stones after they dry. The remaining solution may hold some dissolved material, so you can warm it and add more salt or sugar to try again. Fresh solutions often give cleaner results.
Will colors bleed into each other?
Colors can spread if they touch while wet. If you like distinct bands, let a first layer form a thin crust before adding a different color. For soft transitions, pour colors while the surface is still mobile.
What if my crystals are dull or crumbly?
That can mean the solution was not saturated enough or the environment was too humid. Try warming the solution and adding more salt or sugar until a few grains remain undissolved. Then let it cool slowly in a dry spot.
A Gentle Note Before You Go
As you finish, sit with the pieces you made. Hold one between thumb and forefinger and feel its cold, glass-like texture. Remember the slow stir, the warm jar, the quiet waiting. These small objects carry that time with them.
If you want to revisit this ritual, make a simple log of what you did and what you noticed. The next batch will feel familiar and full of small surprises. Let the process be your comfort, not a race. Each crystal is a tiny record of care.
Discover More Sensory Play Ideas
If this activity sparked curiosity or calm, explore our full collection of sensory play ideas. These hands-on recipes are designed to engage the senses, encourage exploration, and create meaningful play moments with simple materials.
Conclusion
I like to collect gentle inspirations when I make, and sometimes I pair the calm craft of growing crystals with other soft activities like tactile slimes or step-by-step science projects for little hands. For a playful, sensory companion idea, consider exploring the Rainbow Snowcone Slime shown at Rainbow Snowcone Slime – Snoopslimes which shares a similar bright, textural appeal.
If you are curious about crystal-growing science with different materials, a thoughtful guide can add background and safety notes that help you adapt methods to your home. I often read simple experiment pages like Grow Your Own Rainbow Crystals to compare processes and find inspiration while keeping my projects borax-free.