

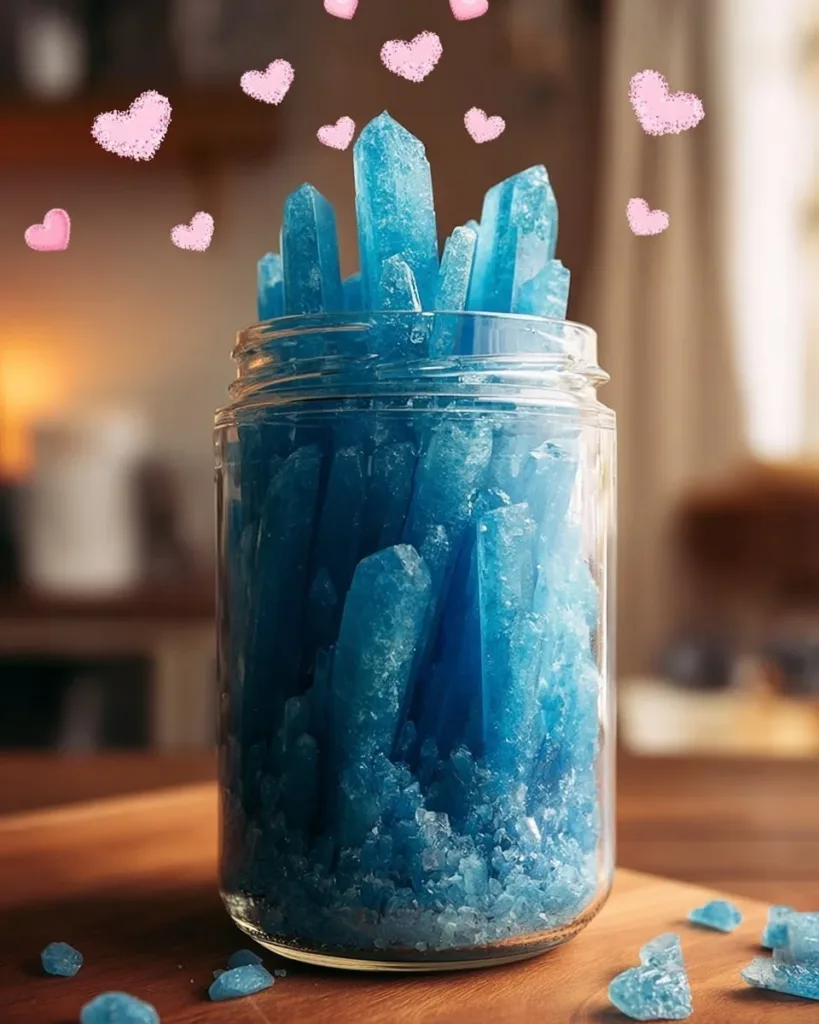
A cool glass jar sits in the window, light slipping through tiny, newly forming facets. I press my fingertips gently to the rim and watch as crystals bloom along a string, each one catching the sun like a slow surprise. This little Crystal Growing Experiment asks me to slow down, to breathe with the kettle, and to notice texture, temperature, and the quiet click of a stirring spoon. For more background on this kind of making, you can visit the Crystal Growing Experiment page and feel the calm that comes from gentle curiosity.
Why Crystal Growing Experiment Feels Comforting to Create

This practice asks for patience and presence. You mix, you wait, and in the pauses the world softens. The process gives small, steady rewards. Each crystal forms slowly and clearly, and you learn to read tiny cues: a sheen on the solution, a thread of solid forming along a surface, the way light refracts when a facet catches the sun.
Making crystals mirrors quiet rhythms we already know. Boiling water, the weight of a wooden spoon, the cooling of a jar on a windowsill those familiar motions make the experiment feel safe. The sensory details soothe: the gentle steam from the kettle, the smoothness of a glass jar, the sound of sugar or salt settling. These moments encourage calm, focus, and a kind of mindful watching that feels grounding.
People often tell me they return to this experiment when they want to slow down. It fits small spaces and short time windows, and it rewards both attention and the willingness to rest in waiting. The result feels like a small secret you made for yourself: fragile, beautiful, and quietly bright.
A Gentle Look at the Process
I invite you to imagine the steps before we begin. You will dissolve a mineral or salt in warm water until it becomes saturated and glossy. You will suspend a seed, string, or pipe cleaner into that liquid. As the jar cools and the solvent releases its hold, crystals will grow along the suspended surface.
The movement feels careful and slow. Pouring water has a soft sound. Stirring brings a glossy sheen to the liquid. As the jar sits, the only noises may be distant household life and the subtle tick of time. Watching growth ask you to return to the jar every day, to notice small changes, and to feel quiet pride in each new cluster.
If you enjoy other gentle science projects, you might find comfort in the steady observation this one asks for. For a similar take with a slightly different focus, see this cozy baking soda crystal growing tree tutorial that explores textured shapes and layered growth.
Materials You’ll Need
- Clear glass jar or jar with a wide mouth (easy to find; reuse a jam jar)
- Water (warm to hot for dissolving)
- Your chosen crystal chemical: table salt, sugar, alum, or borax (alum and borax make reliably faceted crystals; borax dissolves well in hot water)
- Wooden spoon or glass stirring rod (smooth touch)
- String, cotton thread, or a pipe cleaner shaped into a form (cotton and pipe cleaners give different textures)
- Pencil or chopstick to suspend the string (resting across the jar rim)
- Small weight (a paperclip or washer) to keep the string taut (optional)
- Food coloring or liquid watercolors if you want color (optional; a drop or two is enough)
- A heat source for boiling water and a kettle or pot (safety-first; use a stove or electric kettle you trust)
- Paper towel and a tray to catch spills (gentle clean-up makes the ritual feel calm)
- A label and pen to note the start date and recipe (simple record keeping helps you learn)
I choose materials that invite touch. Glass jars feel smooth and cool. String offers a soft contrast to faceted crystals. The chemistry stays simple: the goal sits in dissolution and saturation, and these common household materials let you explore that quietly.
Step-by-Step Directions
- Prepare your workspace so it feels calm and tidy.
Lay a towel on the table and set the jar on a tray. Boil water slowly and mindfully, noticing steam and warmth. - Measure and pour the warm water into the jar.
Use about one cup of warm water for small jars. Pour gently so the surface stays calm and clear. - Add the chosen crystal material a little at a time while stirring.
Stir slowly as you sprinkle in salt, sugar, alum, or borax. Keep adding until the solution holds more solids than it will dissolve and small grains settle at the bottom. - Attach the string or shape to the pencil and suspend it in the jar.
Make sure the string hangs without touching the jar’s sides. Add a small weight if needed so it stays straight and centered. - If you wish, add a drop of color at this stage and stir gently.
Use a single drop to keep the tone soft. A faint wash of color spreads slowly as crystals grow, offering gentle surprises. - Place the jar somewhere still and safe to cool.
A windowsill with indirect light works well. Resist moving the jar; the stillness helps crystals form evenly. - Check the jar every 12 to 24 hours and notice new growth.
Open the window or tilt the jar rarely. When you check, breathe and trace small changes shapes, clarity, and how light plays on new facets. - When growth reaches a pleasing size, remove the string or shape and let it dry.
Lift slowly. Lay your piece on paper towel and let it dry in a safe place. Drying accentuates facets and solidifies the structure. - Photograph and label your specimen if you like.
A small note with the start date, the chemical used, and the time to harvest helps you remember and repeat what you loved. - Clean your jar and workspace gently after the experiment.
Rinse in warm water and reuse the jar for another calm making session.
Enjoying the Finished Piece

Place your new crystal where light can find it. In a small dish by the sink, a jar on a sill, or tucked among dried flowers, it will catch and scatter light in quiet ways. I like to keep a tiny cluster on my desk as a reminder to take slow moments between tasks.
Crystals make subtle gifts. Wrap a small cluster in tissue and nest it inside a hand-written note. The recipient will feel the care in both the process and the present. If you made a larger form on a pipe cleaner, hang it near a corner window to watch the facets throw soft patterns across the wall.
This experiment also pairs well with other calm projects. Set a crystal beside a hand-bound booklet, a knitted square, or a pressed leaf. The contrast between hard facets and soft craft creates a tactile story across your space.
Caring for Your Finished DIY
Keep crystals dry and out of direct moisture to preserve their form. Many crystals dissolve slowly when they meet liquid again, so avoid placing them where they might drift into humidity.

Dust them gently with a soft brush or a dry cloth. Avoid aerosol cleaners or sprays, which can change the surface texture. If a crystal breaks, save the fragments; they still offer interesting light play and can become part of a new display.
If you want to preserve a fragile piece more permanently, consider coating it with a thin layer of clear craft sealant. Test a small corner first to ensure the sealant does not change the color or the way light passes through the crystals. Label the base so you remember the date and the solution used.
What I’ve Learned While Making This
I learned to love slow things by learning how crystals grow. Early attempts left me impatient; I wanted quick, dramatic results. Over time I noticed the quiet rewards of checking once a day instead of constant peeks. The growth looks different when you allow the jar to rest.
I also learned that small changes in temperature and saturation change the crystals’ shape. Warmer solutions and faster cooling can create many tiny crystals. Slower cooling often produces larger, clearer facets. I say this from practice: try one jar with quick cooling and one with a slow cool and see which one you prefer.
Sometimes a piece will bloom in unusual directions. I accept these surprises as part of the process. A crystal that grows sideways or forms a lacy texture can feel more interesting than the ones that grow perfectly. The experiment rewards curiosity over perfection.
If you enjoy branching experiments, you might like to explore other recipes and forms I tried in my kitchen. You can read different variations and outcomes in my notes on baking soda growing tree crystal ideas and see how small adjustments change what you make.
Gentle Tips & Variations
- Invite texture: Use a cotton string for soft, clustered crystals and a pipe cleaner to encourage structure and shape. The different surfaces feed crystals in different ways.
- Play with color lightly: Add one drop of food coloring to the solution to tint the growth without overpowering the natural sparkle.
- Try shaped forms: Bend a pipe cleaner into stars or hearts. The crystals will follow the form and highlight edges and points.
- Do side-by-side jars: Make two small jars with slightly different amounts of solute or different cooling spots. Observe how the environment changes growth and keep notes in a small notebook.
- Keep a slow schedule: Check once a day and take a photo. The collection of images becomes a gentle time-lapse and reminds you of the calm hours you gave the experiment.
FAQs About Crystal Growing Experiment
How long will it take to see crystals?
You will usually see tiny crystals within 12 to 24 hours. Noticeable growth often appears over several days. Large, clear crystals can take a week or more. The timeline depends on your solution and how you cool it.
Is this experiment safe for kids?
Yes, with supervision and clear boundaries. Use safe, non-toxic materials like salt, sugar, or baking soda for child-friendly versions. Keep hot water handling to adults and discuss gentle handling and why we avoid tasting the solutions.
What makes crystals form on the string or pipe cleaner?
Crystals form where the solution loses its ability to hold dissolved particles. As the liquid cools or evaporates, solute particles come together and lock into a repeating pattern. Rough or fibrous surfaces give crystals places to start growing.
Can I reuse the solution?
You can, but the solution may hold fewer dissolved solids after initial growth. If you want to experiment further, dissolve fresh solute into the cooled solution until it becomes saturated again and try a new suspended surface.
How do I avoid cloudy or small crystals?
For larger, clearer crystals, make a very saturated solution and let it cool slowly and undisturbed. Avoid rapid cooling and agitation. Patience and stillness favor clarity.
A Gentle Note Before You Go
Take a breath and let the idea of slow making settle for a moment. The Crystal Growing Experiment asks you to move with intention and to find quiet pleasure in a small, scientific ritual. I hope you find comfort in the textures, the light, and the soft rhythm of checking growth over gentle days.
If you keep a little record dates, materials, and how the light looked you will build a small archive of relaxed experiments. Those notes will remind you that the joy of making often lives in the pauses between steps.
Conclusion
For a clear, step-by-step science perspective on how crystals form and practical tips for growing your own, I recommend this detailed guide: How to Make Crystals: Grow Your Own Crystals. If you want a colorful, child-friendly version with playful ideas, this resource offers gentle experiments and creative prompts: Colorful Crystals Science Experiment.
PrintCrystal Growing Experiment

A calming and mindful experiment to grow your own crystals using simple household materials.
- Prep Time: 15 minutes
- Cook Time: 0 minutes
- Total Time: Several days (check daily for growth)
- Yield: Several crystals (depending on setup)
- Category: Science Project
- Method: Experimentation
- Cuisine: N/A
- Diet: N/A
Ingredients
- Clear glass jar or jar with a wide mouth
- 1 cup warm water
- Table salt, sugar, alum, or borax (optional)
- Wooden spoon or glass stirring rod
- String, cotton thread, or pipe cleaner
- Pencil or chopstick
- Small weight (paperclip or washer, optional)
- Food coloring (optional)
- Heat source for boiling water
- Paper towel and a tray for clean-up
- Label and pen for notes
Instructions
- Prepare your workspace by laying a towel on the table and setting the jar on a tray.
- Boil water slowly and mindfully, noticing steam and warmth.
- Measure and pour the warm water into the jar (about one cup for small jars).
- Add the chosen crystal material a little at a time while stirring until small grains settle at the bottom.
- Attach the string or shape to the pencil and suspend it in the jar without touching the sides.
- If desired, add a drop of color and stir gently.
- Place the jar somewhere still and safe to cool.
- Check the jar every 12 to 24 hours and notice new growth.
- When growth reaches a pleasing size, remove the string or shape and let it dry.
- Photograph and label your specimen if desired.
- Clean your jar and workspace gently after the experiment.
Notes
Crystals can be placed in various locations to catch light. Keep them dry and dust gently to preserve their form.