

A warm pool of syrupy light sits on my windowsill, catching the late afternoon sun. Tiny rainbows wink as sugar crystals begin to bloom along a string, and the whole jar feels a little like a gentle, energetic secret. This Rapid-Growing Rainbow Sugar Crystal Eruption brings that hush of wonder into the hands, one slow, sticky loop at a time.
The Quiet Joy of Making Rapid-Growing Rainbow Sugar Crystal Eruption

This project asks for quiet attention and a soft curiosity. As the sugar solution cools and crystals find their homes, you will notice small sounds and textures: a faint hiss as hot water meets sugar, the soft clink of a jar, the grainy weight between fingertips when you touch a grown crystal. Making these rapid-growing rainbow crystals invites you to slow down and watch a small, colorful change happen right before your eyes. If you want to see more step-by-step photographs and a full project overview, visit the project page for a complete walk-through at Rapid-Growing Rainbow Sugar Crystal Eruption.
A Gentle Look at the Process
Take a breath and imagine pouring warm, clear syrup into glass jars. Stirring becomes a quiet rhythm. You will add a little color and a string or stick that will act like a tiny scaffolding. Crystals will choose to grow along those surfaces, catching light like facets of a gem. The process moves in two parts: making a strong, supersaturated sugar solution, and giving crystals a place to form quickly. For a related idea that focuses on patient, clear crystals, see our page on rapid-growing sugar crystals.
Materials You’ll Need
- Granulated sugar (table sugar), several cups; easy to find and food-safe.
- Water, clean and hot; heat helps dissolve more sugar.
- Heatproof glass jars or clear containers, one per color or composition.
- Wooden sticks, skewers, or cotton strings; these give the crystals something to grow on.
- Clothespins or tape to suspend strings; optional and simple.
- Liquid food coloring, gel color, or natural colorants; choose vivid colors for rainbows.
- A small saucepan for heating the solution.
- A funnel and ladle or heatproof measuring cup to pour safely.
- Measuring cups and spoons; accuracy matters for faster growth.
- Gloves and a spoon for stirring; for gentle safety when handling hot syrup.
- Optional: flavor extracts if you want them to smell cozy but not recommended for long displays.
STEP-BY-STEP DIRECTIONS:
- Prepare the jars and anchors.
Clean jars gently and let air-dry. Tie cotton string around a wooden stick or clip so the string hangs down into the jar without touching the sides. The anchored string gives crystals a regular place to form. - Heat water and begin dissolving sugar.
Warm water in the saucepan until it simmers softly. Slowly add sugar while stirring. The sugar dissolves and the mixture becomes glossy. The heat helps you dissolve more sugar than in cold water. - Make a supersaturated solution.
Continue adding sugar in small handfuls until no more dissolves easily and the mixture looks thick and shiny. You want a syrup that holds extra sugar in solution. This state encourages crystals to form quickly when the mixture cools. - Color the solution gently.
Remove from heat and let sit for a minute so the surface calms. Add a drop or two of food coloring and stir until the color blends softly. Each jar can hold a different hue for your rainbow. - Pour with care into jars.
Use a funnel or ladle to pour warm syrup into your prepared jars, leaving space at the top. Hold the anchor steady so the string or stick remains centered. The warm light on the syrup feels cozy as you work. - Seed the string if you like.
Dip the suspended string into a dry dish of sugar so a light dusting clings to it. That sugar seed helps crystals start faster. The tiny grains look like frost against the fiber. - Set the jars somewhere still.
Place jars in a calm, undisturbed spot at room temperature. Avoid drafts and direct sun so the solution cools evenly. The quiet space lets crystals grow without disruption. - Watch and listen over the next hours.
You will see crystals form along the string, often within a few hours, and they will grow more over the next day. Check gently after a few hours, then less often. The first crystals feel grainy, then hard and glassy. - Remove and dry when you like the growth.
When the crystals reach the size you enjoy, lift the string and let excess syrup drip back into the jar. Lay the string on wax paper to dry and harden. Crystals finish forming as they lose moisture and become bright and clear. - Enjoy, display, or gift softly.
Trim the ends and arrange crystals in a small dish, hang them as ornaments, or tuck one into a bowl of dried flowers. Each crystal holds a little piece of the making moment.
Enjoying the Finished Piece

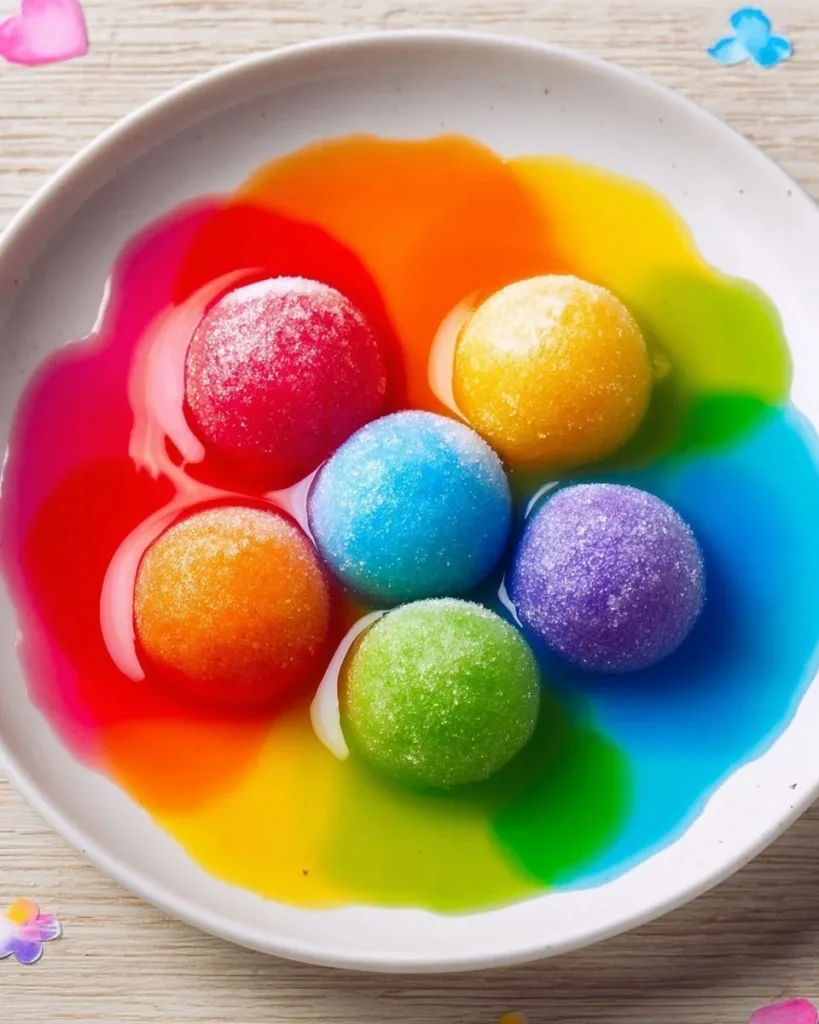
When the crystals finish, they look like small, faceted jewels. You can hold them to the light and see color shift and refract. If you made several colors, arrange them in a shallow bowl to let light pass between them. Crystals invite a pause; take them slowly to feel the cool, smooth edges and the faint, sugary scent that lingers. If you want to explore other playful displays that combine color and texture, you might like our ideas with a baking soda rainbow crystal forest found at baking soda rainbow crystal forest.
Keeping It for Later
Crystals can last for quite some time if you care for them gently. Keep them in a dry, cool place away from direct sunlight and humid spots. I store mine in a shallow box lined with tissue paper, separated so points do not knock together. If crystals pick up a little dust, handle them sparingly; a soft brush will lift the dust without scratching. For growing more forest-like formations, you can reuse parts of the jar and solution carefully, though clarity and size may change with each reuse.
Small Ways to Make It Your Own

- Invite texture: Try cotton string, twine, or a wooden skewer to change how crystals cling and grow. Each fiber gives a different pattern.
- Mix colors in stages: Pour one color, let a thin crust form, then add another color to create layered bands of crystals.
- Add scent gently: A drop of vanilla or citrus extract creates a soft aroma while crystals form, but avoid strong oils that cloud the solution.
- Use recycled glass: Old jam jars make warm, familiar containers that catch light beautifully and keep the making eco-friendly.
- Try different temperatures: Slightly cooler solutions can slow the start and create finer crystals, while warmer solutions may encourage quicker, chunkier growth.
FAQs About Rapid-Growing Rainbow Sugar Crystal Eruption:
Q: How fast will these crystals actually grow?
A: They often begin in a few hours and keep growing over 24 to 48 hours. You will see small grains form quickly, but larger, showy crystals take more time. Expect variation and treat speed as part of the gentle surprise.
Q: Is this safe for children to help with?
A: Yes, with supervision. Hot sugar syrup can burn. Let an adult handle boiling and pouring. Children can do coloring, stringing, and watching, which makes the process warm and collaborative.
Q: Can I eat the crystals?
A: Technically they are sugar, but I do not recommend eating them if you used non-food-safe containers or added fragrances. If you use food-safe materials and simple food coloring, they are similar to rock candy, though I suggest enjoying them as decoration rather than snack.
Q: What if no crystals form?
A: Sometimes you need a bit more sugar in the solution or a seed on the string. Check that your solution was supersaturated and that the jar sat undisturbed. A light dusting of sugar on the anchor often helps.
Q: Why do crystals attach to the string and not just float?
A: The string or stick acts as a surface for nucleation. The tiny irregularities in fiber or wood give crystals places to begin sticking. Without a surface, crystals can still form but they often fall to the bottom instead of growing into visible clusters.
A Gentle Note Before You Go
Sit with the jar for a quiet minute. Watch as tiny, colorful facets gather and think of those first gentle moments of making. Each jar remembers the rhythm of your hand, the warmth of the kitchen air, and the way light pooled on syrup. If you decide to make more, let this first experience teach you about time, patience, and small adjustments that lead to different textures and colors. Trust your hands, and trust that each result holds its own quiet beauty.
Conclusion
If you want to learn more about the science and playful teaching approach behind growing sugar crystals, try this deep-dive experiment guide at Grow Dazzling Sugar Crystals: A Sweet Science Experiment for Kids which gently explains the process for young learners. For practical tips on classic rock candy techniques and clear explanations about crystal formation, this clear tutorial is helpful: Make Your Own Sugar Crystals for Rock Candy – ThoughtCo.
Take your time with this project. Let it be an invitation to notice small changes, to breathe between steps, and to enjoy a little eruption of color and calm in your day.
PrintRapid-Growing Rainbow Sugar Crystal Eruption

Create vibrant and colorful sugar crystals through a gentle process of boiling, cooling, and observation.
- Prep Time: 10 minutes
- Cook Time: 10 minutes
- Total Time: 48 hours
- Yield: Multiple jars of crystals
- Category: Dessert
- Method: Candy Making
- Cuisine: American
- Diet: Vegetarian
Ingredients
- Granulated sugar (several cups)
- Clean, hot water
- Heatproof glass jars or clear containers (one per color)
- Wooden sticks, skewers, or cotton strings
- Clothespins or tape (optional)
- Liquid or gel food coloring
- A small saucepan
- A funnel and ladle or heatproof measuring cup
- Measuring cups and spoons
- Gloves and a spoon for stirring
- Optional: flavor extracts (for scent)
Instructions
- Prepare the jars and anchors by tying cotton string to hang down into the clean jars.
- Heat water in a saucepan until it simmers and begin dissolving sugar.
- Continue adding sugar until no more dissolves and the mixture looks thick and shiny.
- Remove from heat and add food coloring, stirring gently.
- Pour warm syrup into jars using a funnel, leaving some space at the top.
- Seed the string if desired by dipping it into dry sugar.
- Place jars in an undisturbed area to cool and let crystals grow.
- Check crystals after a few hours and remove when they reach desired size.
- Dry the crystals on wax paper and enjoy as decorations.
Notes
Crystals can last a long time if stored away from humidity and direct sunlight. Avoid eating if non-food-safe materials were used.