

A small bowl of warm water sends up a soft steam and the room feels like a quiet kitchen at dusk. I hold a skinny pipe cleaner bent into a star, and the metal cools beneath my fingers as I tie the cotton thread. The first crystals form like tiny morning frost along the fuzzy arms, and the light at the window catches each point.
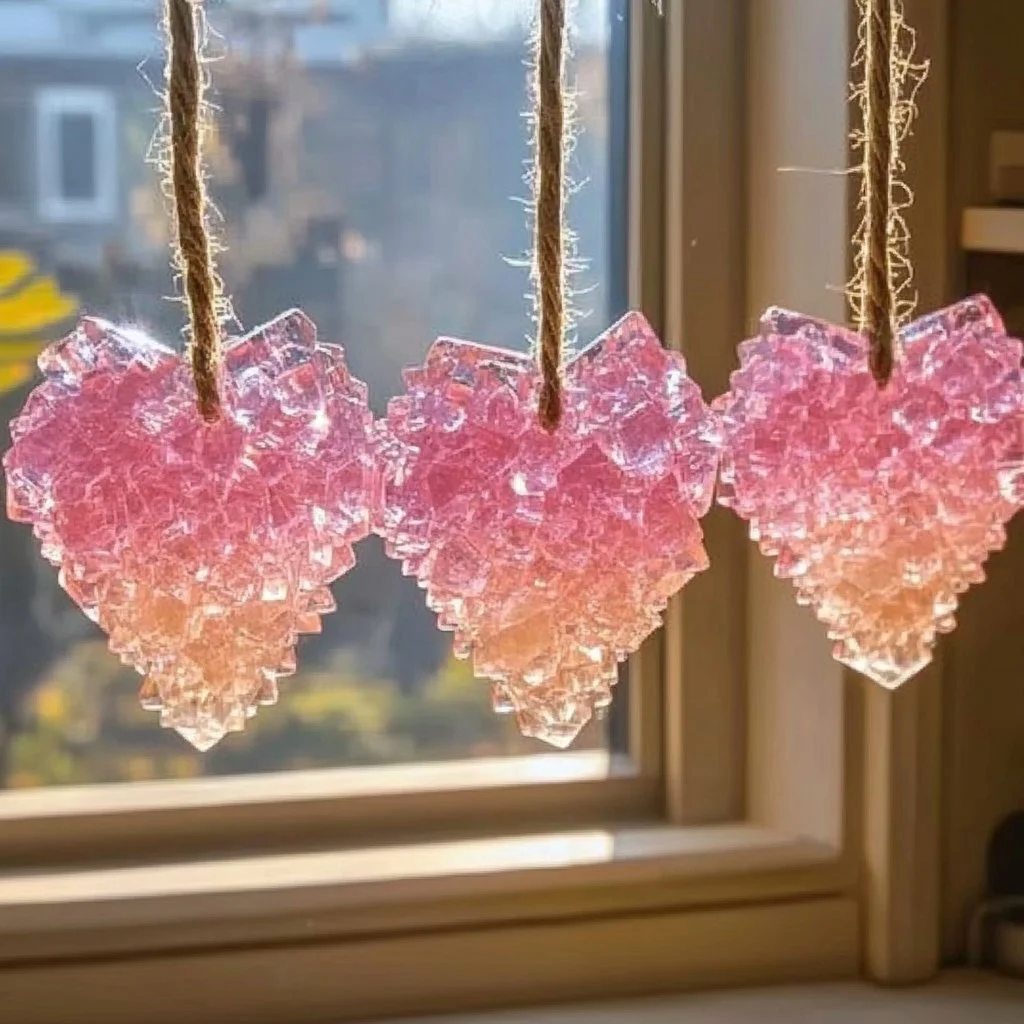
Making Growing Crystal Ornaments turns a noisy evening into a slow, bright ritual that smells faintly of metal and steam and leaves my hands dusted in powder by bedtime. I return to this calm habit again and again, and sometimes I tuck a heart I made into a pocket as a quiet talisman you can see a similar heart project in our growing crystal heart ornaments guide.
Why Growing Crystal Ornaments Feels Comforting to Create

These ornaments ask you to slow down. You measure water, stir until the powder melts, and then wait as the solution cools and the crystals grow. The ritual sits between a quick fix and a long-term project. It rewards a patient hand and gentle attention.
The making brings small, pleasant textures to your day. Pipe cleaners feel soft and springy. The solution moves like silk when you stir it. Tiny crystals form into a kind of fragile lace that you can watch as the light changes. This slow watching calms the mind in a simple way.
I find the project soothing because it uses ordinary materials and gives a clear, visible change. When a child asks what will happen, you can show the first sparkle in an hour and the fuller growth the next day. That steady transformation invites presence without pressure. The result hangs like a small proof that time, quietly kept, becomes something beautiful.
The Flow of Making Growing Crystal Ornaments
Before you gather tools, imagine the small motions you will repeat. You heat water until it steams and breathe in that warm, slightly mineral scent. You stir and listen to the soft song of liquid against the spoon. You suspend a shaped yarn or metal piece into a jar and set it on a windowsill.
The flow moves from fast to slow. The first steps are active: bending shapes, boiling water, measuring powder. Then you switch to waiting and watching. That change in pace helps your nervous system relax. You still care for the project, but the care asks for gentle attention instead of high focus.
If you enjoy other slow crystal crafts, you might like how this compares to our baking soda tree projects in this post about baking soda crystal growing trees. The science feels similar, but each recipe offers a different rhythm and texture.
Materials You’ll Need
- Pipe cleaners in the shape you like (easy to bend; fuzzy helps crystals cling)
- Cotton thread or thin fishing line (for hanging; strong and thin)
- Wide-mouth glass jar or heatproof cup (one per ornament; clear shows the growth)
- Borax powder, plain laundry borax (this is the main crystallizing agent; common in stores)
- Boiling water (hot enough to dissolve borax; handle with care)
- Measuring cup and spoon (accurate amounts help crystal formation)
- Pencil or clothespin (to rest across the jar and suspend your shape)
- Heat-safe spoon for stirring (metal or silicone)
- Small bowl for shaping, if you prefer a clean surface (optional)
- Gloves and safety glasses (recommended; borax can irritate skin and eyes)
- Food coloring or liquid watercolors (optional; very small amounts add color)
- Paper towels and a tray (to catch drips and keep your area tidy)
A note about substitutions: some people use baking soda instead of borax for a different crystal texture. If you want to try that method, our baking soda crystal growing tree project explores that route. You can also try pipe cleaner shapes from other projects like our growing crystal pink hearts for a softer, pastel finish.
Step-by-Step Directions
- Shape your ornament gently with your hands.
Hold the pipe cleaner and mold it into a star, heart, or icicle. Keep motions slow so the wire keeps a smooth curve. - Tie a short loop of thread at the top.
Make a small knot so you can hang the ornament from the pencil or clothespin. Feel the slight resistance of the fiber in your fingers. - Boil water and measure carefully.
Pour one cup of boiling water into your jar. The steam rises warm against your face; move slowly to avoid splashes. - Add borax to the hot water.
Stir in three to four tablespoons of borax per cup of water until it dissolves. The water will clear as the powder melts. If a grain remains, keep stirring until smooth. - Add color if you like, a drop at a time.
A tiny drop will gently tint crystals later. Stir softly and let the liquid settle into a quiet stillness. - Suspend the shaped ornament in the jar.
Use the pencil or clothespin laid across the top to hang the ornament so it hangs in the center without touching the jar sides. Adjust until it rests balanced. - Set the jar somewhere undisturbed.
Choose a quiet shelf or windowsill. The fewer disturbances, the better the crystals attach and grow evenly. - Wait and watch slowly.
Check after an hour to see tiny crystals forming. The next morning, you will likely see much fuller growth. Move with patience, not haste. - Remove the ornament carefully.
Lift slowly and tilt it as you lift. Let any extra liquid drip back into the jar onto a paper towel. - Dry and set the piece.
Lay the ornament on a tray to dry fully for 24 hours. The crystals will harden and feel cool and slightly gritty to the touch. - Trim any rough edges and attach a final ribbon.
If a spot feels uneven, use a soft file or scissors to tidy. Tie a ribbon that complements the crystals and hang gently. - Clean your materials and wash hands.
Rinse the jar and spoon with warm water and soap. Wash your hands thoroughly and store borax out of reach of children and pets.
Bringing Growing Crystal Ornaments Into Your Space

These little ornaments fit into many corners of the home. I like to hang one near a north-facing window where the light stays cool. The crystals catch a soft, muted light and throw tiny points back into the room.
You can string several on a curtain rod to make a quiet mobile. They work well as tree ornaments, tucked into a winter garland, or hung from a simple twig as a natural display. In a child’s room, hang them higher than reach and let the shapes glow in lamp light.
If you plan to give them as small gifts, wrap each in tissue paper and a small box. The crystals feel delicate, so a soft bundle keeps them safe in transit. The weight of a handmade ornament in someone’s hand can feel like a small, thoughtful pause in a busy day.
How to Store or Reuse Growing Crystal Ornaments
Store ornaments in a cool, dry box when you do not use them. Wrap each in acid-free tissue to protect the crystals from rubbing. A shallow box keeps them from shifting and breaking.
You can reuse crystals in a gentle way. If the ornament gathers dust over time, wipe it with a soft, dry brush rather than running water directly over the crystals. If a piece loses crystals, you can remake it by dissolving new borax and re-suspending the shape to regrow the pattern.
If you need to remove an ornament from display and save the shape, keep a note of the exact string length and how you balanced it. That small record helps you hang it the same calm way next season.
Avoid storing in damp basements or hot attics. Moisture can dull the sparkle and soften the bond between crystals and the base material. A lined drawer or a padded craft box keeps these pieces happy for years.
Gentle Tips & Variations

- Invite color slowly: add one drop of food coloring to the hot solution, not more. Test on a spare pipe cleaner first to see how subtle the color becomes.
- Try different textures: fuzzy pipe cleaners grab more crystals. Thin wire gives a finer, icy look. Invite both and see which you enjoy more.
- Use a double solution for bigger crystals: make the solution a touch stronger, but do not force it beyond what dissolves. Stronger solutions often grow more dramatic crystals, but they also form a rougher texture.
- Work with children in a supervised way: let kids shape the ornaments with safe materials, but handle the hot water and borax yourself. Keep the area calm and predictable.
- Experiment with time: check a small test ornament after an hour, then compare it to one left overnight. Different shapes and positions in the jar change how crystals form.
Think of these tips as invitations. The craft asks you to listen to how the materials respond and to adjust gently.
What I’ve Learned While Making This
When I first made these ornaments, I expected instant magic. Instead I learned to welcome slow results. The first night I left a jar on a shelf and forgot about it, I came back to a tiny forest of sparkling points. I remember the quiet joy of seeing the first solid cluster like a small reward.
I learned that tiny differences change the result. A slightly colder window slows growth. A slight touch during the first hour can leave a pattern gap. I learned to move slowly and to enjoy the small surprises: a thicker cluster on one arm, a delicate veil on another.
I also learned to respect safety and the materials. Borax dissolves in hot water but can irritate skin and eyes. I wear gloves when I mix and keep my work area clean. I store borax in a labeled container and keep it out of reach of curious hands. These small precautions let me relax into the process.
Most of all, I learned that the making becomes an excuse to slow down. The project does not demand a perfect result. It invites you to be present and to enjoy each small change.
FAQs About Growing Crystal Ornaments
Is borax safe to use in crafts?
Borax works well for crystals, but it can irritate skin and eyes. Use gloves and avoid inhaling the powder. Keep it away from children and pets. If someone ingests it, contact a poison control center promptly.
How long should I leave the ornaments in the solution?
You can check after an hour to see initial growth. For fuller, heavier crystals, leave them overnight or up to 24 hours. Longer can make larger crystals, but disturbing the jar can cause uneven growth.
Why did my crystals form cloudy instead of clear?
Cloudy crystals can come from impurities in the water, too rapid cooling, or using too much borax at once. Try filtering water or stirring until fully dissolved, and let the jar sit undisturbed in a calm spot.
Can I make colored crystals?
Yes, but use color sparingly. One tiny drop of food coloring in a cup is enough for a soft tint. Too much dye can change how the crystals grow and can make colors streaky.
Can I reuse the borax solution?
You can try to reuse it if you carefully remove debris and bring it back to a near-boil to dissolve any settled crystals. Fresh solution often gives more consistent results, so many makers prefer to mix new.
A Quiet Closing Thought
Sit with the piece in your hands for a moment. Notice the cool touch of crystals, the way light settles into tiny facets, and the faint weight against your palm. These ornaments hold a gentle story of time and care. Making them asks you to slow down and to value quiet attention as a creative act.
Let them remind you that small pauses can make bright things. When you hang one in a window or give one away, you send a little peace into the world. Keep your tools tidy, tuck your notes away, and return to the jar when you feel like watching something small and steady grow.
Conclusion
If you want a clear, step-by-step tutorial focused on star shapes, this helpful guide shows how others make sparkling star ornaments: How to Make Crystal Stars | Borax Crystal Ornaments. For inspiration on icicle-shaped designs and a different visual style, see this practical example with photos and tips: Crystallized Icicle Ornaments with Borax – Happy Hooligans.
PrintGrowing Crystal Ornaments

Create beautiful crystal ornaments using simple materials for a calming craft experience.
- Prep Time: 10 minutes
- Cook Time: 60 minutes
- Total Time: 70 minutes
- Yield: 1 ornament
- Category: Craft
- Method: Crystal Growing
- Cuisine: N/A
- Diet: N/A
Ingredients
- Pipe cleaners (in desired shapes)
- Cotton thread or thin fishing line
- Wide-mouth glass jar or heatproof cup
- Borax powder (plain laundry borax)
- Boiling water
- Measuring cup and spoon
- Pencil or clothespin
- Heat-safe spoon for stirring
- Small bowl (optional)
- Gloves and safety glasses (recommended)
- Food coloring or liquid watercolors (optional)
- Paper towels and a tray
Instructions
- Shape your ornament gently with your hands.
- Tie a short loop of thread at the top.
- Boil water and measure carefully.
- Add borax to the hot water.
- Add color if you like, a drop at a time.
- Suspend the shaped ornament in the jar.
- Set the jar somewhere undisturbed.
- Wait and watch slowly.
- Remove the ornament carefully.
- Dry and set the piece.
- Trim any rough edges and attach a final ribbon.
- Clean your materials and wash hands.
Notes
Store ornaments in a cool, dry box when not in use. Wrap each in acid-free tissue to protect.