

The light through my kitchen window fell soft and warm on my hands as I rolled a small round shape between my palms. It smelled faintly of lemon-scented soap from an earlier wash. The little ball yielded under pressure, cool and smooth, and then returned to its plump form. That quiet squeeze and release is how I first learned to settle down with Fruit Stress Balls, letting the gentle give of squishy filling guide me back to the present.
Why Fruit Stress Balls Feels Comforting to Create

Making Fruit Stress Balls feels comforting because it invites slow, small movements and steady breathing. The textures ask you to pay attention without urgency. When you mix colors or shape a little orange or strawberry, your hands remember patterns that calm the mind. The weight and bounce of the finished piece offer an easy, tactile way to ground yourself between tasks.
This project brings together soft materials, mild scents, and simple repetition. Those things hold a lot of power. They help you return to a steady rhythm: fill, smooth, seal, and then squeeze. That rhythm can quiet racing thoughts and encourage a gentle pause in the middle of a busy day. If you enjoy slow, sensory play, you will find the process restorative in a quiet, honest way.
The making sits well with other small crafts I like to keep at hand. For example, I often pull out supplies that pair nicely with this project when I want a calm creative hour, such as when I revisit my bouncing ball experiments in simpler tones like these cozy shapes found on this page: calm bouncy balls.
A Gentle Look at the Process
Before you begin, imagine a soft rhythm: you will measure, fill, press, and smooth. You will feel the give of the filling and the thinness of the outer skin. You will notice tiny seams and the quiet satisfaction of a neat pinch. The process moves slowly and gently, not fast. It rewards careful attention.
You will work with small tools and soft hands. You may hear the faint rustle of corn flour or the soft tap of a spoon against a bowl. Colors blend in a simple, soothing way. If you have made small sensory toys before, the motion will be familiar and calm, similar to the mindful mixing I do when I make simple color bouncy balls on quiet afternoons: DIY calm color bouncy balls.
This is not a precision craft that requires perfect edges. It welcomes imperfections as part of its personality. Each Fruit Stress Ball will be slightly different, and that makes them feel more like little found treasures than factory-made objects.
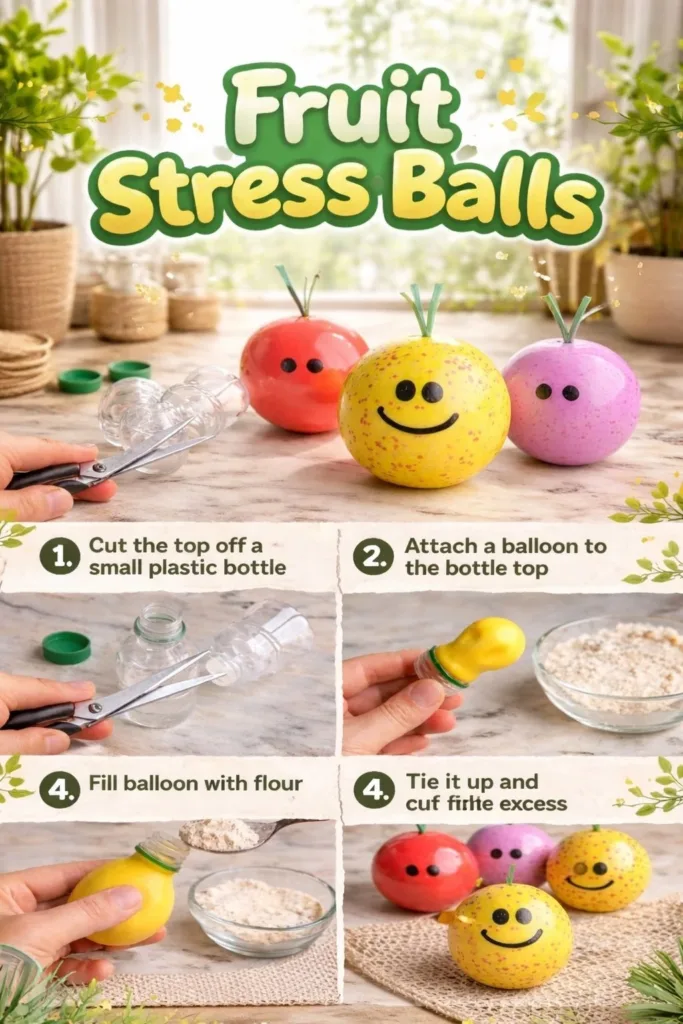
Materials You’ll Need
- Balloons, small or water-balloon size (easy to find, choose thin skin for the softest feel)
- Fine flour, cornstarch, or soft sand (choose cornstarch for a silky interior; substitute-friendly)
- A small funnel or a homemade paper funnel (optional; helps fill neatly)
- A spoon or wooden skewer for packing the filling
- Scissors to trim balloon ends
- Acrylic paint or permanent markers for decorating (optional, low-odor is best)
- Masking tape or a small clip to hold the balloon while filling (optional)
- A bowl and measuring cup for mixing
- Wet wipes or a damp cloth for gentle cleanup
I like to keep a bowl of extra balloons nearby. Sometimes a tiny tear can spoil a round, and having backups keeps the mood relaxed. If you enjoy mixing textures, you might try a small amount of rice or millet as an alternative filling. For a softer, more cloud-like feel, use cornstarch alone.
If you want to pair this project with a different kind of small craft in the same calm hour, you may enjoy making fruit seed bird feeders after your stress balls are done: DIY fruit seed bird feeders.
Step-by-Step Directions
-
Gather your supplies and make a small bowl of the filling.
Take a calm breath. Measure about one to one and a half cups of cornstarch or fine flour. Let the powder sit loose and soft in the bowl. -
Stretch the balloon gently to warm it.
Hold it in both hands and roll it between your palms to make the rubber more pliable. This step helps the balloon slip smoothly over the funnel. -
Attach the funnel to the balloon opening.
If you do not have a funnel, fold a small piece of paper into a cone. Slide the balloon over the funnel neck until it sits snug and secure. -
Spoon or pour the filling into the funnel slowly.
Work in short, steady motions. Tap the funnel gently to let the powder settle. Stop occasionally to press the filling down with a skewer so you avoid air pockets. -
Check firmness as you go.
Every now and then, pinch the balloon and feel the filling. Aim for a squishy but resilient center. Add more filling a little at a time until you reach the feel you like. -
Smooth the surface and tie the balloon.
Twist the neck gently to seal the filling. Tie a neat knot, keeping the knot small so the ball stays round. Trim any excess rubber with scissors. -
Add a second balloon layer for durability.
Cut the end off a second balloon and slip it over the first, stretching gently to cover the knot. This step strengthens the ball and keeps small leaks at bay. -
Decorate with paint or markers.
Use small, light strokes. Let each layer dry between details. If you use paint, choose a low-odor option and work in a ventilated, calm space. -
Let the balls rest before gentle use.
Place them on a soft cloth to settle for a day. This helps the filling settle and the rubber relax into its final shape. -
Try a mindful squeeze.
Hold the finished ball in both hands. Squeeze slowly in and out three times, noticing how your shoulders soften and your breath adjusts.
These steps reflect how I make them at home. Some days I stop at the first balloon layer and enjoy the immediate texture. Other days I take extra time to paint tiny faces or seeds, savoring the decorative pause.
Enjoying the Finished Piece

{image_template}
A finished Fruit Stress Ball sits easily in a small bowl on a bedside table or a desk tray. It feels like a soft, private tool for moments when you want to pause. Use one for a brief hand exercise, to unwind after a meeting, or as a quiet companion while reading.
I like to keep a set in a woven basket near my favorite chair. When I pick one up, I enjoy the small, fruit-like shape. An orange ball makes my hand want to cup it. A lime-green one invites quick, bright squeezes. A tiny strawberry-shaped ball fits just under the base of my thumb, perfect for a focused press.
These little things also make gentle gifts. I once wrapped three in tissue paper and left them on a neighbor’s porch with a note that said, "For quiet moments." They fit a pocket or a small purse. They travel well. They help me return to my breath when the day feels heavy.
If you enjoy having a variety of tactile toys, you might like experimenting with bounce and texture, similar to the playful options I use when testing different shapes like in this project: DIY magic marble bounce balls.
How to Store or Reuse Fruit Stress Balls
Store your balls in a cool, dry place away from direct sunlight.
Sun and heat make balloons degrade faster. A small drawer or a covered basket works well.
Rotate them gently so one does not stay flattened for long.
A ball that sits under heavy items can lose resilience. Change their position every few days to keep them plump.
If a balloon gets a small leak, try to patch it.
A tiny piece of clear tape on the inside can hold short term. For a longer fix, move the filling into a fresh balloon and layer again.
When a ball no longer holds up, repurpose the filling.
Cornstarch or flour used as filling can safely go into compost if you used natural materials. If you used sand or rice, consider it for a small planter drainage layer or a craft jar filler.
Avoid storing near sharp objects or pets that like to chew.
Keep them in a container that protects their skin. If you have children or animals, label the container and store it out of reach.
Caring this way helps your work last longer and keeps the materials out of the trash where possible. I keep a small repair kit with extra balloons and a pair of scissors in the same drawer for easy fixes.
Gentle Tips & Variations
-
Try layering different balloon colors.
Invite a soft surprise by using a bright inner balloon and a pale outer layer. The contrast creates depth and a small visual delight when you squeeze. -
Experiment with scented sachets.
Place a tiny dab of essential oil on a cotton ball and tuck it near the knot, outside the balloon. Keep scents light and test first, as strong fragrances can be overwhelming. -
Make small sets for different moods.
Create a "calm" set in muted tones and an "uplift" set in bright citrus colors. Use them intentionally for different parts of your day. -
Use flour or cornstarch to change texture.
Cornstarch gives a silkier, more cushiony feel. Flour yields a slightly more granular but still soft texture. Try small batches to find the one you prefer. -
Add a gentle weight for grounding.
A spoonful of small beads or rice at the center gives a little more ballast. Keep the amount small to avoid a hard center and layer a second balloon to keep things secure.
These ideas are invitations. Choose what calms you and leave the rest. The project responds well to small adjustments and quiet experimentation.
FAQs About Fruit Stress Balls
Q: Are these safe for children?
A: They can be, if you supervise and choose safe fillings. Keep balloons out of reach of very young children who might bite or pop them. For older kids, show how to use gently and store them in a safe place.
Q: Which filling makes the softest squeeze?
A: Cornstarch gives the smoothest, most cloud-like feel. Flour feels slightly more textured. Fine sand gives more weight. Choose by touch and comfort.
Q: How long will a Fruit Stress Ball last?
A: With gentle use and proper storage, they can last weeks to months. The outer rubber will slowly become more fragile over time, so keep extras on hand for replacements.
Q: Can I wash them?
A: Wipe the surface with a damp cloth and mild soap if needed. Avoid submerging a sealed balloon in water, as that can encourage leaks.
Q: What if one pops?
A: Stay calm and clean up immediately. Move the filling into a bowl and place it into a new balloon. Work slowly and with soft hands to avoid spills and sharp edges.
These answers come from making many small batches at home. I speak from the quiet moments I spend testing textures, fixing seams, and learning what makes a ball feel pleasing in the palm.
A Gentle Note Before You Go
Take a moment to close your eyes and imagine the shape of a small fruit in your hand. Feel the gentle curve and the way your fingers find a place to rest. Making Fruit Stress Balls gives you a soft, portable way to bring that quiet to the rest of your day.
This project encourages gentle presence. It keeps your hands busy while your mind learns to move at a slower pace. Let yourself enjoy the small things: the whisper of cornstarch, the soft tug of rubber, the tiny shine of a painted seed. Each ball you make carries a little of your calm.
Conclusion
If you want to explore more playful ready-made options for inspiration or quick gifts, consider browsing a selection like the STRESS FRUIT collection available on Amazon for an easy reference: STRESS FRUIT – Amazon.com. For custom, themed fruit stress balls and ideas for small bundles that fit a cozy gifting style, this resource offers many shapes and design options: Fruit Stress Balls | Custom Imprinted Stress Reliever Balls.
Thank you for making something gentle with your hands today.
PrintFruit Stress Balls

Create your own calming Fruit Stress Balls using simple materials to help ease stress and promote mindfulness.
- Prep Time: 15 minutes
- Cook Time: 0 minutes
- Total Time: 15 minutes
- Yield: 4 stress balls
- Category: Crafts
- Method: Crafting
- Cuisine: N/A
- Diet: N/A
Ingredients
- Balloons, small or water-balloon size
- Fine flour, cornstarch, or soft sand
- A small funnel or a homemade paper funnel (optional)
- A spoon or wooden skewer for packing the filling
- Scissors to trim balloon ends
- Acrylic paint or permanent markers for decorating (optional)
- Masking tape or a small clip to hold the balloon while filling (optional)
- A bowl and measuring cup for mixing
- Wet wipes or a damp cloth for gentle cleanup
Instructions
- Gather your supplies and make a small bowl of the filling.
- Take a calm breath. Measure about one to one and a half cups of cornstarch or fine flour.
- Stretch the balloon gently to warm it.
- Attach the funnel to the balloon opening.
- Spoon or pour the filling into the funnel slowly.
- Check firmness as you go.
- Smooth the surface and tie the balloon.
- Add a second balloon layer for durability.
- Decorate with paint or markers.
- Let the balls rest before gentle use.
- Try a mindful squeeze.
Notes
Experiment with different fillings or colors for unique textures and designs.