

A thin wash of warm light spills across my work table, turning a small sheet of translucent film into a pool of soft color. I breathe in the faint, sweet scent of corn and glycerin, then trace the film with a fingertip and feel a gentle give, like a kept promise. This project Colorful Eco-Friendly Bioplastic Suncatchers asks for slow attention, a few simple ingredients, and a quiet place where light can find the pieces you make. If you want a quick reference as you settle in, I also keep a concise recipe on the site: Colorful DIY bioplastic suncatchers recipe.
Why Colorful Eco-Friendly Bioplastic Suncatchers Feels Comforting to Create

There is a gentle satisfaction in mixing small things into something new. Making Colorful Eco-Friendly Bioplastic Suncatchers slows you down. You measure, stir, and watch a cloudy liquid turn into clear, soft sheets. The sounds are calm: the quiet hiss of a spoon, the soft drip as drops of color meet the base, the distant tick of your timer. Each movement asks for attention. Each small decision becomes part of the rhythm.
This craft invites mindful touch. As the wet film sets, you feel a change from slippery to tacky to dry. You watch the light move through the color and notice the way morning sun reads warm tones differently than afternoon light. It suits slow afternoons and quiet mornings. It gives you a practical way to invite color and translucence into a room without buying plastic. The process itself doubles as a gentle breathing exercise.
A Gentle Look at the Process
Before you begin, imagine the flow. You will heat a simple mixture until it thickens, rest it briefly, then color and pour it thinly. The mixture spreads like a calm pond and then tightens as water leaves it. If you place leaves, pressed flowers, or small paper shapes, they embed and hold like memories captured in glass. Drying is slow and patient. You can move the setting from a sunny windowsill to a warm oven set low if you want to speed things up, but the slow sun-dry keeps the edges soft and the colors luminous.
This craft works well as a short, hands-on practice to center the day. If you want notes on eco-friendly choices and alternatives, I share some gentle guidance here: eco-friendly making notes.
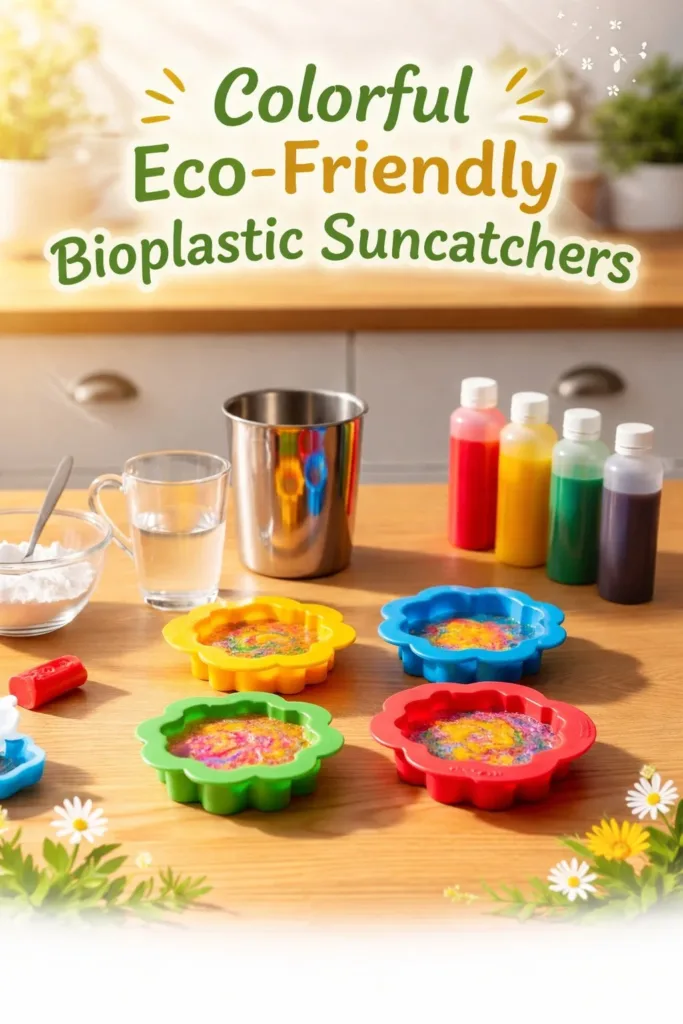
What You’ll Use to Make Colorful Eco-Friendly Bioplastic Suncatchers
- Cornstarch, white or fine (easy to find)
- Water (filtered or tap)
- Glycerin (food grade works; optional but useful for flexibility)
- White vinegar or lemon juice (small amount helps film form)
- Natural or food-safe colorants (powdered pigments, concentrated food coloring, or plant dyes)
- A small saucepan and wooden spoon (dedicated to craft use if you prefer)
- Measuring spoons and cups
- Baking parchment or silicone mat (nonstick surface)
- Cookie cutters, small cookie stamps, or templates (for shapes)
- A straw or skewer (to pop bubbles and move edges smoothly)
- A hole punch or sharp needle (for hanging)
- Tweezers (for placing botanicals or tiny bits)
- A small baking tray or flat plate (to support the parchment)
- Optional: pressed flowers, thin leaves, tissue paper, or metallic foil bits
If you want a fuller look at common materials and substitutions, my materials guide shares helpful notes: materials guide.
Step-by-Step Directions
- Measure the base mixture and gather your tools.
Warm the kitchen by placing a tray and parchment nearby.
Measure gently: this quiet prep gives the project a calm start. - Mix cornstarch and water off the heat.
Stir until smooth and free of lumps.
The texture should feel silky, like thin cream. - Add glycerin and vinegar to the bowl.
Glycerin will make the finished film bend instead of crack.
Vinegar helps the film set evenly as water leaves. - Heat the mixture slowly over low heat.
Stir continuously with a wooden spoon.
You will notice the mix thicken into a glossy paste. - Bring to the gentle stage and remove from heat.
Let the pan rest for a minute so steam calms.
The paste should be viscous and slightly gel-like. - Divide into small cups for color.
Add drops of color or a pinch of powdered pigment.
Stir each cup until the color runs true and even. - Lay out parchment and set cookie cutters or templates.
Work on a flat tray to catch any spills.
The shape edges will give the film a little guide. - Pour the colored mixture thinly into shapes.
Use the back of a spoon to spread it smooth.
Listen for the faint settling sound as it finds its plane. - Smooth bubbles and edges with a damp skewer.
Gently tap air out toward the edge.
Small bubbles vanish and the surface calms. - Add pressed flowers or thin leaves if you like.
Use tweezers to place them gently on the wet film.
They will sit suspended and dry into the piece. - Allow to dry in a sunny spot or a low oven.
Dry on a windowsill for many hours or overnight.
For a faster finish, set oven to very low heat and watch closely. - When dry, peel carefully from the parchment.
Edges should lift without sticking or tearing.
If the edges feel sticky, leave a little longer. - Punch a hole and thread a cord for hanging.
Tie a soft string or ribbon and hang where light can pass.
Enjoy the gentle movement and warming color.
The Flow of Making Colorful Eco-Friendly Bioplastic Suncatchers

Hold a finished suncatcher up to the light and notice how the color sings differently as the day moves. A morning sun will make cool tones glow, while late light brings a honey warmth. Small weight and flexibility let the pieces catch and tilt in a slight breeze. Use a tiny loop of thread to let them dangle from a wooden dowel or an old frame.
These suncatchers work well in windows, on a balcony, or hung in a small mobile. You can cluster them in a group so colors layer and change with perspective. If you make several shapes and hang them on a thin branch, you create a slow-moving light garland that moves with a room’s breath. The finish feels soft to the touch; it invites a quiet fingertip test.
Where This DIY Fits Into a Calm Routine
This craft can nest into many slow rituals. Try making suncatchers as a weekly creative pause. Set aside a morning with a warm drink, a playlist of soft instrumentals, and a single small tray of materials. The act of mixing and pouring becomes a short ceremony. If you prefer evenings, the drying and waiting are a gentle counterpart to winding down. Keep a small jar of finished pieces on the shelf as a visual reminder of the time you spent making.
Many people gift a single suncatcher with a handwritten note. The piece holds a light memory of the moment it was created. If you work with children, this craft becomes a shared breath: adults can manage the warm step, while kids can color, press bits in, and name the colors. For longer practice, experiment with a seasonal palette and keep a little stack of saved pieces to mix into a larger hanging.
How to Store or Reuse Colorful Eco-Friendly Bioplastic Suncatchers
Store suncatchers flat in a cool, dry place.
Place parchment or tissue between pieces to avoid sticking.
Avoid folding; the film likes to rest flat.
If a piece bends or warps slightly, lay it flat under a book for a few hours.
You can refresh color by layering a new thin film on top.
Cut smaller pieces from a larger sheet to make new shapes.
When a suncatcher becomes too fragile, compost it if your recipe used food-based ingredients.
If you used synthetic glycerin or non-compostable bits, recycle or repurpose as tags or small craft pieces.
Label a storage box with the date and color palette so you can look back on past seasons.
Gentle Tips & Variations

- Invite nature inside
Try pressing thin, dry leaves or small flowers into the wet film.
Choose materials that already feel dry to avoid trapped moisture. - Use natural dyes
Steep beet powder, turmeric, or spinaches for soft, natural tones.
These pigments fade gently in bright sun and look especially cozy. - Make a layered effect
Pour a clear base, let it partially dry, then add another thin layer of a different color.
This creates depth and a sense of hidden color. - Add texture with salt or sugar
Sprinkle a pinch on the wet surface and lift it away once dry.
This leaves a subtle, frosted texture that scatters light. - Try different shapes and frames
Cut freeform shapes or use metal cookie cutters for crisp edges.
Frame several small pieces in a window frame for a simple artwork.
You can also find many playful ideas in a set of variation notes I like to return to: variation ideas.
What I’ve Learned While Making This
I learned that patience changes the outcome. A piece left to dry slowly under gentle sunlight shows fewer cracks and a warmer color. I learned to trust a slow stir; rushing at the heat step creates lumps that stay. I learned that small hands delight in color mixing, and that children remember the smell of warm cornstarch long after the pieces are gone.
I also learned clear things about materials: glycerin keeps the film flexible by staying between polymer chains and letting them slide. Heat activates starch into a network that, when water evaporates, forms a sheet. Vinegar or acid helps the network set more smoothly. These small, quiet facts help me feel confident when I measure and when I choose a drying method. I remind myself that making is an experiment and that each batch teaches me something new about heat, time, and light.
FAQs About Colorful Eco-Friendly Bioplastic Suncatchers
Are these bioplastic suncatchers safe for kids to help make?
Yes, with supervision. Keep the hot-stove steps to adults. Children can mix colors, press decorations, and help hang finished pieces. Choose food-grade glycerin and non-toxic colorants when young hands will touch the wet film.
How long does it take for a suncatcher to dry properly?
Drying time varies with thickness and humidity. Thin layers can dry in 6 to 12 hours in a warm, dry spot. If you use a low oven to speed things up, watch closely and use the lowest safe heat. Patience yields more even, clear results.
Will the colors fade in sunlight?
Natural pigments tend to fade more quickly than synthetic dyes. If you want long-lasting color, use concentrated food coloring or light-stable craft pigments. Placing pieces where they get indirect sun will help preserve saturation.
Can I wash the suncatchers?
Gently wipe with a soft, damp cloth. Avoid soaking in water, which can soften the film. If a piece has dust, a light brush or a mini vacuum on low power can tidy edges without stressing the film.
What if my film cracks when drying?
Cracks can come from drying too fast or using too much heat. Try a thinner pour next time and dry in a more moderate setting. Adding a small amount more glycerin can also reduce brittleness.
Conclusion
If you want a step-by-step science-friendly tutorial to compare methods, this clear guide explains one approach in an accessible way: How To Make A Bioplastic Suncatcher – Chemistry for Kids. For more creative inspiration and alternative techniques, this project roundup shows colorful finished pieces and variations: DIY Bioplastic Suncatchers: Eco-Friendly Art That Shines Bright!.
Thank you for taking a little time to make something soft and luminous. Place your work where the light can meet it, and let it remind you that small, mindful making brings a quiet brightness to ordinary days.
PrintColorful Eco-Friendly Bioplastic Suncatchers

Create beautiful and eco-friendly suncatchers using simple ingredients and a mindful process.
- Prep Time: 20 minutes
- Cook Time: 20 minutes
- Total Time: 40 minutes
- Yield: 3-5 suncatchers
- Category: Crafts
- Method: Crafting
- Cuisine: N/A
- Diet: N/A
Ingredients
- Cornstarch (white or fine)
- Water (filtered or tap)
- Glycerin (food grade; optional)
- White vinegar or lemon juice
- Natural or food-safe colorants (powdered pigments, food coloring, or plant dyes)
- A small saucepan
- Measuring spoons and cups
- Baking parchment or silicone mat
- Cookie cutters or templates
- A straw or skewer
- A hole punch or sharp needle
- Tweezers
- A small baking tray or flat plate
- Optional: pressed flowers, thin leaves, tissue paper, metallic foil bits
Instructions
- Measure the base mixture and gather your tools.
- Warm the kitchen by placing a tray and parchment nearby.
- Mix cornstarch and water off the heat until smooth.
- Add glycerin and vinegar to the bowl.
- Heat the mixture slowly over low heat, stirring continuously.
- Bring to the gentle stage and remove from heat.
- Divide into small cups for color.
- Lay out parchment and set cookie cutters or templates.
- Pour the colored mixture thinly into shapes.
- Smooth bubbles and edges with a damp skewer.
- Add pressed flowers or leaves if desired.
- Allow to dry in a sunny spot or a low oven.
- When dry, peel carefully from the parchment.
- Punch a hole and thread a cord for hanging.
Notes
Store suncatchers flat in a cool, dry place. Use parchment or tissue between pieces to avoid sticking.