

Beneath soft lamp light, I press cool, slightly grainy cornstarch dough into a tiny flower, and the room grows quiet around that gentle motion. Cornstarch Flower Charms invite that small pause, where thumbs shape petals and palms feel the dough give. If you like slow, tactile projects, you might also enjoy cornstarch-based play recipes that bring similar quiet moments and simple textures into the day.
Why Cornstarch Flower Charms Feels Comforting to Create

Making Cornstarch Flower Charms warms more than your hands. The soft, matte surface of cornstarch dough absorbs light in a calming way. Pressing a petal leaves a small, tidy indentation. Rolling a bead between fingers creates a steady rhythm.
This project invites small, repeatable motions that center attention. You sense the coolness at first, then the dough relaxes beneath your touch. You hear only the faint scrape of a tool or the whisper of paper under your work. Those gentle cues help your breathing slow and let your shoulders ease.
Cornstarch Flower Charms pair well with slow mornings or quiet evenings. They fit into tea breaks, short pauses between chores, or a mindful stretch at your work table. If you enjoy delicate decorative craft like crystal flowers, this project keeps that same focus on small, quiet beauty.
This craft also feels forgiving. Cornstarch dough feels soft but firm enough to hold shape. You can reshape a petal, tuck a center, or smooth edges with a damp fingertip. That low-pressure flexibility invites play without pressure.
The Flow of Making Cornstarch Flower Charms
Before you gather materials, picture the flow. You mix a few pantry items, warm the dough a little, then knead until the texture feels smooth. You pinch small petals and nest them around a center. You let the pieces dry slowly until they firm up.
The process moves from an active, sensory start to a patient, waiting end. In the first phase, the dough changes under your hands. It goes from crumbly to cohesive, and you notice warmth, slight tack, and the smooth trail your finger leaves. In the next phase, shaping brings a soft, repetitive rhythm. Finally, drying brings silence and anticipation as the charms harden.
This rhythm gives the mind something steady to follow. The project focuses attention but also leaves room to notice small comforts like a cup of tea or the light through a window. You can sit with music or sit quietly. Either way, the tactile work keeps your hands gently engaged.
Materials You’ll Need
- Cornstarch, plain and easy to find
- Baking soda (optional, for a slightly firmer finish)
- Water, warm to help the dough come together
- A small saucepan for gentle heating
- Wooden spoon or silicone spatula, smooth and gentle on the dough
- A small rolling pin or dowel, optional for thinning petals
- Soft paintbrush for smoothing and adding texture
- Small cookie cutters or silicone molds, optional for neat petals
- Toothpicks or a blunt skewer for detailing and making holes
- Clear varnish or matte sealer, optional to protect finished charms
- Thin string, cotton cord, or jump rings for turning charms into pendants
You can adapt this list to what you already have. If you like transparent, glossy finishes, try a water-based sealer. If you prefer very natural pieces, skip the varnish and keep the matte texture. For a different but related project, see ideas for bioplastic flower suncatchers that use similar shaping steps.
Step-by-Step Directions
- Mix dry ingredients and water in a small saucepan.
Warm your water slightly in the pan. Stir in the cornstarch and a little baking soda if you want a firmer bead.
Keep the mixture smooth and lump-free as you stir. - Heat gently while stirring until the dough thickens.
Use low heat and a steady wooden spoon. Watch the mixture change from milky to paste-like.
Turn off the heat once it gathers into a soft ball. - Transfer to a cool surface and let it rest for a minute.
Press the dough gently with your fingers to test warmth. It should feel warm, not hot.
Let it rest so steam escapes and the surface stops sticking as much. - Knead the dough until it feels smooth and slightly elastic.
Cup your palms and press, fold, and roll the dough for a few minutes. Pay attention to texture.
If it feels too dry, add drop-by-drop warm water. If it feels too sticky, dust lightly with cornstarch. - Divide the dough into small pieces for petals and centers.
Work with pieces about the size of a small grape for each charm. Smaller pieces dry more quickly.
Roll pieces into tight little balls before shaping so they stay smooth. - Shape petals by pressing and flattening each small piece.
Use your thumb to press a gentle cup into a petal. Arrange five or six petals into a flower.
Overlap lightly and smooth the joins with a damp fingertip so seams look soft. - Add centers and texture with a toothpick or small tool.
Press a tiny ball into the center and gently score lines or dots for detail. Feel for balance.
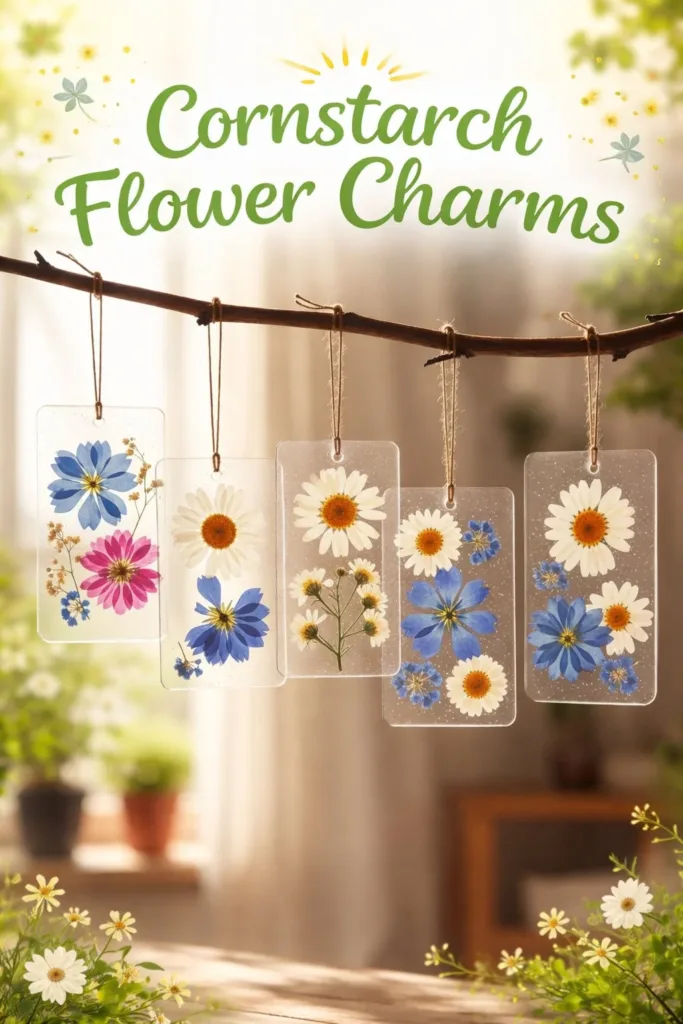
A quick, light touch gives a natural look without overworking the piece. - Make a small hole if you plan to string the charm.
Use a toothpick or skewer to make a hole through the top while the dough still feels soft.
Rotate the tool slowly to keep the hole even and avoid tearing. - Let the charms dry slowly at room temperature.
Place them on parchment or a soft cloth in a warm, dry spot. Give them at least 24 hours.
Turn or reposition after 12 hours if one side dries faster than the other. - Sand or smooth edges gently if needed.
Use very fine sandpaper or a soft nail file to round rough spots. Brush away dust with a soft brush.
A light pass keeps edges gentle and ready for finish work. - Seal or paint as you like.
Use a thin coat of matte varnish for protection, or add soft watercolor for a gentle wash of color.
Allow the sealant to dry fully before handling for the last time. - Attach string, jump rings, or set into a small frame.
Slip a cord through the hole and tie a small knot. Add a tiny jump ring if you plan to chain the charm.
Wear, gift, or tuck the charm into a quiet bowl where you can enjoy it by touch.
Where This DIY Fits Into a Calm Routine

Cornstarch Flower Charms work well as small pauses in your day. I like to make a few charms during a morning light break and leave them to dry while I do other gentle tasks. The act of shaping petals takes about ten minutes, but drying brings longer, slower attention that feels restful rather than hurried.
You can use this craft as a way to mark transitions. Create a charm at the end of the workday to close one headspace and welcome a softer evening. Make a set with a friend and exchange them over tea to share quiet time. If you enjoy watching tiny transformations, you might like to combine these charms with simple growing projects such as crystal-growing flowers for a mixed table display.
Display a few charms in a shallow dish near your favorite chair. Keep extras in a small jar by your desk to pick up when you need a mindful minute. The tactile weight and soft matte finish invite brief handling that resets your senses.
How to Store or Reuse Cornstarch Flower Charms
Store finished charms in a dry place away from direct sunlight.
Line a small box with tissue paper and place charms in a single layer. Avoid stacking while they remain fragile.
If charms get dusty, wipe them gently with a dry soft brush.
Avoid soaking them in water once they harden or in case you used a water-sensitive finish.
If a charm breaks, keep the pieces to repair or repurpose.
Warm a tiny bit of fresh dough and press it into cracks, then smooth with a damp fingertip. Let it dry slowly.
You can reuse a charm in new ways.
Glue a charm onto a wooden pin, attach it to a small wreath, or use it to seal a hand-tied gift. A light coat of sealant helps the piece last when you wear it on necklaces or rings.
Consider making a fresh batch for seasonal swaps.
Small charms let you change colors, scents, and finishes to match mood or season without much waste.
Gentle Tips & Variations

- Invite scent subtly by dusting a petal with a single drop of essential oil on the first day of drying.
Think of lavender or orange for soft, calming notes, and use only a tiny amount so the scent stays gentle. - Try shallow relief patterns from household objects.
Use the edge of a leaf, a small bead, or the tip of a metal button to press patterning into the petals before drying. - Make tiny sets for thoughtful gifts.
Create three charms in matching or complementary tones and tie them together with a cotton ribbon for a small, mindful present. - Play with color by adding powdered pigments or soft watercolor.
Mix a small pinch of pigment into the dough or paint gently after drying. Watercolor creates a soft, natural wash without heavy coverage. - Use different finishes for varied feel and look.
A matte sealer keeps the natural, tactile quality. A glossy varnish brings a bright, jewel-like look. Choose what fits your calm.
FAQs About Cornstarch Flower Charms
Will the dough crumble if I make very thin petals?
Can I make these with kids? How long will a finished charm last? What if my dough feels sticky or too dry? Can I bake the charms to speed drying?
Will the dough crumble if I make very thin petals?
Thin petals feel delicate but they can hold if you dry them slowly.
Keep them on a flat surface and allow longer drying time. If a petal flexes when you touch it, let it sit longer before handling.
Can I make these with kids?
Yes, children often love the sensory aspect.
Keep an eye on small parts and avoid heating steps for young children. You can prepare the dough and let children shape cooled portions while you supervise.
How long will a finished charm last?
With care, a sealed charm lasts years as a small keepsake.
Avoid strong sunlight and damp storage. Use a gentle seal and store in a dry box for best results.
What if my dough feels sticky or too dry?
If it feels sticky, dust lightly with cornstarch and knead until smooth.
If it feels crumbly, add a drop of warm water and knead slowly until it comes together. Work mindfully and small amounts at a time.
Can I bake the charms to speed drying?
I recommend air drying for the most even, gentle result.
If you choose to use low heat, set an oven to a very low temperature and check frequently. Baking changes texture and may create small cracks if you rush the process.
A Gentle Note Before You Go
Carry one quiet insight from this making session into the rest of your day. Cornstarch Flower Charms offer a simple way to practice presence while you shape small things by hand. Notice the cooling of the dough under your fingers, the soft score of a toothpick making a center, and the quiet satisfaction of a tiny petal holding its form. These small acts knit gentle attention into ordinary moments.
If you feel inspired to explore more cornstarch techniques, take the next step slowly. Crafting should soothe, not rush. Return to this process whenever you need a brief, comforting ritual for your hands and your mind.
Conclusion
If you would like another cornstarch shaping approach, try this helpful guide to How to Make Cornstarch Beads which offers a different take on bead shaping and drying. If you ever wonder about kitchen substitutes for cornstarch, this piece on Here’s How to Thicken Your Stew Without Cornstarch or Flour explains practical alternatives and simple techniques.
PrintCornstarch Flower Charms

Create delicate cornstarch flower charms through a simple, calming craft process that invites mindfulness and creativity.
- Prep Time: 10 minutes
- Cook Time: 5 minutes
- Total Time: 24 hours
- Yield: Multiple charms
- Category: Craft
- Method: Crafting
- Cuisine: N/A
- Diet: N/A
Ingredients
- Cornstarch
- Baking soda (optional)
- Warm water
- A small saucepan
- Wooden spoon or silicone spatula
- Small rolling pin (optional)
- Soft paintbrush
- Small cookie cutters or silicone molds (optional)
- Toothpicks or blunt skewer
- Clear varnish or matte sealer (optional)
- Cotton cord or jump rings (for pendants)
Instructions
- Mix dry ingredients and warm water in a small saucepan.
- Heat gently while stirring until the dough thickens.
- Transfer to a cool surface and let it rest for a minute.
- Knead the dough until it feels smooth and slightly elastic.
- Divide the dough into small pieces for petals and centers.
- Shape petals by pressing and flattening each small piece.
- Add centers and texture with a toothpick or small tool.
- Make a small hole if you plan to string the charm.
- Let the charms dry slowly at room temperature.
- Sand or smooth edges gently if needed.
- Seal or paint as you like.
- Attach string, jump rings, or set into a small frame.
Notes
This project fits well into calm routines, allowing for mindful creativity at your own pace.