

As you settle into a moment of quiet, the soft glow of your DIY Cotton Candy Glow Jars fills the room. You can almost feel their warmth softly illuminating your space, inviting a sense of calm and wonder. The gentle light dances, reflecting on the surfaces around you, while the colors swirl like the cotton candy experiences of your childhood. This moment isn’t just a reminder of what was; it’s a serene space you have created through your hands. The texture of the jar, the smoothness of the cotton candy, and the soft light evoke feelings of nostalgia, creativity, and comfort, immersing you in the present.
The Quiet Joy of Making DIY Cotton Candy Glow Jars

Creating DIY Cotton Candy Glow Jars feels rewarding, almost like crafting a piece of magic. When you engage in the process, you allow yourself to slow down and connect with the simple joys of crafting. Each jar becomes a cozy beacon of light, illuminating not only the space around you but also your spirit.
Working on this project engages your senses in delightful ways. The soft cotton candy invokes a sense of nostalgia, reminding you of fairgrounds and sweet treats. As you twist and layer, the smoothness of the material flows through your fingers, grounding you in the present moment. The process of crafting these jars helps to distill distractions and worries, leaving behind a warm, inviting focus.
Moreover, the rhythmic action of creating layering the cotton candy, twisting the lights, and watching your vision take shape feels therapeutic. It invites creativity to flow, sparking joy with each turn of the jar. You are not just making a light; you are weaving together a slice of comfort for your home and your heart.
A Gentle Look at the Process

As you prepare to create your DIY Cotton Candy Glow Jars, the process unfolds gently. Each step leads you deeper into a cozy rhythm, where the act of making becomes a meditative practice. Imagine the soft sounds of crinkling cotton candy, the faint hum of a light string, and the serene environment enveloping you.
This project is about more than just the layers; it’s about the flow of the experience. With each gentle movement, you can foster a connection between your hands and your heart. You will feel the textures, see the colors blend softly, and breathe in the calmness of the moment. The goal is to be present, allowing the act of creation to wash over you, folding in the joy of making along the way.
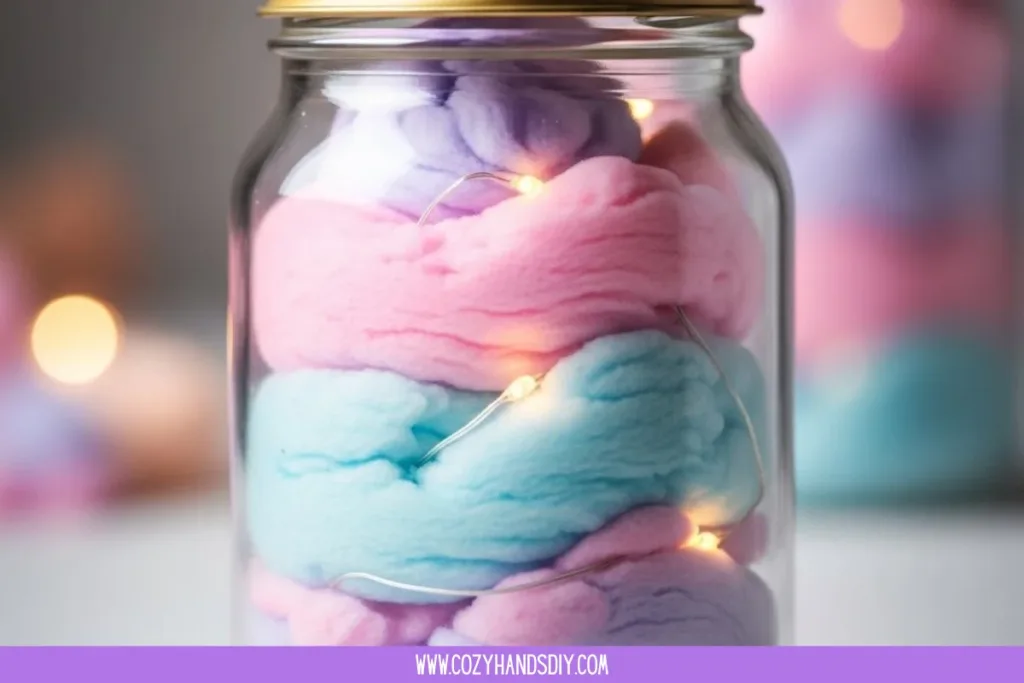
Materials You’ll Need
Gathering your materials is a part of the journey. Here’s what you’ll need to create your enchanting glow jars:
- Clear glass jars (repurposed or new)
- Cotton candy (any color you prefer)
- Battery-operated LED fairy lights (choose a warm tone for a cozy glow)
- Optional: Glitter or iridescent beads for extra sparkle
- Scissors (for trimming lights if needed)
- Twine or ribbon (for decorating the jars)
- Optional: Small labels or tags for a personal touch
These materials are easy to find, and you may already have some waiting to be used in your crafting space. The cotton candy invites a burst of color, while the lights will bring a gentle radiance to your jars.
Step-by-Step Directions
- Start by cleaning your glass jars thoroughly. This ensures a clear view of all the beauty that will come inside. Feel the coolness of the glass as you prepare it for your project.
- Next, take your cotton candy and gently pull it apart, allowing it to fluff up and expand. Notice the soft texture and sweet smell as you handle it.
- Begin layering the cotton candy inside the jar. Alternate between colors if using more than one. The colors dance together, inviting your creativity to play.
- Once you have filled the jar to your liking, take your battery-operated fairy lights. Carefully place them inside the jar, tucking them around the cotton candy to hide the battery pack at the bottom.
- Gently adjust the cotton candy to allow the light to shine through beautifully. Turn the lights on, taking in the delightful glow that emanates.
- Finish off your jars by adding twine or ribbon around the neck. Tie a simple knot, and if you wish, attach a small tag. This adds a personal touch and makes the jar feel complete.
- Place your finished jars in a cozy spot in your home, allowing the warm glow to infuse your space with comfort. Take a moment to appreciate your creation.
Bringing DIY Cotton Candy Glow Jars Into Your Space

The finished DIY Cotton Candy Glow Jars can become delightful additions to various spaces in your home. Imagine placing them on a bedside table, where they softly light your bedtime rituals. Or set them in a reading nook, casting a warm glow that invites you to dive into pages of your favorite book.
These jars also make lovely gifts, offering a piece of warmth and comfort to friends and family. They can transform a simple gathering into a cozy night by providing a gentle ambiance. With their enchanting colors, they invite memories and a sense of nostalgia, reminding us of sweet moments.
You can enjoy their glow during quiet morning coffee or while unwinding at the day’s end. Embrace their light as a reminder to find comfort in the small details, cherishing each moment of your life.
Keeping It for Later
Your DIY Cotton Candy Glow Jars can last with just a bit of tender care. To preserve their charm, keep them out of direct sunlight, which might fade the colors of the cotton candy over time.
If you need to store them, gently remove the cotton candy and keep it in an airtight container to maintain its fluffy texture. The jars themselves can serve as lovely decorative pieces on shelves or tables when not in use.
Should you want to reuse the jars with fresh cotton candy, simply repeat the gentle layering process. This can offer delightful new experiences with every recreate, inviting your creativity to flow anew.
Gentle Tips & Variations
Feel free to explore and make this project your own. Here are a few soft invitations for customization:
- Experiment with different types of cotton candy. Try fruity flavors or even unique options like lavender or birthday cake. Each will emit a different atmosphere in your jars.
- If you feel adventurous, spray the inside of the jars with a light coat of adhesive spray before adding glitter. This will give your jars an enchanting sparkle that captures the light beautifully.
- Consider using different sizes of jars or even unique shapes to mix things up. Each will bring a new personality and ambiance to your space.
- If you want to adjust the light intensity, try using dimmable fairy lights. This offers more control over the mood, creating different vibes for different times of day.
- Incorporate tiny treasures like seashells or dried flowers alongside the cotton candy for added depth and texture. These small touches can enhance the sensory experience of your jars.
FAQs
How long will the cotton candy last in the jars?
Cotton candy typically has a short lifespan once exposed to air. If kept sealed, it can last several weeks. For best results, enjoy your jars soon after making them.
Can I use regular lights instead of battery-operated?
While you can use regular lights, battery-operated fairy lights are safer and more convenient. They eliminate the need for cords and allow for flexibility in where you place your jars.
What if I don’t have cotton candy?
Can I substitute it? You can substitute cotton candy with any soft filler like tulle, tissue paper, or even layers of colored fabric. Just keep in mind that it won’t have the same sweet scent or nostalgic feel.
Can I display these jars outdoors?
These jars are best suited for indoor use to protect the cotton candy from moisture and fading. However, if you choose outdoor areas with minimal humidity, chances of fading or damage increase.
What if my cotton candy shrinks or loses its fluffiness?
If your cotton candy shrinks, it’s just losing moisture. If you want to fluff it up again, gently pulling apart the cotton candy can help restore its airy texture.
A Gentle Note Before You Go
Creating DIY Cotton Candy Glow Jars is not just about the end result; it’s about the peaceful moments spent in the process of making. Allow yourself to sink into this experience, enjoying the soft textures, vibrant colors, and soothing glow.
Remember, every creation holds the energy of your hands and heart, cultivating a sense of comfort and warmth. Embrace the art of making these jars as a nurturing ritual in your life. Each moment spent crafting invites calmness to your day, illuminating the beauty in gentle creative expression.
For More DIYprojects ideas chack our Mindfulness Crafts
Follow US on Pinterest For daily DIY projects Idea
PrintDIY Cotton Candy Glow Jars

Create enchanting glow jars filled with cotton candy and fairy lights to illuminate your space.
- Prep Time: 15 minutes
- Cook Time: 0 minutes
- Total Time: 15 minutes
- Yield: 1 jar (can be multiplied for more)
- Category: Craft
- Method: Crafting
- Cuisine: N/A
- Diet: N/A
Ingredients
- Clear glass jars (repurposed or new)
- Cotton candy (any color you prefer)
- Battery-operated LED fairy lights (warm tone recommended)
- Optional: Glitter or iridescent beads
- Scissors
- Twine or ribbon
- Optional: Small labels or tags
Instructions
- Clean your glass jars thoroughly.
- Gently pull apart cotton candy to fluff it up.
- Layer the cotton candy inside the jar, alternating colors if desired.
- Place the battery-operated fairy lights inside, tucking them around the cotton candy.
- Adjust the cotton candy to allow the light to shine through.
- Add twine or ribbon around the jar, tying a knot and attaching a tag if desired.
- Display your jars in a cozy spot and enjoy the warm glow.
Notes
Keep jars out of direct sunlight to preserve color. If storing, remove cotton candy and keep in an airtight container.