

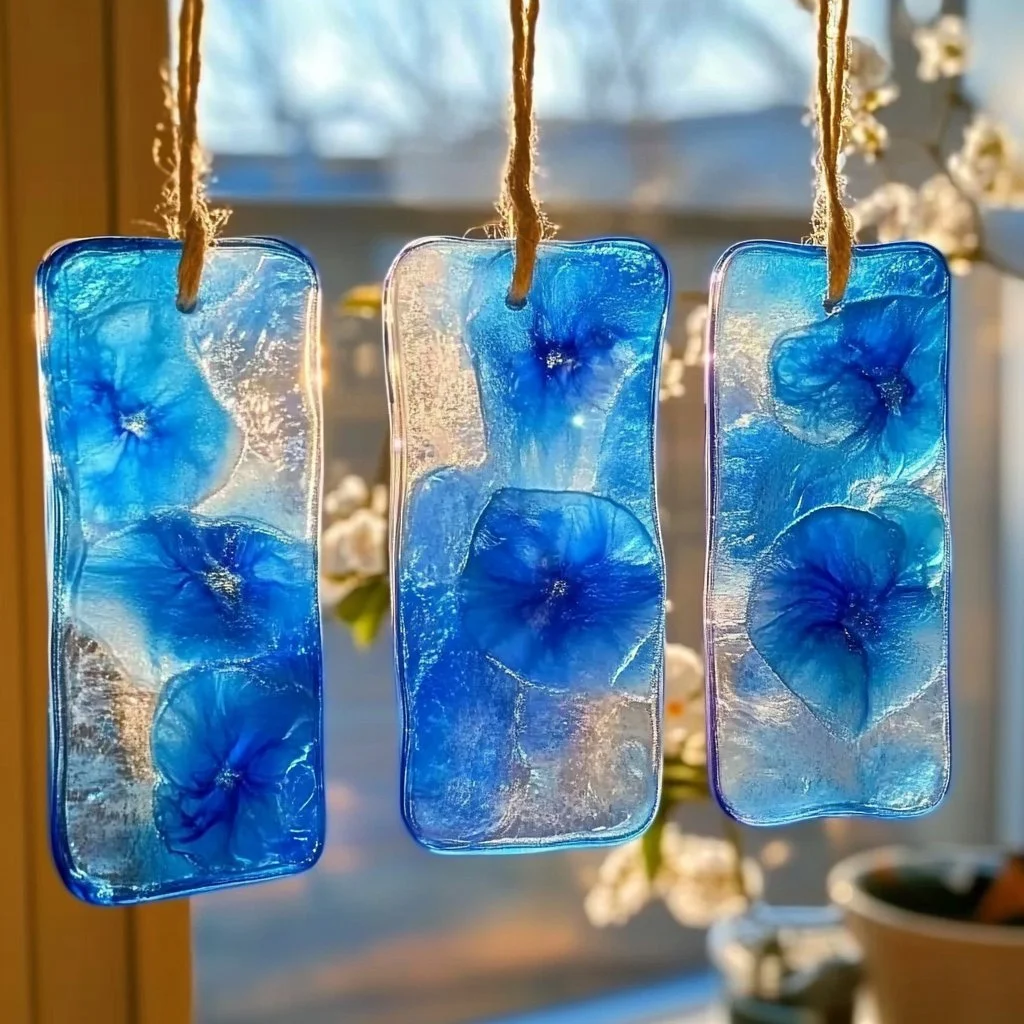
A warm, slow light falls across the table as I peel away a strip of blue crayon shavings. The wax smells faint and sweet, like crayons do when they warm in a sunny window. I hold the tray to the sun and watch the blue glow spread, glass-soft and ocean-deep. Making DIY Blue Crayon Suncatchers asks for small, careful motions and brings a hush to the afternoon. If you would like the full step list I use, you can find the full DIY Blue Crayon Suncatchers tutorial for reference as you read, and carry that quiet feeling through your own making.
Why DIY Blue Crayon Suncatchers Feels Comforting to Create

Blue holds a quiet kind of calm. When you place melted wax in a translucent shape, the color becomes soft light. It looks like a little fragment of sky or a pond held up to the window. The act of breaking crayons, arranging bits, and waiting for the wax to set gives your hands and mind a steady rhythm.
This craft slows you with texture. You feel the rough edges of peeled paper, the slight stick of softened wax on your fingertips, and the smooth cool of a finished suncatcher. Those small textures turn making into a sensory rhythm that calms the busy mind.
I make these suncatchers when I want a gentle pause. I often sit by a window with a cup of warm tea while the wax melts. The quiet ticking of a kitchen timer or a soft playlist keeps things calm. The project does not ask for perfection. It invites curiosity and small adjustments. You practice patience at the same time you make something that catches light in a very simple, honest way.
Making this piece also supports mindful focus. Choosing blues, layering them, and deciding where to let the wax pool becomes a subtle meditation. Even if you make a handful of imperfect shapes, each one teaches you something about heat, color, and how light moves through thin wax. That slow learning feels gentle and kind.
A Gentle Look at the Process
Before we collect materials, take a moment to imagine the process. You will shred or shave crayons into thin flakes and arrange those flakes inside a simple mold. You will warm them until they melt and flow. The wax will spread and settle slowly, catching bubbles and small crystals.
You will move slowly when you remove the tray from heat. The liquid wax will shine, and then the surface will dull as it cools. You will press a little, tap a bit, and perhaps add a loop or ribbon for hanging. Each motion carries texture and sound. The rub of paper as you peel crayon wrappers. The soft clink of metal tools. The gentle thud as you set a finished piece on a towel.
I learned to steady my hands by making a practice piece first, using a small oven-safe tray and a low heat setting. If you want to see other color ideas or different shapes, the quiet gallery of blue crayon suncatchers may give you soft inspiration. Let the process feel like tending a small flame. Move slowly, notice the light, and follow what feels calm.
Materials You’ll Need
- Crayons in shades of blue, peeled and chopped or shaved (easy to find, reuse old crayons)
- A silicone mold or an oven-safe shallow tray (silicone works nicely for release)
- Parchment paper or a silicone mat (optional, for catching drips)
- A sharp knife, peeler, or grater for creating shavings (use gently and with focus)
- An oven, toaster oven, or heat source with a reliable low temperature
- A small metal spoon or wooden craft stick for arranging wax
- A toothpick or skewer for nudging small bits and releasing air bubbles
- Thin string, ribbon, or fishing line for hanging (optional)
- A hole punch tool or a metal skewer for making hanging holes once set (optional)
- A towel and a heatproof surface for cooling (safety first)
I often keep a small box of recycled crayons saved for making. Old crayons melt well and create lovely layers. If you do not have a mold, press the wax between two sheets of parchment and cut shapes when it is firm. For more experimenting with raindrop shapes, take a look at the green variation I made in my other piece about green crayon raindrop suncatchers. For a different base material, you may enjoy the texture of a bioplastic suncatchers recipe which uses a very different feel and transparency.
Step-by-Step Directions
- Preheat your oven or toaster oven to a low setting, around 200 to 225 degrees Fahrenheit.
Keep the temperature gentle so the wax melts slowly and does not bubble too much. Low heat gives you more control. - Prepare your workspace on a heatproof towel and set out your silicone mold.
Lay down parchment or a silicone mat to catch any stray drips. Have your tools nearby so you do not rush. - Peel crayon wrappers and shave or chop crayons into small pieces.
Use a peeler for thin shavings or a knife for small chunks. The thinner the pieces, the faster and more even they melt. - Arrange blue shavings in the mold in a single layer first.
Think about light. Leave tiny gaps or patch with lighter blues to let sun glow differently through each area. Keep hands steady and fingers cool. - Add a second layer of shavings if you want deeper color.
You can mix blues or create stripes. The wax will blend a little, but the layers keep some texture. Less is often more. - Place the mold on a flat tray and slide it into the oven.
Check it at three to five minute intervals. The wax will soften and then become liquid, showing a gentle shine. If you heat slowly, you avoid bubbling and discoloration. - Use a spoon or skewer to nudge any large unmelted bits and to encourage even spread.
If small air pockets appear, let the wax settle or very gently tap the tray to bring bubbles to the surface. Work with calm, small motions. - Remove the mold when the wax looks mostly smooth and has the glow of melted wax.
Set it on a heatproof surface. It will cool and dull slightly as it sets. Avoid moving it while still very liquid to prevent spilling. - Let the wax cool fully until it feels solid and slightly warm.
Cooling may take thirty minutes or more depending on thickness. If you plan to make a hanging hole, do so with a skewer while the wax is just cooled but not bone-chilly; this reduces cracking. - Trim any rough edges and attach string or ribbon for hanging.
If you used a mold, gently press from the back to pop the suncatcher free. Enjoy the way the light filters through the blue; adjust hang height as you like.
These steps come from small experiments and quiet afternoons. I learned to watch the wax at the very first sheen of melting instead of waiting for lots of bubbling. That moment tells you the wax is ready to flow but not overheated. I also learned to keep my oven temperature steady and to avoid open flames. The process grows gentler as you repeat it. Each piece teaches you the right timing for your particular oven, mold, and crayons.
Enjoying the Finished Piece


A finished suncatcher brings a window a new kind of breath. Hang it where morning light reaches first, and notice how the blue shifts through the day. In early light it may look pale and glassy. In the afternoon, it may glow like a pool.
Try pairing one with fresh house plants nearby. The soft blue works well near greens. Place a few small suncatchers at different heights to catch shifting light across a wall. I often string three at varying lengths in front of a small window to make a gentle mobile of color. The movement is subtle but satisfying.
You can also rest a suncatcher on a windowsill as a tiny, colored tray. It holds small, nonsharp treasures like a smooth stone or a pressed flower. When guests arrive, the piece becomes a quiet conversation starter. People often ask about the texture of the wax and the small imperfections I leave; those small marks feel honest and homey.
For a playful shelf display, lay a soft white cloth and tuck a suncatcher under a glass cloche or a shallow dish. The blue shines differently under different layers and this creates a small scene to return to. If you enjoy mixing materials, pair your crayon suncatchers with other handmade light-catchers like bioplastic pieces for an eclectic window collection.
Making This DIY Last
Wax suncatchers last well if you handle them gently. Keep them out of direct, intense heat such as a car dashboard on a hot day. Excessive warmth can soften the wax and warp the shape.
Store extra pieces flat and separated with parchment to prevent sticking. If you have thin shapes, lay them in a single layer inside a shallow box. Cooler, stable temperatures preserve color and shape longer.
If a piece collects dust, wipe it gently with a dry, soft cloth. Avoid water when possible because wax does not respond well to soaking. For tiny scratches, a brief touch with a warm cloth can smooth the surface slightly, but do this with care and low heat.
If a suncatcher chips or cracks, you can repurpose those shards in a new piece. The fragments melt quickly and create lovely marbled textures. I keep a small jar of leftover bits for this reason. Recycling keeps both the colors and the memories alive in new creations.
Gentle Tips & Variations
- Invite a child or friend to help with the peeling and arranging.
This can make the process social and slow. Keep hot steps for adults. - Try adding a touch of metallic crayon for flecks.
A tiny amount of gold or silver can catch light like little stars. Use sparingly for subtle shine. - Create layers with vellum between thin sheets of wax for muted translucence.
This gives a softer, frosted look and feels cozy next to linen or paper. - Make small shapes to string together as a garland.
Tiny drops and circles look lovely when grouped. They dry faster and make a quick, calming project. - Experiment with a very light mix of white in the blue to create clouds.
This gives a soft depth that looks like sky glimpsed through glass.
These suggestions aim to invite play, not to prescribe. Each variation will teach you something new about heat, texture, and color.
FAQs About DIY Blue Crayon Suncatchers:
Will melted crayon wax burn or smoke?
If you melt crayons at a low temperature, you avoid heavy smoke. Keep the oven at a gentle setting and watch the wax carefully. If it begins to smoke, reduce the heat and ventilate the area.
Can you make suncatchers without an oven?
Yes. You can use a heatproof pan over low heat, a warming tray, or a craft heat gun with care. These methods need careful attention and a steady hand. I prefer ovens for even, slow warming.
Are recycled crayons safe to use?
Yes, if the crayons are clean and free of contaminants. Recycled crayons from household use generally melt fine. Avoid crayons with unknown additives or coatings.
How do you make a hole for hanging without cracking?
Make the hole while the wax is still slightly warm but firm enough to hold shape. Use a skewer to gently create a small opening. If you wait until the piece is fully cold, heat the skewer slightly before poking to reduce cracking.
How do I remove bubbles from the melted wax?
Tap the mold gently on the table to coax bubbles to the surface. You can also use a toothpick to lift or burst a stubborn bubble. Patience and a low heat help prevent bubbles in the first place.
A Quiet Closing Thought
Sit with your finished suncatcher for a few moments. Let the light move across the blue and notice a small detail you did not see at first. Maybe a thin line where two shades blended, or a tiny trapped air pocket that looks like a cloud. These quiet details hold the story of your hands.
Making this piece does not rush you. It asks you to be present with warm wax, cool glass, and slow light. Each step keeps you grounded. Each finished piece carries a calm memory of the afternoon you made it.
Conclusion
If you want another take on raindrop shapes and step-by-step video guidance, the Ormond Art Museum offers a gentle tutorial in their Raindrop Sun Catchers | Family Art Night | OMAM resource that pairs well with this kind of slow making.
For a short, approachable how-to that explores recycled crayon techniques and beginner-friendly steps, KiwiCo’s guide on Recycled Crayon Suncatchers | DIY for Beginners – KiwiCo makes a good companion to your own experiments.
Take your time with the melting, savor the soft smells and textures, and let each suncatcher teach you something small and comforting about color and light.
PrintDIY Blue Crayon Suncatchers

Create beautiful, calming suncatchers using melted blue crayon wax, perfect for capturing light and adding a touch of color to your windows.
- Prep Time: 15 minutes
- Cook Time: 30 minutes
- Total Time: 45 minutes
- Yield: 4 suncatchers
- Category: Craft
- Method: Melting and Shaping
- Cuisine: N/A
- Diet: N/A
Ingredients
- Crayons in shades of blue, peeled and chopped or shaved
- A silicone mold or an oven-safe shallow tray
- Parchment paper or a silicone mat (optional)
- A sharp knife, peeler, or grater for creating shavings
- An oven, toaster oven, or heat source with a reliable low temperature
- A small metal spoon or wooden craft stick for arranging wax
- A toothpick or skewer for nudging small bits and releasing air bubbles
- Thin string, ribbon, or fishing line for hanging (optional)
- A hole punch tool or a metal skewer for making hanging holes once set (optional)
- A towel and a heatproof surface for cooling
Instructions
- Preheat your oven to a low setting, around 200 to 225 degrees Fahrenheit.
- Prepare your workspace on a heatproof towel and set out your silicone mold.
- Peel crayon wrappers and shave or chop crayons into small pieces.
- Arrange blue shavings in the mold in a single layer first.
- Add a second layer of shavings if you want deeper color.
- Place the mold on a flat tray and slide it into the oven, checking every 3-5 minutes.
- Use a spoon or skewer to nudge any large unmelted bits.
- Remove the mold when the wax looks mostly smooth and shiny.
- Let the wax cool fully until it feels solid and slightly warm.
- Trim any rough edges and attach string or ribbon for hanging.
Notes
Handle the wax pieces gently to prevent damage; they last well if kept out of direct heat and stored flat to avoid sticking.