

A slow beam of late afternoon light presses across my work table and warms the clear sugar bowls. I hold a small wire heart and listen to the soft clink as it meets glass. For a quiet hour I watch crystals bloom along a wire frame and feel my chest ease. Making Crystal Hearts asks for small, steady motions and gentle attention, and it returns a little glowing object that keeps the calm.
Why Crystal Hearts Feels Comforting to Create

There is a hush to the process. You mix warm water, add a familiar pantry ingredient, and wait as tiny facets form. The cadence of stirring, the soft steam, and the steady weight of the jar in your hands all slow your pace.
Crystal Hearts ask you to be present but not frantic. You tend to them and then allow time to work. That gentle alternation of small activity and patient waiting fits well into a cozy routine. The finished hearts catch light in quiet ways. They sparkle without shouting, and they reward soft, careful touch.
When I first made these, I found myself tracing the formed crystals with a fingertip, noticing the cool, slightly rough surface and the way each point reflected late day light. That small sensory focus can anchor the mind. This craft fits into slow afternoons, mindful breaks, or a relaxed table with a warm drink and soft music.
The Flow of Making Crystal Hearts
Before you mix anything, imagine moving slowly. Gather your materials and set them in a tidy row. Feel the warm cup you will use and the glass jar you will watch.
The flow moves from warm to cool. You dissolve, you suspend, and then you watch. The sound stays minimal: a spoon in glass, a soft pour, a quiet timer. The visual rhythm changes from smooth liquid to clustered shapes, and each stage has a different texture to enjoy.
This project asks for gentle hands and steady placement. You will form wire shapes or use pipe cleaners, tie a loop, and suspend them where they can sit undisturbed. You will check in occasionally, not to hurry anything, but to appreciate the slow change.
Materials You’ll Need
- Clear glass jars or heatproof containers, one per heart (easy to find)
- Borax powder or baking soda, depending on the crystal method you choose
- Clean water, warmed to help dissolve the crystals
- Wire, pipe cleaners, or cookie cutter shapes to form the heart frame
- String or thread to suspend the shape in the jar
- A small spoon for stirring
- A tray or towel to protect your work surface (optional but helpful)
- A thermometer or just a sense that water should be hot but safe to touch
- Food coloring or liquid watercolors if you want faint tinting (optional)
- Tweezers or a chopstick to lift pieces carefully
If you prefer a slightly different recipe, you might like the gentle pink variations I tried on other small crystal projects; they lend a soft color to the finished pieces and use similar steps to this craft. See a simple pink variation at growing crystal pink hearts for a calming color option.
Step-by-Step Directions
- Make your heart frame. Bend wire or shape a pipe cleaner into a heart. Leave a small loop at the top to tie your string. The metal feels cool and smooth in your fingers.
- Warm your water. Heat enough water for your jar until it becomes comfortably hot, not boiling. Warm water dissolves the crystal ingredient more readily.
- Stir in the borax or baking soda. Add the powder slowly and stir until it dissolves. You will see the liquid clear when it is ready. The mixture may become a bit glossy on top.
- Tie the string to the heart frame. Make a steady knot and test the length so the heart hangs freely without touching the jar bottom. Adjust until the frame finds balance.
- Place the frame in the jar. Suspend it gently so the bottom sits just above the jar base. The heart should hang still and not brush the sides.
- Cover and wait. Set your jar in a safe, still spot where it will not be disturbed. Crystals often begin to show within a few hours and develop more fully overnight.
- Check gently. When you see a good layer form, remove the heart slowly and let excess solution drip back into the jar. The crystal surface will feel cool and slightly granular.
- Rinse and dry. Rinse the heart in clean water to remove loose crystals, then set it on a clean towel to dry. Handle it with care; the points can be sharp to the touch.
- Display or repeat. Choose a quiet shelf, a window with soft light, or a small bowl of sand to nest the heart. If you want a different texture, try changing the concentration or adding a faint tint when you dissolve the powder.
While you work, I found that stirring in a slow, circular way and resting the spoon against the jar edge created a comforting rhythm. I also learned to mark the time on my phone so I could walk away and not worry.
Enjoying the Finished Piece

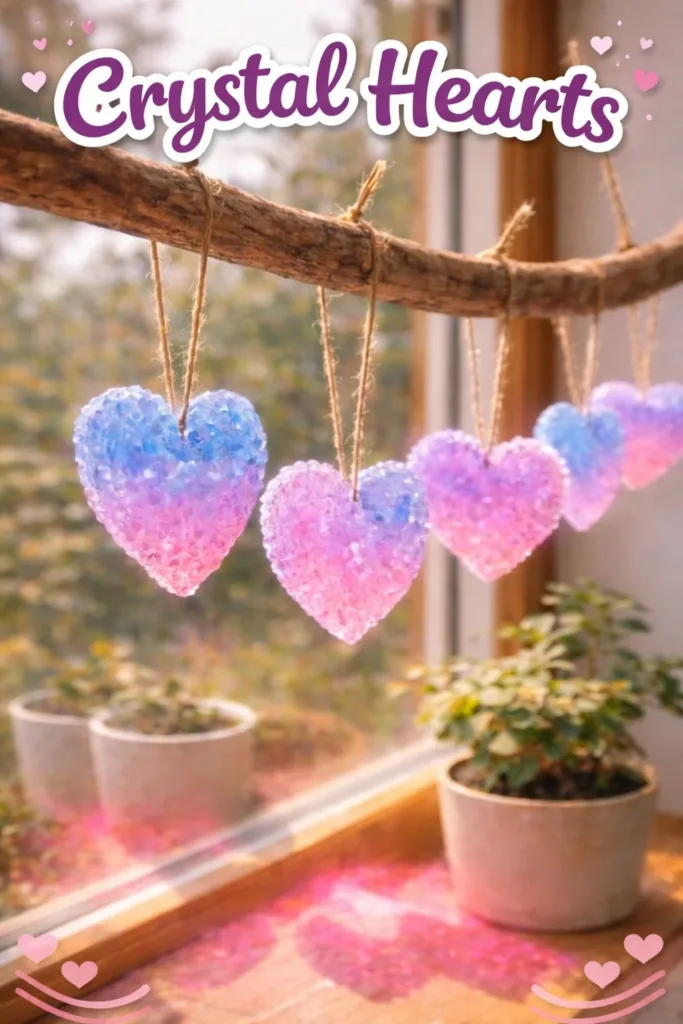
Place your Crystal Hearts where they catch gentle light. A north-facing window works well for soft, even shimmer. You can hang them from a small hook, lay them in a shallow dish, or string a trio across a shelf.
I like to position one near a reading nook. When I take a pause, the heart sits in view and returns my attention to a simple, lovely object. The surface invites a slow touch, and the crystalline texture feels reassuringly tactile.
You can give these as quiet gifts. Tuck a tiny heart into a note, or add it to a wrapped bundle. The recipient receives not just an object but a small process of care and time that you shared.
If you want inspiration for different ways to grow crystal shapes, I found helpful variations that use similar materials and steps for tree shapes, which gave me ideas about scale and display. See more on alternate forms at baking soda crystal growing tree.
Keeping It for Later
Store your Crystal Hearts with care. Place them in a padded box or wrap them in soft tissue paper. Avoid jostling; crystals can chip or flake with rough treatment.
If dust gathers, a gentle blow or brief rinse in cool water usually cleans them without damage. Avoid prolonged exposure to direct, hot sunlight, as strong heat can sometimes weaken the surface over months.
If you plan to keep them outdoors, expect gradual weathering. The crystals will change if they meet heavy moisture or freezing temperatures. For lasting display, keep them indoors in a stable environment.
If you want to repurpose a frame, you can dissolve the crystals by soaking the shape in warm water and stir gently. This step returns the wire frame to a near-clean state so you can experiment again.
Gentle Tips & Variations
- Invite color softly. Add a drop of food coloring when the powder dissolves for a whisper of tint. Use small amounts for muted shades.
- Try different frames. A small cookie cutter or a thicker wire gives varied crystal patterns. Thinner wire tends to create finer points.
- Make multiple sizes. Use larger jars and longer hanging strings for dramatic pieces, or tiny jars for delicate mini hearts.
- Combine with natural elements. Nest a finished heart on a piece of driftwood, a shallow bowl of sand, or a bed of dried lavender for added texture and scent.
- Keep a calm table. Protect your surface with a towel and label jars if you plan several batches, so you track which concentration made which texture.
These invitations let you personalize the craft without changing its gentle nature. They offer small experiments you can try over a few afternoons.
What I’ve Learned While Making This

I learned to respect small changes. A slightly different water temperature or a touch more powder yields a noticeable variation in crystal size. That taught me to keep notes if I want to replicate a particular look.
I learned the value of a quiet workspace. When my table stayed still and uninterrupted, the crystals formed with more even coverage. Interruptions led to uneven growth and more fragile edges.
I also learned a simple safety habit: label jars and keep them out of reach of small children and pets. The ingredients here are common, but the concentration matters and the jars can feel tempting to curious hands.
Most of all, I learned to enjoy the wait. The act of returning to the jar after some hours carries a small, soft joy. Each reveal feels like a gentle surprise.
FAQs About Crystal Hearts
Are the crystals safe to touch?
The finished crystals usually feel cool and a bit rough. Handle them gently. Small flakes can break away, so avoid letting pets or very small children play with them unsupervised.
Can I use other powders besides borax?
Yes. Baking soda or alum can produce lovely crystals with slightly different habits. Each material behaves a bit differently because of solubility and how the molecules arrange as they solidify.
How long do the crystals take to form?
You often see initial growth within a few hours. For fuller, larger crystals, leave the heart undisturbed overnight or up to 24 hours. Temperature and concentration influence timing.
Will the crystals last forever?
They last well indoors under stable conditions. They can dissolve in water and change under extreme humidity. For long-term keeping, display them away from direct moisture.
Can I reuse the wire frame?
Yes. You can soak the frame to dissolve most crystals, then dry and reshape. Reuse works well if you prefer experimenting with different finishes.
A Quiet Closing Thought
Sit with the heart you make for a few slow moments. Notice how it holds light and consider the small acts that shaped it. This craft invites the same kind of gentle attention you give a plant, a kettle, or a page of a book.
If you make more than one, arrange them in a little cluster and watch how their angles and sizes play together. Each one records a memory of your hands and a patient hour of waiting. Treat that as part of the gift you give yourself.
Conclusion
If you want a step-by-step experimental version that uses borax in a classroom-friendly way, the Borax Crystal Hearts Experiment – Little Bins for Little Hands guide offers clear photos and safety notes that I found reassuring when planning a group session.
For another simple classroom-friendly writeup focusing on borax crystal hearts for valentines, try the instructions at DIY Class Valentines: Borax Crystal Hearts – Simply Local Magazine for more ideas on scaling this project to share with others.
Take your time, and allow the making to be as soft as the finished sparkle.
PrintCrystal Hearts

Create beautiful Crystal Hearts using simple materials like borax, wire, and water. This calming craft invites patience and creativity.
- Prep Time: 15 minutes
- Cook Time: 0 minutes
- Total Time: 24 hours
- Yield: 1-3 Crystal Hearts
- Category: Craft
- Method: Crafting
- Cuisine: N/A
- Diet: N/A
Ingredients
- Clear glass jars or heatproof containers
- Borax powder or baking soda
- Clean water, warmed
- Wire, pipe cleaners, or cookie cutter shapes
- String or thread
- A small spoon for stirring
- A tray or towel (optional)
- A thermometer (optional)
- Food coloring (optional)
- Tweezers or chopstick
Instructions
- Make your heart frame with the wire or pipe cleaners, leaving a small loop at the top for the string.
- Warm your water until it is comfortably hot, but not boiling.
- Stir in the borax or baking soda until dissolved.
- Attach the string to the heart frame and ensure it hangs freely.
- Carefully place the heart frame in the jar, making sure it doesn’t touch the bottom.
- Cover the jar and place it in a safe spot to allow crystals to form.
- Check gently after a few hours and remove when a good layer has formed.
- Rinse the heart and allow it to dry on a clean towel.
- Display your finished Crystal Hearts or repeat the process.
Notes
Store your Crystal Hearts carefully to avoid chipping. Use food coloring for a faint tint, and experiment with different wire shapes for varied textures.